About Aurora OIDC/OAuth2.0 SSO
OpenID Connect (OIDC) is an SSO implementation based on OAuth2. Refer to the official OpenID Connect specs for more information. OIDC Quick Start Common OpenID Connect terms: OP = OpenID Provider, also known as the Identity Provider (IDP) RP = Relying Party, also known as the Service Provider (SP) OpenID Connect typically follows this workflow: User requests to sign in. User is redirected to OP’s sign-in URL, and OP redirects the user to the RP with an authorization code sent as a query parameter value. RP sends a back-channel request to the OP’s token API with the OP-provided authorization code to retrieve the ID and Access Tokens. The ID Token is retrieved from the token response and is parsed as a JSON Web Token (JWT). The JWT is validated and decoded. (JWT validation should follow the signature specified in the OpenID Connect specifications.) The JSON payload is retrieved from the JWT and is parsed for claims to be set to the user’s community profile. If a user profile endpoint is configured, an additional call is made to the endpoint passing the access token using Bearer Authorization. (OIDC feature supports both GET and POST requests to the user profile endpoint. This is configured within the Provider settings.) Claims returned from the user profile endpoint are parsed and set to the user’s community profile based on configured Claim Mappings. Community checks to see if the user already exists with the specified SSO ID; if so, the user signs in to an existing account; if not, a new account must be created. User resumes browsing Khoros Community in signed-in state. OAuth 2.0 typically follows this flow: User clicks the sign-in/registration link or takes an action that requires sign-in. User is redirected to a Khoros endpoint that builds the IDP/OP's sign-in URL based on configured attributes and the user state (that is, the page they were on when they initiated sign-in), and then redirects the user to the built sign-in URL. User signs in or registers. If the app is not on the allow list, the user will be prompted to give access to the Aurora Community app. The user is redirected to a callback URL on Community and an authorization code is included in the request as a query parameter. Community reads the authorization code. Community makes a back-channel API call to the OAuth provider to exchange the authorization code for ID and access tokens. The ID Token is retrieved from the token response and is parsed as a JSON Web Token (JWT). Optionally, the access token is then passed using Bearer Authorization in a subsequent API call to obtain additional user attributes such as SSO ID, e-mail address, display name, etc. Community checks to see if the user already exists with the specified SSO ID; if so, the user signs in to an existing account; if not, a new account must be created. User resumes browsing Khoros Community in signed-in state. Enable OIDC/OAuth 2.0 SSO for the … 855ViewsSign in to react to this post
 0Comments
Aurora: Configure SSO settings for the community
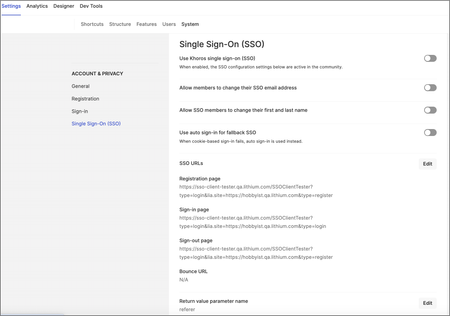
Before you can use SSO with your community, you need to configure settings and enable the option. Note: As soon as you turn on the Use Khoros single sign-on (SSO) option, all the settings in the Single Sign-On area become active in the community. To configure SSO settings and enable SSO: Go to System > Account & Privacy. Scroll down to the Single Sign-On (SSO) section. Manage the following options: Allow member to change their SSO email address: Enable members using SSO to change the email associated with their account. This should be enabled only if the email address is collected on the Community SSO Registration screen. Allow member to change their first name and last name: Enable SSO users to update their first and last names under My Preferences > Personal. Use auto sign-in for fallback SSO: When Khoros SSO token-based sign-in fails, auto sign-in is used instead. Enter the following SSO URLs: Registration page: Direct users to this URL when they register. Sign-in page: Direct members to this URL when they sign in. Sign-out page: Direct members to this URL when they sign out. Bounce URL: (Optional) URL where the first request of a session is redirected. Can help to enable seamless Community authentication or "Bounce SSO". Leave blank to disable. Enter the Return value parameter name. By default, the Aurora Community application appends a query string parameter named referer (spelled as shown) and a value corresponding to the URL of the page the member was browsing prior to being redirected to the login or registration page. If your authentication system is already configured to use a parameter like “referer,” you can change “referer” to the name of that parameter. Otherwise, leave the parameter name as “referer.” Turn on Use Khoros single sign-on (SSO) to make these settings active in the community. Note: This must be enabled in order for any configured SSO mechanisms to be fully functional, including when using the multi-auth Sign-in Display feature detailed in Multi-Auth SSO. URL formats SAML (REDIRECT BINDING) Sign-in URL: <Aurora url>/t5/s/<communityID>/auth/saml/doauth/redirect Sign-out URL: <Aurora url>/t5/s/<communityID>/auth/saml/dologout/redirect SAML (POST BINDING) Sign-in URL: <Aurora url>/t5/s/<communityID>/auth/saml/doauth/post Sign-out URL: <Aurora url>/t5/s/<communityID>/auth/saml/dologout/post OIDC SSO Sign-in URL: <Aurora url>/t5/s/<communityID>/v1/auth/oidcss/sso_login_redirect/provider/<providerID> Sign-out URL: <Aurora url>/t5/s/<communityID>/v1/auth/oidcss/sso_logout_redirect/provider/<providerID> Related topics: About Khoros Aurora Single Sign-On (SSO) Khoros Aurora SSO auto-sign in MultiAuth SSO881ViewsSign in to react to this post0CommentsAurora: Multi-Auth SSO
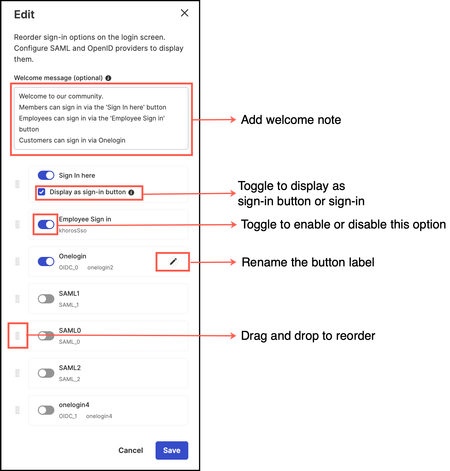
Communities require diverse authentication methods to accommodate varying member segments like employees, customers, etc. Admins can offer multiple sign-in options simultaneously, providing enhanced flexibility. These options include: Khoros SSO Up to three IDPs for SAML More than three IDPs for OIDC/OAuth2 (OIDC can be configured via admin only) To edit these settings, go to Settings > Systems > ACCOUNT > Sign-in. If Sign-In Display is not displayed, contact Khoros Support and request that the Multi-Auth feature be enabled. Edit the Sign-In Display option to configure the sign-in options you want to provide your members and how you want to display the sign-in options. Below is an example on the list of sign-in options you can configure. From here, you can: View all available sign-in options for your community. Add a welcome note that is displayed to users on the sign-in page. Turn on or off the sign-in options you prefer. Edit the labels of the sign-in buttons. Rearrange the order in which the sign-in options appear on sign-in pages. Choose to display the sign-in options as buttons for member sign-in. If you select the Display as sign-in button option, members see a sign-in button. If you de-select this option, members see a sign-in form instead. Enable SSO When you have finished your OAuth or OIDC configuration and you are ready to test, in the Single Sign On (SSO) section, turn on Use Khoros single sign-on (SSO). For more information, refer to Configure SSO settings for the community. Related topics: About Khoros Aurora Single Sign-On (SSO) Khoros Aurora SSO auto-sign in Configure SSO settings for the community789ViewsSign in to react to this post0CommentsAurora OpenID Connect/OAuth 2.0 setting descriptions
This article describes all the OIDC- and OAuth2.0-related settings within Settings > System > Account > OIDC/OAuth Providers. If OIDC/OAuth Providers and its subsections are not displayed in the panel on the left, contact Khoros Support and request that the OIDC/OAuth feature be enabled. Learn more about the OIDC/OAuth 2.0 feature. Provider Information Name: Desired name to label this provider within the settings. ID: Desired ID to give to this provider. This ID is used within the Sign-in URL and Registration URL that are defined in Settings > System > Account > Single Sign-On (SSO). Client ID: The Client Identifier used to validate against the authorization server. Client Secret: The Client Secret used to validate against the authorization server. Authorization URL: The authorization endpoint which will return either the authorization code (Authorization code flow) or the ID token (implicit flow). Response type: Community only supports the Authorization Code flow; code is the default value for Authorization code flow. Scope: Defines what access privileges are being requested. To use OpenID Connect requests, openid value must be used. If supported, other scope values may be profile, email address, address, and/or phone. The scope defined here will determine which Claims are returned from either the ID Token or User Info endpoint. Multiple values input here must be separated by a comma. Add Static Parameters: Add any additional parameters that should be sent with the authorization URL during sign-in by clicking Add Parameter. You must enter the Key and Value. This can be used for passing optional parameters such as max_age, claims, etc. Persist parameters: When enabled, any query string parameters passed to the Khoros OIDC sign-in endpoint will be passed through to the Authorization URL upon sign-in. Parameters to be persisted can be added to the Registration page and Sign-in page URLs defined in general SSO settings for the community. Enable PKCE: Turn on this option to enable Proof Key Code Exchange for the authorization code flow. The OpenID Provider must also be configured to support this flow. Token URL: The token endpoint which will return the ID token. Client auth method: Authentication method to the token endpoint. Only two methods are supported, with the option to disable only if PKCE is being used. client_secret_base: Uses HTTP basic authentication. client_secret_post: Includes the client credentials in the request body. none: For security purposes, this should be chosen only if PKCE is used. Static Parameter (optional): Any static parameters that are used to request a token can be defined here. Header parameters (optional) Claim mapping (ssoid required): Any Claims returned from the token endpoint can be mapped here to an Aurora community profile attribute. JWT Options Note: The following options apply only to OIDC setups. Audience Override:…702ViewsSign in to react to this post0CommentsAurora: Configure SAML for the community
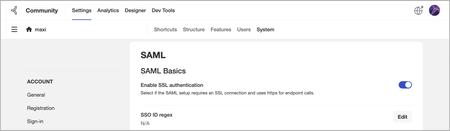
As an Aurora community admin, you can configure authentication for your community and integrate with your SAML IdP. To configure your SAML settings, go to Admin > Settings > System > Account. If SAML and its subsections are not displayed in the panel on the left, contact Khoros Support and request that the SAML feature be enabled. Learn more about Khoros SAML here. For more details regarding individual SAML settings, see About SAML settings. Set up basic SAML Configure your identity provider. Retrieve Community Service Provider Metadata XML: /t5/s/<communityID>/auth/saml/metadata Update the external Identity Provider configuration using values provided by Community SP metadata XML. Go to Admin > Settings > System > Account. Scroll down to the SAML section, and below SAML Basics, ensure that Enable SSL Authentication is turned on if the SAML setup requires Secure-Sockets Layer (SSL) connection. In the IdP Metadata section, in the Metadata XML area, click Edit to paste your IdP metadata XML, provided by your IdP. In the Assertion to Profile Mapping section, enter the name of the attribute corresponding to the field you want to map from your SAML assertion (see Assertion to profile mapping in About SAML settings). A SAML assertion is the XML document that contains the user authorization details and is case sensitive. The identity provider sends this XML to the service provider. With the exception of the SSOID value, user settings can be gathered either directly from assertion attributes from your identity provider or else can be captured on the SSO User Registration form. Note: Adjustments to the SSO registration form currently require manual configuration by Khoros. When you have finished your SAML configuration and are ready to test, in the Single Sign On (SSO) section, turn on Use Khoros single sign-on (SSO). Set up SP-initiated SAML To set up SP-initiated SAML flow, you must also set up the basic SAML flow. Note: The Registration page, Sign-in page, and Sign-out page URLs (in the Single Sign On (SSO) section) must be preceded by your community ID. Contact Khoros Support and request the Community ID. Go to Admin > Settings > System > Account. In the Single Sign On (SSO) section, below SSO URLs, click Edit. In the Registration page field, enter the URL of the default page to which you want to redirect the users when they click the registration link to register to the community. If you use the (default) SAML POST binding for AuthN requests, then enter /t5/s/<communityID>/auth/saml/doauth/post If you use the SAML REDIRECT binding for AuthN requests, then enter /t5/s//<communityID>/auth/saml/doauth/redirect In the Sign-in page field, enter the URL of the default page to which you want to redirect members when they sign in to the community. If you use the (default) SAML POST binding for AuthN request…651ViewsSign in to react to this post0CommentsAbout Khoros Aurora Single Sign-On (SSO)
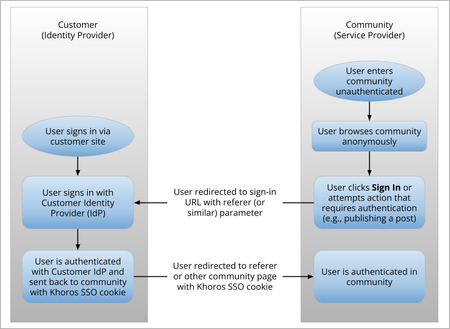
Khoros Single Sign-on (SSO) enables you to integrate your sign-in and registration system with your Khoros community member system. To create a seamless sign-in experience for community members, the Khoros SSO solution enables your user system to: Create a new member account in your community Sign in a member to the Khoros system Change a member's personal profile parameters in the Khoros system by assigning a role Change a member's permission levels in the Khoros system Members sign in as usual through your main site. After they sign in, they are forwarded to the Khoros site and are automatically signed in or registered in the Khoros system. To integrate with Khoros SSO, the client system must: Be able to create Khoros SSO tokens from its user system Have the Khoros SSO libraries installed Have a client-specific C encryption key installed SSO workflow diagrams Khoros supports cookie-based and parameter-based workflows. Cookie-based Khoros SSO Parameter-based Khoros SSO SSO Sign-Out Flow The flowchart below shows where members are directed upon sign-out. Khoros (Lithium) SSO libraries Khoros issues the Khoros SSO libraries (Java, .NET, or PHP) and a unique encryption key for each deployment. Information for all three versions is provided in the attached SSO Guide. Additionally, you can refer to the attached flowchart for a diagram that explains how SSO works with the Khoros Platform. Note: When using the .NET library, you must have the .NET Framework, not just .NET Core available for all requests to operate properly. Related topics: Khoros Aurora auto-sign in Configure SSO settings for the community1.5KViewsSign in to react to this post2CommentsKhoros Aurora SSO auto-sign in
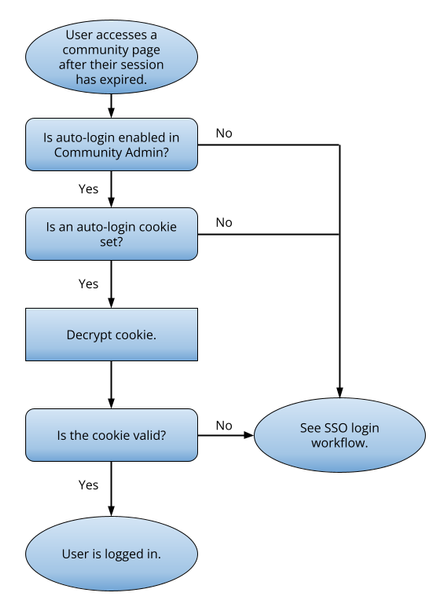
The Khoros Single Sign-On feature enables any client user system to integrate its sign-in and registration system with Khoros Community. This solution creates a seamless sign-in experience for community members. Members sign in as usual through the main client site. After signing in, they are forwarded to the community site and are automatically signed in or registered on the Khoros system. While auto-login works for local authentication as well as any supported SSO mechanism, the steps describe the process for the Khoros SSO sign-in flow: Member signs in to your system If the member is already in the system, go to step 2. If the member is new, require them to register and create an account through the normal method for your system. It is recommended that you capture a uniqueID and email address. Pass the following parameters to LithiumSSOClient class to generate the SSO token: uniqueID parameter login (display name) parameter email parameter The token (cookie) is generated and the member is authenticated in the community. When the member comes to the community, Khoros verifies the token (to make sure it was generated by your system) and lets the member in. Note: Auto sign-in works only if the user has accepted to set cookies. Notes: If your system does not capture both an ID and an email, the uniqueID can be the same as the email address as long as all users are guaranteed to have a unique email address. If using an email address for uniqueID, pass the email address twice for both uniqueID and email parameters. If your system is not currently capturing a display name or profile name for the community user, Khoros can configure your community to direct members to a profile setup page where the member will create a username (display name). However, you still need to pass any character (for example, a single space) in the login parameter. Khoros will then ignore this value since the member will be asked to choose a login. Ask your Customer Success Manager to set this up for you. Some communities choose to implement “bounce” SSO as well, where Khoros configures a “bounce URL” to redirect a browser to the first time it comes to a Khoros site. That URL is hosted by the customer and is used to check if a member is logged in and to redirect back to Khoros with an SSO cookie (or SSO token in a query parameter). This adds a seamless login experience for cases where a member is already logged in to a customer site and goes straight to the community. Use the flowchart below to discover what happens when you have auto sign-in enabled in your community. This flowchart begins with a member accessing a community page after their session has expired. The chart ends with the member being logged in or directing you to the SSO flowchart named SSO_login.pdf, which you can find linked at the bottom of the About Khoros Aurora Single Sign On (SSO) article on Atlas. Related …453ViewsSign in to react to this post0CommentsAbout Aurora SAML settings
As an Aurora community admin, you can configure authentication for your community and integrate with your SAML IdP. To follow step-by-step instructions, see Configure SAML for the Aurora community. The following article describes each SAML setting. Basic SAML settings Setting Description Enable SSL authentication Turn on this option if the SAML setup requires an SSL connection and uses https for endpoint calls. SSO ID regex Click Edit to enter a regular expression to extract the SSO as a substring of an attribute. By default, the entire attribute value is used as the SSO ID. If nothing is specified, the entire value is used and no additional logic is applied. IdP settings Your identity provider must provide you the IdP metadata XML. This should contain the IdP certificate, the entity ID, the sign-in bindings as well as sign-out binding if used. To configure more than one identity provider, contact Khoros Support. Assertion to profile mapping Assertion mapping Description SSO ID Enter the SAML Response assertion attribute name that should be mapped to the Community user SSO ID. For example, if the attribute name for the SSO ID is NameID, enter NameID in this field. This mapping is required. Community login Enter the attribute name for the user’s display name in the community. This mapping is required unless the value is gathered on the Aurora Community user registration page. Email address Enter the attribute name for the user’s email address. This mapping is required unless the value is gathered on the Community user registration page. First name Enter the attribute name for the user’s first name. Last name Enter the attribute name for the user’s surname. Location Enter the attribute name for the user's location. This maps to the location setting that you specify in the community member’s profile page. Time zone Enter the attribute name for the user's time zone. This maps to the time zone setting that you specify in the community member’s profile. Language Enter the attribute name for the user's language. This maps to the language setting that you specify in the community member’s profile. Roles to add attribute Enter the attribute name holding a comma-separated list of existing community Role names (any roles that do not exist in the community are ignored). Role names are case sensitive. The user is added to the matched roles. Roles to remove attribute Enter the attribute name holding a comma-separated list of existing community role names. Role names are case sensitive. The user is removed from the matched roles. Any roles that do not exist in the community are ignored. Dynamic assertion mapping Enter any custom Aurora community user settings that…674ViewsSign in to react to this post0CommentsAbout Aurora Security Assertion Markup Language (SAML) Single Sign-On (SSO)
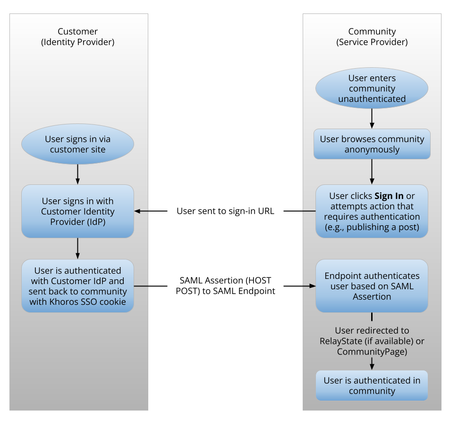
Single-Sign On (SSO) eliminates the need for users to provide their login credentials each time they sign in to different applications and services. With SSO, users can sign in once, and those same credentials can be reused to sign in to other applications or services. SAML enables Single-Sign On. Learn more about Khoros Single Sign-On. SAML SSO Supported SAML 2.0 profiles Supported flows Existing customers who want to upgrade to Aurora and port their existing SAML configuration may want to contact their Customer Success Manager or Account Executive. This process can be involved, and a Professional Services (PS) engagement can ensure a successful reconfiguration and help address any existing customizations such as user authentication workflows, custom user profile fields, and other customizations or integrations relying on user data. About Khoros SAML SSO Let’s begin by defining some terms in the context of the Khoros Aurora platform: IdP (Identity Provider): This is your SSO server. IdP is a server or service that provides the end-user identity authentication and SAML assertion. The IdP is owned and managed by you (the customer). SP (Service Provider): This is your Khoros community. SP is a software/service platform that consumes/processes the assertions SAML provides. Security Assertion Markup Language (SAML) is an OASIS standard for passing single sign-on (SSO) authentication data from an identity provider to a service provider. This XML-based protocol uses security tokens containing assertions to pass information about an end user between the SAML Identity Provider (IdP) and SAML Service Provider (SP). Here's an overview of the SAML SSO workflow: SAML implements a secure method of passing user authentications and authorizations between the identity provider and service providers—in our case, your community. When a user signs in to a SAML-enabled community, the community (the SP) requests authorization from the appropriate identity provider. The identity provider authenticates the community member’s credentials, then returns the authorization for the member to the community, and the member is signed in to the community. Supported SAML 2.0 profiles We support the following SSO profiles used to define the assertions, protocols, and bindings that support your integration: Web Browser SSO Profile, involving an identity provider (IdP), a service provider (SP), and a user employing an HTTP user agent (usually a web browser). Single Logout Profile in conjunction with the HTTP Redirect binding (no backchannel communication) Khoros supports HTTP POST and HTTP Redirect SAML 2.0 bindings, which map SAML protocols to other messaging and communication protocols. Supported flows Khoros supports the following two flows for SAML: SP-initiated SAML IdP-initiated SAML Read on to learn how community admins can configure SAML SSO for their community by themselves. Relat…521ViewsSign in to react to this post0Comments


You’ve seen all recent content