Aurora: Start a discussion
From a Forum, members with appropriate permissions can start a discussion. Anonymous users can neither start a discussion nor comment on existing discussions. Note: Members must have Start discussions and new content permission to start a new discussion. Learn more about forum-specific permissions. To start a new discussion, view the below walkthrough: 1. On your Forum board, click Start a Discussion. 2. Enter a Title. 3. Enter the content for your discussion. 4. Use the editor tools to modify the look and feel of your content. 5. Let's take an example of adding an image. To add an image, you can either drag and drop the image directly to the editor window or click Insert Media drop-down. 6. Click From Computer to select an image from your computer. You can also upload image From Image URL. 7. You can also copy-paste the image. Use the re-size options to resize the image. 8. Add a Caption, if required. 9. Scroll down and click Attachments to attach a file to the discussion. Click the information icon to know more about the supported formats, maximum file size, and maximum number of attachments. 10. Add tags to categorise your content and make it more findable. 11. You can select from the available preset tags. The preset tags are configured in Community Settings for tags. 12. To add new tag, Click + Tag. 13. Enter the tag name. You can either add a new tag or select the existing tags based on your search text. 14. Click New tag "season" to add the tag. 15. Here, you can view the newly added tag. 16. Under SEO Content section, you can define search engine properties to attract more readers. 17. Here, you can view the last autosaved date and time of your content. Your content gets autosaved while creating the discussion. 18. Click Publish. 19. Now, you have successfully published your discussion to the respective forum. Here's an interactive tutorial https://www.iorad.com/player/1979272/Start-a-Discussion After you publish the discussion, other members can view and read the discussion in the respective forum. They can also like or reply to the discussion. In discussions, Moderators or members who post the first message in a discussion can mark one of the replies as an accepted solution. After a solution is accepted, the original message is marked as solved, and the reply is marked as a solution. Learn more about Accepted Solutions. Note: You can use markdown syntaxes while writing the content instead of formatting the text using toolbar options. Also, you can use other keyboard shortcuts to work quickly and efficiently. Learn more about keyboard shortcuts. While creating a discussion, the content added gets auto-saved in edit mode. Upon reloading the page, the content is auto-recovered and you can continue editing the discussion.… 1.4KViewsSign in to react to this post
 6Comments
Aurora Upgrade Playbook
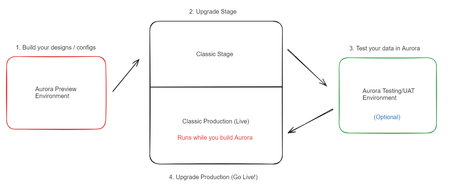
Getting Started What is Aurora? "Aurora is a game-changing update to the industry-leading Khoros Communities solution, with a set of transformative capabilities that make it easier to deliver an exceptional member experience." Aurora is the major upgrade for Khoros Communities (Classic). First released officially on July 31st, 2023, Aurora is a total transformation of our top-notch community platform. We've completely revamped it, utilizing cutting-edge technologies and adopting a modern headless architecture. We have intentionally bolstered Aurora with powerful APIs that provide flexibility and robustness. From the very beginning, we've focused on creating an exceptional user experience, designing it with mobile-friendliness, performance, SEO, and accessibility in mind. It's a fresh start with a foundation built for the future of online communities. Jump to Features. Discovery: Am I ready for Aurora? The first step is to determine your readiness for upgrading to Aurora. There is no rush to move from Classic as of 2024, so it is essential to review where you stand and what you need in order to upgrade successfully. Secondly, it's good to remember that any change to your community presents an opportunity to revisit what success means and how your community experience supports success today and in the future. With this in mind, we encourage you to challenge yourself at each step of planning and ask, "How does this align to and support our business goals?" Getting started Understand Your Goals: While Aurora improves drastically upon the day-to-day community design, admin configuration, moderation, and end-user experience, in evaluating your readiness to upgrade to Aurora, ask yourself: What are your plans for the community in the coming year? How do they align with your business goals & strategy? Do you require certain features or integrations to support your community strategy and day-to-day management? How do you use them? Do you use SSO authentication? How does the authentication process work? (You may need to gather this information from the team that manages SSO at your organization.) How long will it take to gather resources to help you in the upgrade to Aurora? Evaluate Customizations: As a best practice, customizations should be limited to those where there is a clear business value and no alternative feature. With this in mind, we recommend you evaluate existing customizations in line with your community goals, and as part of your upgrade plan, consider your path to sunset any customizations you use today that do not provide measurable value to the community experience and its success. You may have custom features today (like widgets, special pages, etc.)—many of these can now be replaced with Aurora's built-in features. Where you can, we recommend switching to Aurora's features. It will not only save you the cost and effort to rewrite those components …4.1KViewsSign in to react to this post10CommentsAbout Content permissions
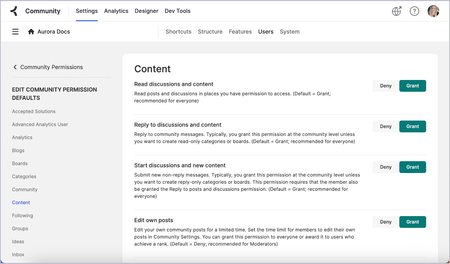
You can adjust permissions related to content at the community, container (category & group), and board level. Some permissions are set to Deny by default while others are set to Grant by default. At the container level and the board level, permission defaults and role permissions are inherited from the parent level. In those cases, the Inherit button is displayed in green to indicate that the permission was set to Grant at the parent level or red to indicate that the permission was set to Deny at the parent level. As an admin, you can manage these permissions. To manage content-related permission defaults at the community level: Note: To manage this permission at a lower level, go to the [Place] Permissions page and edit the permission defaults for that level. To manage this permission for a particular role, go to the [Place] Permissions page at the desired level of the community and edit the permissions of the individual roles. Go to the Roles and Permissions page for the community. Beside Community Permissions Defaults, select Edit. Review permissions in the following areas: Blogs Content Events Ideas Knowledge Bases Select Deny or Grant as required. Unless you have specified different permissions for certain roles or levels below the community level (a category, group, or board), these selections affect all members of the community. Content permissions While Forum permissions are granted by the Content permissions, Blogs, Event Boards, Ideas boards, and Knowledge Bases have distinct permission sections for content type-specific tasks. The Content permissions are provided for general content access and tasks and relate to all content types. Follow the links in the table below to learn more about the tasks granted by these permissions. Permission Default Related permissions in content type sections Read discussions and content Grant Blogs: Read posts and Read comments Ideas: Read ideas and comments Reply to discussions and content Grant Blogs: Comment on posts Events: Comment on events Ideas: Comment on ideas Knowledge Bases: Comment on articles Start discussions and new content Grant Blogs: Start new posts Events: Post new events Ideas: Post new ideas Knowledge Bases: Create, edit, publish, and manage articles Edit own posts Deny Blogs: Edit own published posts Events: Edit own events Ideas: Manage ideas and comments Knowledge Bases: Edit own published articles Edit any post Deny Blogs: Edit any published post Events: Edit all events Ideas: Manage ideas and comments Knowledge Bases: Edit any published article Move content Deny Blogs: Manage any posts and Manage own posts Delete own post Deny Blogs: Manage own posts Events: Delete own events Knowledge Bases: De…850ViewsSign in to react to this post0CommentsAurora: Set forum permissions
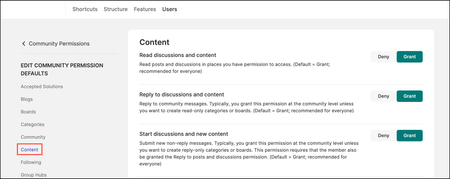
In the community, you can set forum-specific permissions to control who can read, start, reply to, and manage discussions. At the community, category, group, and board levels, Aurora includes these forum-specific permissions: Read discussions and content: Members can read forum discussions. By default, this permission is granted to all community members. Start discussions and new content: Members can start a new discussion in a forum. By default, this permission is granted to all community members. Reply to discussions and content: Members can add replies to discussions. Also, members must have Edit own posts and Edit any posts permissions (common permissions for all the content types) to edit their own and other posts. This permission is recommended for Admins or Moderators and denied by default. Learn more about managing community permission defaults. You can modify these permissions at various levels or assign permissions based on role. We recommend not altering these permissions unless you have a particular scenario where you want to modify the default permissions for specific members. Let’s take an example in which you want to deny Start discussions and new content permission at the category level. This is granted by default at other community levels. In this scenario, the permission you set at category level overrides the default community permission. To modify permissions at a category-specific level: Note: To manage this permission at a lower level, go to the [Place] Permissions page for that forum and edit the permission defaults. Sign in to the community as an Admin. Open the Account menu and select Settings. Go to the Community Structure and select the category whose permissions you want to modify. Go to Category Permissions, and then select Edit next to the Category Permission Defaults. Scroll down to the Content section and set the permissions. Grant forum-specific permissions to a role Sign in to the community as an Admin. Open the Account menu and select Settings. Go to Users > Roles and Permissions. Use the place picker at the top left to select the desired place and level of the community (such as a specific forum) where you want to edit a role's permissions. Select Edit next to the role you want to assign a forum-specific permission. Scroll down to the Board (board level) and/or Content sections and set the permissions.1.1KViewsSign in to react to this post7CommentsAbout Aurora Forums
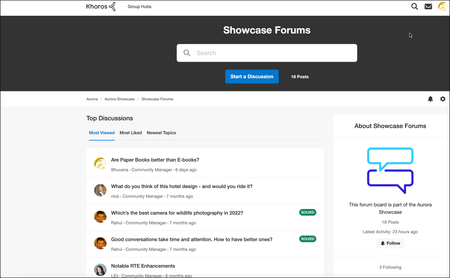
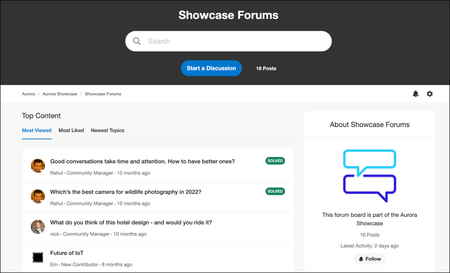
Forums tap into the most basic level of human interaction: conversations or discussions. Khoros forums generate activity to keep people coming back and generate traffic in the community. This traffic creates a large base of content. Khoros offers features such as accepted solutions, likes, and Top Content widgets to surface the best content in a community. Using these features, you can identify the jewels of your customer network: your superusers. Generally, superusers are 1% of the community population who make communities work. They are your deepest advocates, product experts, and often your support problem solvers. Typically, superusers spend hours per day on a community. In fact, we’ve seen superusers who spend 40-50 hours a week in the community, primarily in the forums. Helping others, a natural passion for the community topics, and being part of the community are all important to superusers, but they also like recognition and rewards for their efforts with special ranks and privileges. The forum is the heart of your community and an essential place to start identifying superusers who play a key role in building your customer network. With forums, you are creating a social fabric. As part of your pre-launch process, you must discuss your forum strategy with your Community launch team. Generally, you can start out with a small number of forums in the community. You want forum traffic to be active and lively, and creating too many forums to start can dilute the activity and leave some of your forums looking abandoned. Most of your forums will be public, but you will most likely have some private boards as well. This can be useful for internal communication among employees, and also to allow select community members to communicate access to special areas. Here’s how a forum looks: From a forum, you can: Start a new discussion Search for a discussion Follow/unfollow the board Those with admin permissions have additional tasks they can perform related to the following: Forums Create a forum Delete a forum Set forum permissions Edit forum settings Discussions Delete a discussion Move a discussion Comments and Replies Comments and replies on posts About threaded replies and comments Block or allow comments and replies Move a comment or reply591ViewsSign in to react to this post0CommentsAurora: Edit forum settings
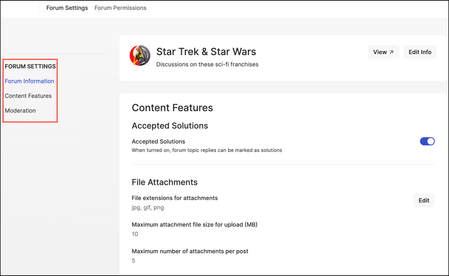
In the community, you can configure various options specific to forums. When you create a forum, the default options are set and you can modify the settings as required in Forum Settings. To configure forum settings: Sign in to the community as an Admin. Open the Account menu and click Settings. Go to the Community Structure and click the forum whose settings you want to configure. The Forum Settings page is displayed. To edit the forum's information, click Edit Info. In Content Features, you can edit the following options: Enable Accepted Solutions to have solutions in forum discussions. Learn more about Accepted Solutions. In the File Attachments section, click Edit to adjust the file attachment extensions you want to allow in the community, the maximum file size for each upload, and the maximum number of attachments per post. In the Forums section, enable SEO canonical URL overrides for discussions to override the SEO title, descriptions, and canonical URLs of the discussions. In the Media section, turn on or off the image uploads, video uploads, and embed external videos options. In the Tags section, you can enable community members to tag posts; choose whether to allow Preset tags, Freeform tags, or both; and enable the requirement that an author use at least one tag to publish content. Learn more about tag options. In Moderation, enable Spam management and set Content moderation defaults for the board.462ViewsSign in to react to this post0CommentsAurora: Create a forum
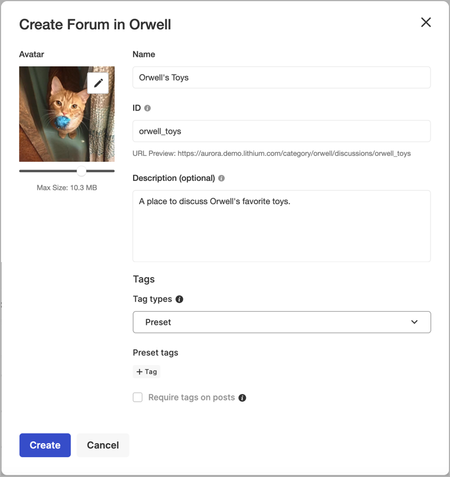
Forums are essentially conversations or discussions. To create a forum: Click the add icon at the community level where you want to add a forum. On the window, enter a Name and ID. The ID displays in the URL for the forum. Note: The ID must be a single word made of only letters, numbers, dashes, and underscores with no spaces. It cannot be changed later. Optionally, enter a Description and add an Avatar for the forum. In the Tags area, in the Tag types drop-down menu, select Preset and Freeform, Preset, or Freeform. Learn more about Tags here. (Optional) If you selected Preset and Freeform or Preset, in the Preset tags area, click + Tag to add the tags members can choose from. (Optional) Select the Require tags on posts checkbox if you want members to always add tags to content. Click Create. For more information, see About Forums.349ViewsSign in to react to this post0Comments


You’ve seen all recent content