Aurora: Managing group members
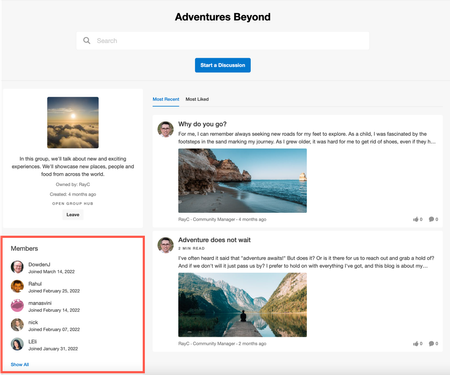
Community Administrators and Group Owners can manage memberships from a group’s Manage Members page. From this page, you can: View group members Assign or edit group member's role Invite new members to the group Remove members from a group Manage pending invitations Manage requests to join Note: Group Inviters and Curators cannot access the Manage Members page. Inviters and Curators invite members using the Invite Members option in the Options menu. View group members Group members (who are not a group owner) can see a list of group members on the main Group page in the Members widget. To view group members in Manage Members page: Sign in to the community and go to a group. Open the Options menu and select Manage Members. The Manage Members page opens with the Members tab by default. Group members are listed along with their membership role and the date that they joined the group. You can sort this list by newest or oldest members or search for a specific member by typing a name in the filter. Change a group member's role Administrators and Owners can change a group member’s role. From the Manage Members page, click the Options icon > Edit Role next to their name in the list, select the role(s) to grant for the member, and click Apply. Invite a member to a group From the Manage Members page, members with the Send group invitations permission can invite other community members to join the group. To invite a community member to join a group: Go to the Manage Members page for a group. Click Send Invitation. Search for the member by entering their username in the To field. Select the Role to grant the person and enter a welcome note (optional). Click Send Invite. Remove a member from a group From the Manage Members page, Administrators and Owners can remove a member from a group. To remove a member in the Community UI: Go to the Manage Members page for a group. Click the Options icon > Remove next to the member you want to remove from the group. Click Remove to confirm. Manage pending invitations To manage pending invitations: Go to the Manage Members page for a group. Click the Pending Invites tab. For each member in the list, you can Resend or Cancel the invitation request. Manage requests to join For Closed groups, community members can request to join the group. You can manage these requests from the Manage Members page for the group. To manage invitation requests: Go to the Manage Members page for a group. Click the Requests tab. Accept or Deny each request in the list. 1.2KViewsSign in to react to this post
 2Comments
Aurora: Delete a group and sub-groups
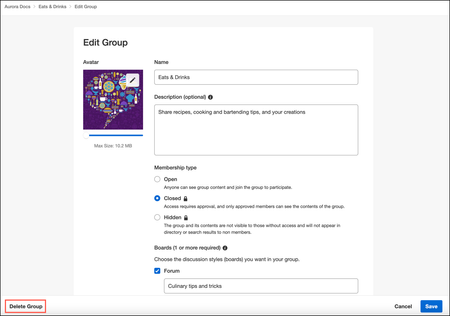
Group Owners and Community Administrators can delete groups. Warning: Deleting a group permanently deletes all of the content, membership, and settings associated with the group. The action cannot be undone. No notification is sent when a group is deleted. Delete a group in Community UI Delete a group in Community Admin Delete a group in Community UI Sign in to the community and navigate to the Group 9age for the group you want to delete. From the Options menu, click Edit Info. In the Edit Group page, go to the bottom left of the page and click Delete Group. Click Delete Group in the confirmation modal. The group is deleted and you are returned to the group parent page (the top-level Community page or the parent Category page). Delete a group in Community Admin Go to Community Admin > Community Structure. Navigate to the group you want to delete. Hover your cursor over the group and select Delete. Click Delete Place to confirm. The group is deleted. Note: You cannot delete the boards with in a sub-group.418ViewsSign in to react to this post0CommentsAbout Aurora Groups
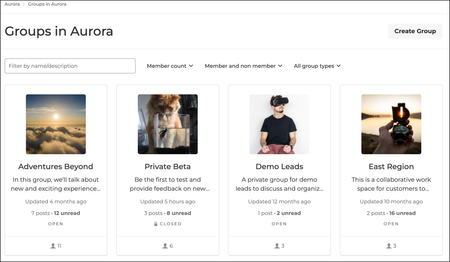
Groups deliver an enhanced experience for Community members to engage around a common theme or purpose. Each group has its own configurable set of content types (forum, blog, knowledge base, ideas, and events) to organize content and communication. This guide provides overview information about: Group membership types Search within groups Group management Group flood controls You can imagine groups for everything from special interests within the community to focus groups to product launches and more. Groups can be visible and open to anyone in the Community, closed (requiring a request to join), or hidden (invisible to the public and accessible by invitation only). Community Administrators can share group management with Community members by giving a member the Owner role, which enables the member to edit group details, manage membership requests and invitations, and assign and change group roles for members. Members can discover and browse groups on the Group landing page: The Group page provides quick access to the hub's info, contents, recent activity, and members. Administrators and group Owners can perform most group management tasks directly in the Community UI without needing access to Community Settings. On the Create Group page, here is a quick look at group configuration options. Note: The Boards section of the page appears to Community Administrators only. The ability to add group child places is dependent on the Add any community-supported boards permission, which is denied by default to the Owner, Curator, Inviter, and Member group roles. Member management is performed in the Manage Members page. An Owner or Administrator can see a list of current members, edit a member's role, remove members from the group, view pending invitations, and accept and deny requests to join. Other important group capabilities include fully-functional search and group subscriptions. Group membership types Every group has a membership type that controls access. A group can be: Open Closed Hidden Important: Membership type and access are managed through Community permissions. There are no other Community Settings to control access. For example, a hidden group is hidden because non-members of that group have the See groups permission set to Deny. Open groups All community members can browse and like all content, reply to posts, and comment on posts of the group. Group members can create new content and browse, reply, and comment on the post. The ability to see and join a group is governed by the access allowed to the container node. For example, an open group placed in a category with the See categories permission set to Deny cannot be joined by a member unless the member is assigned a role with See categories set to Grant. Ways to join: Join Group button on the Group page By invitation from a group Owner, Inviter, or an Administrator Closed g…944ViewsSign in to react to this post0CommentsAurora: Create a group
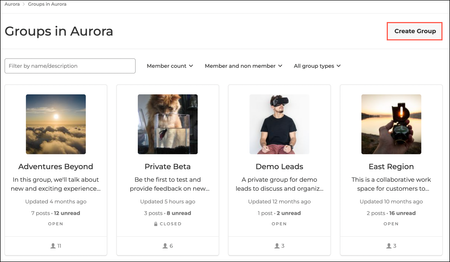
You must have the Create groups permission to create a group. This permission enables a member to create a group with a single Forum. To create a group with the remaining content types, members also need Add any community-supported boards permission. A group can contain one child node of each content type supported in the community. Create a group in the Community UI Create a group in Community Settings Only Community Administrators can create groups. An Administrator can create a group in Community Settings or in the Community UI. Group Owners can edit group settings after a group is created. See Edit group settings for instructions. When you create a group, you define the following: Group Name: A display title within the community for the group. Group ID: An identification string that will be used for the URL of the group, as well as other back-end functions. Description: Brief overview of the purpose of the group. Boards (Content Types): The content types to include in the group. There can be one instance of each content type in the group. Membership Type: The membership type controls access to the group. You can change the membership type of a group later if needed. Membership types are: Open: Non-members can browse all content and can also reply to existing content. Members can create new content as well as browse and reply to existing content. Closed: Non-members do not have any read or reply rights for closed groups. Members can create new content as well as browse and reply to existing content. Hidden: This type is invite-only and completely hidden within the community structure and cannot be searched. Accessing the URL if you are not a member (or invited) results in an error page. Avatar: Allows you to upload an avatar for the group. This will be used for out-of-the-box components to represent the group. We recommend square or circle-shaped images, at least 500 x 500px. Create a group in the Community UI To create a group in the Community UI, click the Create Group button to open the creation page. To create a group in the Community UI: Ensure that the Create Group Button has been added to a community page. Go to the respective page and click Create Group. Enter the Name of the group. (Optional) Enter a Description for the group. Under Avatar, click Add to browse and select an avatar for the group (or use the default group avatar). We recommend square or circle-shaped images having at least 500 x 500px size. Select the Membership type for the group: Open, Closed, or Hidden. Select at least one Board (content type) to include in the group. Note: The ability to define the required child nodes in a group is granted by the Create all supported boards permission. This permission is granted only to Community Administrators by default. Optionally, set a display name for each board. Otherwise, each child board in the group will…650ViewsSign in to react to this post0CommentsAurora: Edit Group settings
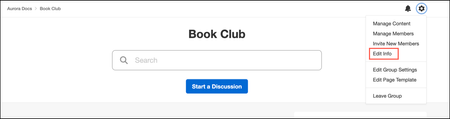
In the Community UI, group Owners and Community Administrators can edit group settings. Administrators can also edit a group in Community Admin. Edit a Group in the Community UI Edit a Group in Community Admin Edit a Group in the Community UI Sign in to Community and go to a Group page. From the Options menu, click Edit Info. The Edit Group page is displayed. From here, you can edit the Name, Description, Avatar, Membership Type, and the Names of the child boards in the group. Community Administrators can add or remove boards in the group. Note: By default, group Owners cannot edit child places in a group. To enable this ability, you can clone the Owner role and set the Add any community-supported boards permission to Grant. See Create a custom group role for instructions. Click Save. Edit a Group in Community Admin To edit a Group in Community Admin: From the Account menu, go to Settings > Community Structure. Find the group in the structure, open the Options menu, and click Edit. Click Edit Info. From here, you can change the Name, Description, Group Avatar, Group Type, and boards included in the group. Note: Board titles within groups must be added and edited in the Community UI. Click Save. Additionally, you can change the group’s content-related settings: Content workflow: Enable this option to use the content workflow features for blogs and knowledge bases. File attachments: Define the filename extensions, maximum file size, and maximum number of attachments per for file attachments. Media: Enable this option to allow members to add images to their content. Tags: Enable this option and set tag options to add tags to the content within the group. Learn more about configuring tag options. Invitations: Configure Send invitations via option that allows members to send group invitations either via community inbox (for members only) or email (for both members and non-members). Moderation: Configure moderation settings such as spam management and content moderation defaults at the group level.573ViewsSign in to react to this post0CommentsAurora Group roles and permissions
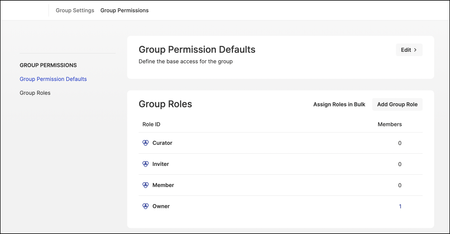
This article describes the roles and permissions used with Groups. Group roles Custom Group roles Mapping Group roles to content workflow capabilities Group permissions Add members to Group roles Permissions for Group role hierarchy Group roles Community includes out-of-the-box Group roles: Owner, Curator, Inviter, and Member. Community Administrators can create custom group roles at community, category, board, and group levels. You can add members to these Group roles only at the Group level. Note that you cannot add members to the Group roles at community or category level. A group can have multiple Owners. Only Community Administrators can assign the Owner role to group members. (Owners cannot assign the Owner role to other members.) Members with the Administrator role can perform all Owner actions. Owners and Administrators can assign group members the Curator and Inviter roles. This enables other group members the ability to create and manage place content and to invite other community members to the group. Having both a group Owner and one or more Curators helps distribute the task load for node content. An Owner can: Delete groups that they create Modify group settings Invite members Approve or deny requests to join Assign and change member roles Manage all content Perform all Member actions Manage featured content and places widgets on a page A Curator can: Manage all content Invite members Perform all Member actions Manage featured content and places widgets on a page Note: By default, the Edit items in list widgets permission is enabled for Group Owners and Curators to manage featured content and places widgets on any page. An Inviter can: Invite users Perform all Member actions A Member can: Create content Reply to content Edit their own content Delete their own content Tag content (if tagging content is permitted in the group's parent node) Mapping Group roles to content workflow capabilities You can map the Group roles to the capabilities in the KB and Blog content publishing workflow: Owner has all 3 capabilities: Authoring, editing, and publishing Curator has all 3 capabilities: Authoring, editing, and publishing Member has only authoring capabilities It is recommended to assign permissions to the roles instead of the users. Custom group roles Community Administrators can create custom group roles in Settings > Roles and Permissions at the community, category, board, and group node level. Group roles are created for a specific group; custom group roles are not shared across groups and custom group roles are not inherited from parent nodes. Learn more about Custom group roles. Group permissions Groups are backed by the standard Community permission system. Each membership type has default permissions that are applied when a group is created. Important! We strongly recommend against altering per…757ViewsSign in to react to this post1CommentAurora: Invite members to a group
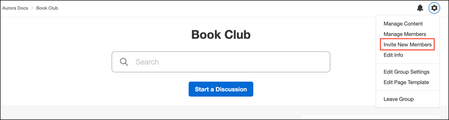
Group Owners and Community Administrators can start the invitation flow in the Manage Members page or from the Options menu of the Group page. Group Curators and Inviters can start the invitation flow from the Group page Options menu. Group users can send 50 invitations in an hour and up to 100 invitations in a day. Note that if you want to change these default configuration values, you must open a Support ticket. For the community members, you can send the invitation via private message by specifying their usernames. To invite external users, you can send the invitation via email by specifying their email addresses. From the group settings, you can configure the mode of group invitations. Note: The community member receiving the invitation and receiving the approval notification must have a verified email address. To send an invitation: Select Invite New Members from the Group page Options menu or click Send Invite in the Manage Members page. Groups Page Options menu Manage Members Page (Click Options menu > Manage Members in the Group page) Send Invitation dialog box opens. In Send Invitation dialog box, specify the following fields: To: Specify the recipient Username or email address. Role: Select the group role from the drop-down that you want to assign to the recipient. Message (optional): Enter the invitation message. This field is optional. Click Send Invite. Community members or external users receive a private message or email with the invitation and a link to join the group. When the external users click Accept the invitation link, they are redirected to the Registration page to register themselves to the community before joining the group. When the member clicks Accept the invitation link, they are redirected to the group page with a confirmation message that they are now a member of the group.563ViewsSign in to react to this post0CommentsAurora: Ways to join a group
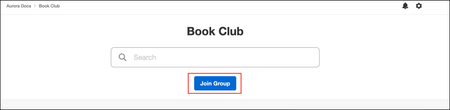
Community members can join a group in several ways: Join Group button Request to join a closed group Receive an invitation to join a group Using Join Group button Community members can join any open group from the Group page using the Join Group button. After someone joins a group, the group appears in the community’s Group page, where you can filter the Groups list to see which ones you’re a member of. You can also see the Groups you're a member of on your community profile page. Request to join a closed group Using the Join Group button, community members can request to join Closed groups from the Group page. After requesting access, a window opens indicating to the member that their request to join was sent and the system sends the group Owner an email with the request. In addition to email notification, group Owners see pending membership requests in the Requests tab of the Manage Members page. The group Owner has the option to Approve or Deny the request. When Owner approves the request, the new member receives a private message in the community that contains a link to the group. If the group Owner denies the request, the owner must confirm the decision. When the request denial is complete, the Owner sees this confirmation message: The member requesting to join receives a private message: Receive an invitation Members with the Owner, Inviter, or Administrator role can invite any community member or external users to any group (Open, Closed, or Hidden). Note that community members can access Hidden groups by invitation only. See Invite members to a group for more information.463ViewsSign in to react to this post0CommentsAurora: Leave a group
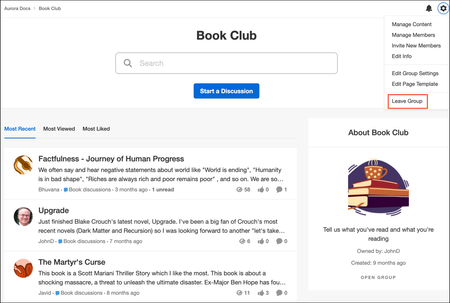
A group member can opt to leave a group at any time. To leave a group: Sign in to the community and go to the group you want to leave. In the group page, click Leave Group button. or Open the Options menu and click Leave Group. The member receives a confirmation once they have been removed from the group. Owners and Administrators do not receive a notification when a member leaves a group. Likewise, Administrators are not notified if the group Owner leaves the group.346ViewsSign in to react to this post0CommentsAurora Group roles hierarchy
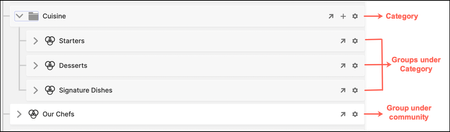
In Aurora, you can set the permissions for group roles at the community, category, or group level. By default, the out-of-the-box role permissions are set at the community level. These roles and the default permissions cascade down to the groups under them. To understand the hierarchy, let’s take an example of a community called “Aurora” with: a group called “Our Chefs” and a category called “Cuisine” with groups such as “Starters,” “Dessert,” and “Signature Dishes” Let’s look at how the permissions of Curator group role are available at various levels: Community level: At the community level (Aurora), the roles and permissions are set to the OOTB values as shown in the below screenshot. Note that you can add members to group roles only at the group level, not at the community level. Category level: At the Category level (Cuisine), the roles and permissions are set to the default values as shown in the below screenshot. Note that you cannot add users to the group roles at the Category level. Group level: At the Group level (Our Chefs), the roles and permissions are set to the default values as shown in the below screenshot. In this level, you can add users to the group roles using Add Members. You can change the permissions of any of these roles at the group level or category level. The permissions at the group level takes precedence over the roles defined at the category level, followed by the roles defined at the community level.444ViewsSign in to react to this post0Comments