Aurora: Invite people to join the community
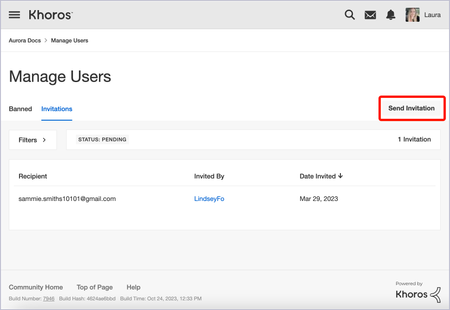
Whether your Aurora community is public or private, if you have the Manage roles and bans in admin and member profiles permission, you can invite people to join via email invitations. When they receive the email, they are prompted to register for the community. After they register, they can participate and perform actions based on their roles and permissions. To send a community invitation email: Open the Account menu and click Users. Click the Invitations tab. At the top right, click Send Invitation. In the Send Invitation window, in the Email addresses field, enter one or more email addresses of people you want to invite. Email addresses must be separated by a space or comma. (Optional) In the Role to assign these recipients when they register (optional) field, select one or more roles you want to assign to the people whose email addresses you entered. Note: You must have the Manage roles and bans in admin and member profiles permission to be able to assign roles in this field. Click Send. The people you invited receive emails telling them how to register for your community. (Optional) To search for a sent email invitation: Click Filters. For the Status, select Accepted or Pending. In the Email address contains field, enter part or all of the email address of the recipient of the sent invitation you’re looking for. View the related results where you can see the Recipient, who they were Invited By, and the Date Invited. 353ViewsSign in to react to this post
 0Comments
Aurora: Ban members from the community
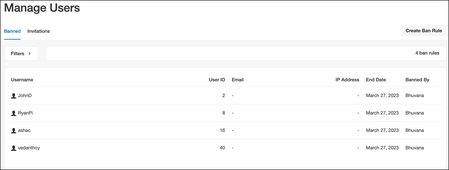
Each member plays a crucial role in the community's growth and is responsible to behave appropriately to create a positive space where other members feel welcome, safe, and engaged. But in some cases, members act maliciously, violate the community guidelines, or are abusive in nature. To avoid such malicious behaviors in the community, Moderators and members with appropriate permissions can ban these members and prevent them from accessing the community. Before banning a member, consider their member history, not just a single action or post. You can temporarily or permanently ban members based on the impact caused. You can ban members using their profile information (username, user ID, and email address) and IP addresses. Use IP address bans as a last resort. IP addresses tend to be dynamic and if a banned member restarts their router, they can get out of the ban and another member may receive the ban. In the community, you can ban members in several ways: Create ban rule from the Manage Users dashboard Ban members from the Content Management dashboard Ban members from the members’ profile page Ban members from the content page Create Ban rule from the Manage Users dashboard Using a ban rule, you can ban single or multiple members from the community. From the Manage Users dashboard, you can create and view the list of ban rules in the community as shown below: To create a ban rule: Sign in to the community as an Admin or Moderator. Open the Account menu and go to Manage > Users. The Banned tab on the Manage Users page is displayed. Click Create Ban Rule. Specify any of the following fields: Username: Enter a member’s username. The entry can include * and ? wildcard characters to ban all members whose usernames match all or part of the username. Example 1: If you enter the username as “Jess*,” any member whose username begins with “Jess” followed by any character will be banned. Example 2: If you enter the username as “Je?s,” the "? " replaces only the single character. The usernames like "Jess," "Jeos," and other matching usernames will be banned. User ID: Enter member’s unique User ID. Email Address: Enter member’s email address. The entry can include * and ? wildcard characters to ban members whose email addresses match all or part of the email address. Example 1: Entering “*@test.com” bans members whose email address begins with any character followed by test.com. Example 2: Entering “[email protected]” bans members with email addresses like “[email protected],” “[email protected],” and other matching email addresses. IP Address: Enter member’s IP address. Note that other members who use the same IP address will also be banned. Match any of the above criteria: Select this checkbox to ban a member who meets any of the criteria listed above. Otherwise, the ban is in effect only if all criteria are met. In the Ban Actions drop-down menu, select the ban Duration. The duration can be temporary or permanent as required. To set a custom duration, select Custom from the drop-down menu and set the duration. (Optional) In Ban Reasons, specify the following reasons for the ban: Internal reason for ban: Only Admins and Moderators can see this reason. They can see this reason when they edit the ban rule. Public reason for ban: Enter the reason that the banned member can see when they fail to sign in to the community. Click Ban. The impacted members are banned and signed out from the community. Ban members from the Content Management dashboard On the Content Management dashboard, you can ban members from the Spam, Abuse, and Moderation tabs using the Options menu > Ban Member. Note that you can only ban one member at a time from the Content Management dashboard. Let’s say you saw malicious content on the Abuse tab and you want to ban the member who created the content. To ban the member: Sign in to your community as an Admin or Moderator. Open the Account menu and go to Manage > Moderation. Go to the Moderation tab where you can view the list of content reported as abuse. To ban a member, open the Options menu and click Ban Member. The Ban Member window opens where the member details are auto-populated: Add information to the fields and click Ban. The Member is banned and signed out from the community. Similarly, you can ban members from the Spam and Moderation tabs. Ban members from the member profile page To ban a member from the member’s profile page: Sign in to the community as an Admin. Go to the member’s profile page by clicking the member account you want to ban on the community. Open the Options menu and click Ban Member. The Ban Member window opens where the member details are auto-populated. Specify the fields and click Ban. The Member is banned and signed out from the community. To modify ban, open the Options menu and click Edit Ban. Ban members from the content page From the content page (forum discussions, blog posts, ideas, and knowledge base articles), you can ban the member who created the content as well as members who posted replies/comments to the content. To ban an author, go to the respective post, open the Options menu, and click Ban member. To ban a member from comments or replies section, go to the comment or reply posted by the member, open the Options menu, and click Ban Member.1.3KViewsSign in to react to this post8CommentsAurora: Capture notes about specific members
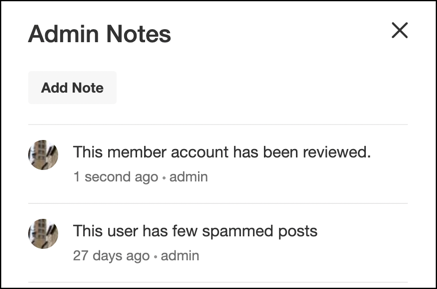
As your community grows, you may want to jot down notes about specific members in a central place for future reference. You can use the Admin Notes feature on the member Profile page to do this. You can use Admin Notes to capture a list of subjects that a member has expertise in, so you can leverage the member as an expert in specific threads. Or, you capture notes on any warnings issued to a member for inappropriate community behavior so moderators can review the member’s activity before taking additional action. Admins and moderators can view Admin Notes added by themselves and others on the member’s profile page: Note: Members who do not have a role with the Manage roles, bans, and abuse notifications in admin & member profiles permission cannot see these notes. Learn more about adding members to roles. To manage permissions, see Manage community permission defaults. To view or add Admin Notes about a member: Sign in to the community as an Admin. On the main page, click the Search icon to expand the search field. Search for the member and press Enter. Note: You do not need to enter the exact name of the member as the search page displays all the matching results based on the keyword. On the Search page, you can view the members who match the search keyword under People: Click the member's avatar to view their profile page. The member’s profile page is displayed. To view Admin Notes, open the Options menu and click Admin Notes. In the Admin Notes section, you can view the notes added by other admins: To add a new note, click Add Note and enter your notes in the window. Click Add.356ViewsSign in to react to this post3Comments


You’ve seen all recent content