Aurora: Searching in the community
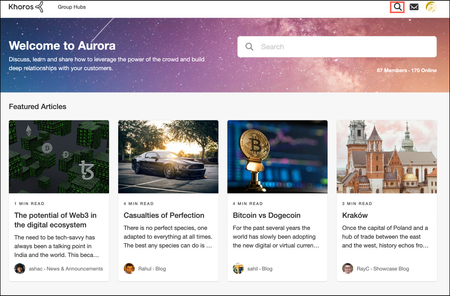
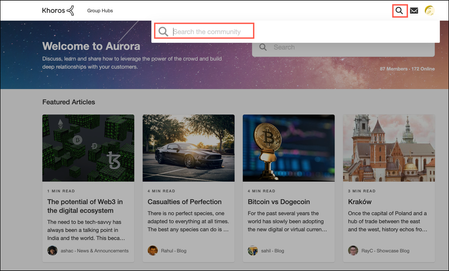
You can perform a community search from almost every page in the community. Where you are on the community site dictates the range of the search you can do. You can search for content, places, or members. Search for content, places, or members across the entire community Search for a content in a specific category or node Filter search results Search for content, places, or members across the entire community Let’s take an example where you want to search for a topic across the entire community and not in the specific place. To perform a search across the entire community: On the main page, click the Search icon to expand the search bar. In the Search field, enter the search text or keyword. When you enter the search keyword, the Search field auto suggests the topics based on the specified keyword. You can either navigate to the respective content from the list or press Enter to navigate to the Search results page and explore more search options. The Search page displays the list of matching topics available across the community based on the specified search keyword. Similarly, you can search for places (category or board) or members across the community. The Search page displays the results under People or Places sections respectively. Search for a member: Search for a place: Search for content in a specific category or node Consider you want to search for a topic specific to a forum and not across the entire community. To perform a search in the specific place: Go to a particular place, enter the search phrase or keyword in the search field, and press Enter. On the Search results page, you can see that the search has been restricted to the specific location and displays the matching records based on the specified search term. To further filter the results, use the filter menus (Last Update, Replies, Location, Author, Content Type, or Tags). Click More Filters to see more filtering options. You can sort the search results by Most relevant, Newest, Most liked, and Most viewed: Filter search results After you have performed your initial search, additional filtering options become available to you. When you apply these filters, your search results update in real time. If a filter option is grayed out, there are no search results that fit that criterion. Each filter criterion displays the count of search results available for the respective criterion: The Search page offers several filters: Last Update: Search for the topics updated on the Past day, Past week, Past month, and Past year. Replies: Search only the topics With replies, Without replies, and With solutions across the community. Location: Search only the topics based on the selected location. Using the Location filter, select the category or board to view the search results for the respective location. For example, if you want to search for a content in a forum, select the respective forum from the list. Author: Search the topics based on the author of those topics. Using the Author filter, you can search by username or rank. Content Type: Search the topics based on the content types such as Blog, Knowledge Base, Ideas, Forum, and Events. Tags: Search for posts that are associated with certain tags. The Tags filter displays the list of tags that have been added to posts, which have matching search results. Exclude replies from search results: Select this checkbox to get matching results only from the topic header and main content area and exclude replies from the search results. Note: On the Search page, members can perform keyboard navigation between the search field and other search filters using the tab and arrow keys and press the return or Enter key to apply the selection to the search results. 2.3KViewsSign in to react to this post
 11Comments
Aurora SEO: Regulate content crawling by search engines using robots.txt
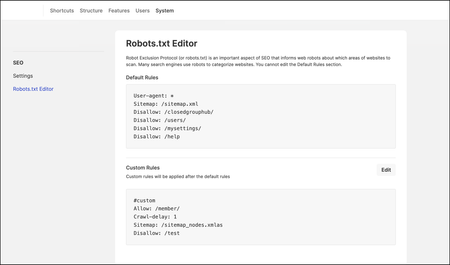
When you publish content in the community, search engines (web robots or web crawlers) crawl these newly published pages to discover and gather information from them. After crawling the content, the search engines index these pages to provide relevant search results based on the search queries. It is important to instruct the web crawlers to crawl only the relevant pages and ignore the pages that don't require crawling activity. Using Robots Exclusion Protocol (a file called robots.txt), you can indicate the resources that need to be included or excluded from the crawling activity. When a new community is created, the Khoros platform configures the robots.txt file with the default rules for the community. The default rules include instructions, which are generic for all the communities. Admins and members with permissions can view the Default Rules in Robots.txt Editor (from Settings > System > SEO area). In the editor, you can also add Custom Rules that are appended after the default rules. Note: You cannot edit the default rules. How does Robots.txt work? You can find the robots.txt file in the root directory of your community by appending “robots.txt” at the end of the URL (https://site.com/robots.txt). The file includes the list of user agents (web robots), community URLs, and sitemaps with instructions indicating whether the user agents are allowed or disallowed to crawl the specified URLs. When the user-agents or web crawlers enter your website, they first read the robots.txt file and proceed further with the crawling activity based on the instructions added in the file. The user-agents gather information only from the community pages that are allowed and are blocked from the pages that are disallowed. Robots.txt syntax The robots.txt includes these keywords that are widely used to specify the instructions: User-agent: The name of the web crawler for which you are providing the instructions. Example: User-agent: testbot To provide instructions to all the user agents at a time, enter * (wildcard character). Example: User-agent: * Disallow: Command to indicate the user-agents not to crawl the specified URL. Note that the URL must begin with ‘/’ (forward slash character). Example: User-agent: testbot Disallow: /www.test1.com Allow: Command to indicate the user-agents that they can crawl the specified URL. Note that the URL must begin with ‘/’ (forward slash character). Example: User-agent: testbot Allow: /www.test2.com Sitemap: Indicates the location of any XML sitemaps associated with the URL. The Khoros platform automatically generates sitemaps for each community when it is created and adds them to the robots.txt file. Example: User-agent: testbot Sitemap: https://www.test.com/sitemap.xml The following is the sample format to allow or disallow a user-agent "testbot” to crawl the community pages: User-agent: testbot Disallow: /www.test.com Allow: /www.test1.com Sitemap: https://www.test.com/sitemap.xml Using the Robots.txt Editor The Robots.txt Editor enables you to add, edit, and remove custom rules to robots.txt. You can look for more information provided by Google and other crawlers handling rules in robots.txt. Let’s take an example where you want to add a custom rule to disallow a user-agent “testbot” from crawling a member profile page of the community. To add a custom rule: Sign in to the community as an Admin. Go to Settings > System > SEO. In the Robots.txt Editor, you can view the Default Rules and Custom Rules sections. In the Custom Rules section, click Edit. In the Edit window, enter the instructions and click Save. The rule appears in the Custom Rules area of the tab. You can edit or remove the existing Custom Rules by clicking the Edit option. The new custom rules get appended to the robots.txt file located in the root directory: After you edit the custom rules, you can validate the robots.txt via the Lighthouse tool. Learn more about robots.txt validation using lighthouse. Note: The Audit log records the member actions made in the robots.txt file.999ViewsSign in to react to this post7CommentsAbout Aurora SEO
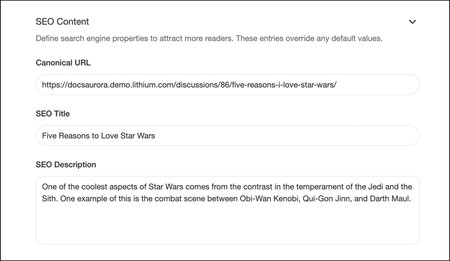
The appearance of your community pages in web search results is the first impression you make, an important factor in attracting more visitors to your site. As such, getting a higher place in search engine rankings is important. Search Engine Optimization (SEO) is a series of techniques you can use to improve your community's visibility and search engine ranking. Unlike paid search, SEO tunes your site to get the best results based on the ranking criteria used by various search engines. Khoros offers the following on-page and technical SEO features to make your content SEO-friendly and drive more traffic to your site: Custom metadata (SEO Title, Description, and Canonical URL) Structured markup Robots.txt file Sitemap Canonicalization Keyword-enriched and user-friendly URLs Meta open graph tags for social media Domains exemptions from rel = “nofollow” attribute Heading tags Custom metadata (SEO Title, Description, and Canonical URL) Khoros Communities offers out-of-the-box SEO metadata, which you can optimize in your content (Blogs, Forums, Ideas, Events, and KBs) to attract more readers to your site. You can define these properties while creating any post in the community. Learn more about creating posts in various content types. Add an effective SEO Title to your post that appears in the web search results. Note that a post’s Title is different from the SEO Title. The SEO Title appears only in the search results page and when people click the SEO Title link, they see the main Title of the post. Add a short SEO Description about your post. The SEO Description appears below the title of the post in search results. Add Canonical URL for your post when there are a group of duplicate pages for the same post. Canonical URLs act as the prime URL of the page and are indexed in the search engines. By default, Khoros Communities sets the SEO title and description for a post based on the post’s title and snippet of its content, if you explicitly don’t specify them yourself. Admins and moderators can override the SEO titles, descriptions, and canonical URLs defined by authors with more SEO-friendly properties that are informative and drive more traffic to the content. Learn more about adding SEO specific titles, descriptions, and canonical URLs for posts. To ensure that the metadata for your titles and descriptions is unique, Khoros enables you to append the topic ID of individual posts to your title and description metatags. This avoids duplication of the tags and improves search engine rankings. Learn more about avoiding duplication of content title and description meta tags. Structured markup By default, Khoros optimizes the forum discussions, blog posts, and knowledge base articles across the community to preview them as rich results on the search pages based on the engagement within the content. This preview helps people easily find the right information and drives more people to your site. The search results display the forum discussion with the relevant answers (replies to the discussion) as shown below: If the forum discussion has a reply marked as an accepted solution, the search results display the reply as Top answer. Learn more about accepted solutions. The other suggested answers are sorted based on the number of likes to the replies. Robots.txt file In Robots Exclusion Protocol (Robots.txt file), you can include the links that need to be excluded from the search crawling and indexing activity. Learn more about regulating content crawling using robots.txt. Sitemap To help search engines better understand your community site structure and crawl it more effectively, Aurora automatically generates a sitemap for each community when it is created. This sitemap lists the URLs of all posts created within the community. It also has URLs of all the community category and board pages. If a sitemap exceeds 50,000 entries, Khoros splits the sitemap file into multiple files. Links to sitemap files are stored within a sitemap index file. The frequency at which the sitemap is generated for the community can also be configured based on how much your community grows and changes over time. To enable the sitemap for your community and configure its refresh frequency, Contact Khoros Support. Canonicalization To avoid duplicate content that negatively impacts search indexing, by default, the permalinks of replies or comments are canonicalized to the main post page in the community. Keyword-enriched and user-friendly URLs Using post slug, Khoros platform generates SEO-friendly URLs to enhance search rankings. In a URL, post slug is the unique part that comes after the top domain, which represents the specific post page (post title). In the below sample URL, the post slug is highlighted in bold: “https://community.example.com/discussions/customer-support/mobile-phone-issues-troubleshooting/1234” The post slug is generated from the user content and keywords are separated by hyphen as shown in the above sample URL. Meta open graph tags for social media To provide a better look and feel of your content when shared in social media, Khoros platform automatically embeds Open Graph tag values: title, type, description, and image for the posts to be displayed on social media. Domains exemptions from rel = “nofollow” attribute Khoros platform uses the rel = “nofollow” attribute to prevent certain external links being crawled. However, you can override this default and add specific domain links you might want to make exceptions from this rule, such as any company-owned domains. Learn more about configuring rel = “nofollow” attribute set. Heading Tags The page title on blog posts, KB articles and forum discussions are added as H1 tags. This is to ensure that search engines understand the content of the pages while also improving the user experience and accessibility of these pages.899ViewsSign in to react to this post2CommentsAbout Aurora Search
Aurora provides a robust search tool so people visiting your community can quickly find the information they need. In the community, people can search for content at the community, category, or board levels. Based on the search keyword or phrase, the search engine fetches the topics that include the matching keyword in title, content, replies, and attachments of the posts. It also fetches the people and places available in the community based on the search keyword or phrase. Search Options Aurora Communities offers the following search options: Spotlight search: Searches for content, places, and people across the entire community. On the top-right of the page header, you can find the Spotlight search. Embedded search: Searches the content only in the specific category or node (Forums, Blogs, KBs, and so on). Embedded search automatically constrains the search to the location you are currently located. In any node or category, you can find the embedded search field: For example, if you are in a forum, the embedded search looks for content only within that forum. Note: Using embedded search, you cannot search for the content, places, or people in other parts of the community.700ViewsSign in to react to this post2CommentsAurora SEO: Manage URL redirects for Community pages
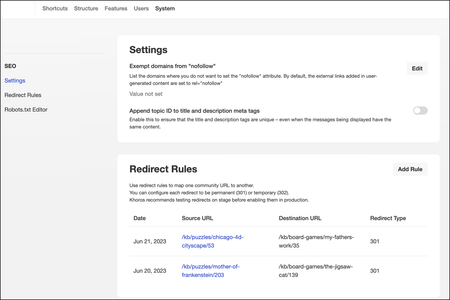
Over time, content on your community changes, moves, is deleted/archived, or replaced. When this happens, you want to make sure that the web searches don’t show results that go to obsolete or missing pages. Or, sometimes, you might want to point people to newer or more relevant content. To help optimize these search results and make sure that people get to the right content, you can create redirect rules. Redirects enable you to keep the page and link authority of your website when a website’s URL is redirected to another URL for any reason. Basically, redirects help you keep the SEO of your website healthy and keep visitors engaged on your site. Properly defined redirects help keep your search rankings. The most common types of redirects are 301 (permanent) redirect and 302 (temporary) redirect. Technically, there’s no behavioral difference between a permanent or temporary redirect. Permanent redirects are for the pages that you do not want to retain and might want to permanently delete. Temporary redirects are for the pages you plan to keep in place for a finite time period. For example, you might want to temporarily redirect to another page while you make updates to the source page on your site and then remove the rule when the update is complete. Defining the redirect as temporary (302), you can easily find these rules in the list when you want to remove them. Admins and members with the Manage Redirect Rules permission can access Redirect rules in the SEO Settings page (Settings > System > SEO). Key points When creating redirect rules, you must: Use valid community URLs. You cannot redirect to an external site. Use different URLs. Currently, we don't support nested redirects. When creating redirect rules, keep the following in mind: You cannot use a destination URL in one rule as the source URL in another rule. You cannot use a source URL in one rule as the source URL in another rule. If you experience these conflicts, you must delete one of the other rules in your list to create this new rule. Tip: Avoid redirecting to posts marked as spam, archived content, or content in private boards and Groups. You should link only to public URLs. Add redirect rule Sign in to the community as an Admin. Go to Settings > System > SEO. Click Add Rule. Enter the Source and Destination URLs. (URLs must be from one of your company’s community pages.) Select Redirect Type: 301 (Permanent) or 302 (Temporary). Click Add. Note: It takes an hour for the redirects to reflect on the site. Delete redirect rule To delete an existing rule, click Delete next to the rule you want to remove.699ViewsSign in to react to this post4CommentsAurora: Reverse proxy Best Practices
During pre-sales and launch, our customers often ask us about reverse proxy and vanity URLs. The question usually spawns from branding and search engine optimization (SEO) concerns. Some customers have corporate rules around aggregating all traffic for their domain. Branding, SEO, and corporate guidelines are all reasonable business considerations. In a branding-motivated scenario, a customer may want to use a subdirectory of the customer’s website, such as www.customer_name.com/community instead of our standard subdomain structure community.customer_name.com. With regard to SEO, you can find many articles that discuss how subdomains affect search engine optimization. The tricky part is determining whether the SEO benefit of a subdirectory structure is offset by latency potentially introduced with a reverse proxy. Khoros requires that any customer use of a reverse proxy be implemented in accordance with the appropriate implementation process specified by Khoros and set forth in the Statement of Work (SOW) that Khoros provides. The SOW sets out the process and important information that must be provided to support such implementation. Note: If you are using the Khoros Care with your Community, you also need to ensure that Care is able to communicate through the reverse proxy to Community in both stage and production. If you have IP address restrictions or other access restrictions for your reverse proxy, this might prevent integrations between Community and Care from operating correctly. What is a reverse proxy? In a reverse proxy implementation, community members do not access the community by directly connecting to Khoros servers. Instead, community members make requests to the proxy, which then makes requests to the community on the person's behalf. More generally speaking, any configuration that doesn’t include a CNAME to Community is a reverse proxy. What does Khoros recommend? As a general rule, Khoros strongly recommends against customer-controlled reverse proxy setups as these types of configuration introduce an unknown and uncontrolled layer between the end user (your customers) and our application. Occasionally, we have customers that do not discuss the concerns/goals described earlier with Khoros and add a reverse proxy in front of the community, managing the configuration and maintenance on their own. This practice often causes serious issues with community performance and stability that are difficult to debug. If you truly need a reverse proxy, we provide configuration options to create the most stable experience possible for you and your customers, and we have recommendations and best practices that we’ve learned over the years. Thoroughly discuss using a reverse proxy with Khoros, and work with Khoros Support to configure your request/response flow correctly. Using a reverse proxy—even with Khoros guidance and configuration—comes with costs that customers should understand before making the request. You may find that a reverse proxy's cost outweighs the benefits, or that Khoros has alternative solutions to consider about branding, security, and SEO that meet your needs without introducing a reverse proxy’s complexities. Let’s look at the complexities of customer-controlled reverse proxy implementations more closely: It's a black box to us. Customer-maintained proxies, using a technology of your choosing, are extremely difficult to debug and support without access to your infrastructure and specific proxy configurations. Coordinated debugging is required and can be very time-consuming. Working with Khoros to set up a reverse proxy integration properly pays off in the long run. Issues with a reverse proxy can confuse you and your customers. For example, if misconfiguration or performance issues with a reverse proxy arise, it looks like an issue with Khoros's application/infrastructure to end users. Similarly, Khoros has less information distinguishing users because all requests come from the proxy, which may be pooling connections, transforming requests, or otherwise acting differently than users’ browsers. It often takes some time to find the root cause of an issue. We’ve observed upwards of 2 times the response time for some customer-controlled reverse proxy setups, which can negatively impact SEO and dramatically reduce user retention. The reverse proxy flow has more steps than the standard Khoros response/request flow. More steps translates to extra server resources, a larger attackable surface area, extra latency for the user, and a performance bottleneck. A reverse proxy introduces an additional potential point of failure that is outside of Khoros’ control. If the proxy goes down, there's nothing Khoros can do to rectify the situation. It's entirely dependent on customer resources. Due to the lack of transparency, confusing indicators, and other complexities associated with a reverse proxy, the customer is responsible for verifying the source of any performance issues arising in a reverse proxy configuration. Khoros is not responsible for any performance issues related to or caused by a customer’s use of a reverse proxy. Therefore, it is critical that customers work with Khoros to implement a reverse proxy properly in order to minimize adverse effects. Okay, but what can really go wrong? Need some more concrete details? Here are a few issues we’ve encountered with customers who have attempted a reverse proxy implementation without Khoros guidance and proper community configuration: DNS issues: With incorrect DNS setup for the proxy or when pointing the proxy to Khoros servers incorrectly, the proxy can fail to connect. The failure might not happen at setup time but later when DNS records expire or when Khoros makes infrastructure changes. Examples we have seen include getting stuck in an infinite loop of self-requests, pointing at the wrong servers when we change IP addresses, getting turned away as invalid clients, or repeatedly being redirected to their own URL. The proxy fails to pass destination data from the original request: When this happens, we have no way of knowing the host and port that the end user (your customer) requested. We see only the host/port that the proxy requested. This incongruity can generate links and redirects with the wrong destination. In turn, if vanity hostname redirects are enabled, then the end user (your customer) is either kicked off the proxy or cannot access the community due to infinite redirects. Missing or incorrect client IP: If the reverse proxy doesn’t send the client IP, Khoros cannot get the end user IP. This makes all visitors appear to be from the same computer, which affects per-IP rate limiting and flood detection, IP bans, IP-based analytics in Community Analytics, IP-based geolocation, the Administrator IP-locking security feature, and the User IP address shown in reporting mechanisms. Response transformation: Actions such as injecting markup and JavaScript into the response has caused breakage for end users (your customers) that we could not reproduce or fix. What Khoros needs from you Your SOW order outlines the details of a reverse proxy integration. Here are a few things you can expect us to ask for: Emergency contact information: A person/team on call that we can call in the case of any integration issues, performance degradations, or outages SSL: We will use a secret header with a key to establish trust. Distributed proxy integration requires SSL to avoid the secret and key from being sniffed. These details are worked out during implementation. Proxy headers: We need to know which proxy headers you’re going to send. We require all of the following headers (these are the default, but they are customizable): X-Community-Proxy-Key: This passes the security key provided above and ensures the communication is really coming from your RP X-Community-Real-IP: Original user's IP address X-Forwarded-Host: Originally requested domain X-Forwarded-Proto: Originally requested protocol Requirements for a successful integration Make sure your proxy servers are robust, redundant, stable, and well-monitored. Connect from the proxy to the community via HTTPS for all requests. We also expect your proxy to require HTTPS for the end user. Make sure the 2 proxy headers above are populated correctly on every request. Point the proxy at the internal domain name provided by Khoros (for example, <your-company>.community.com). Do not configure using IP addresses. The community IP address may change at any time. It is recommended to preserve the Host header (for example, use "Incoming Host Header" for Forward Host Header in Akamai). It is acceptable not to preserve the Host header from the client. If you choose not to preserve it, you can pass the end-user request host using the X-Forwarded-Host header. The Host header should still reflect the internal domain provided by Khoros. If you decide not to preserve the Host header, let us know so we can configure it accordingly. proxy.allowForwardedHeader.host = true Do not alter the request or response (including all the headers and cookies) — be completely hands off to avoid regressions that are difficult to debug. If you must transform the request, let us know what you will be doing, and obey the W3C Guidelines for Web Content Transformation Proxies. We do NOT support CDN along with Reverse Proxy implementation, so alert us if you plan to use a reverse proxy so that we can take you out of our CDN. Khoros cannot update robots.txt in reverse proxy communities. You must work with your own IT team to update your robots.txt at the root level. Testing/Troubleshooting Both proxy headers, X-Community-Real-IP and X-Community-Proxy-Key, are mandatory to access the community in a reverse proxy setup across all instances. Consequently, any testing that bypasses the reverse proxy and directly targets our server must use a browser plugin (such as ModHeader for Chrome), to include both secret headers in the request. Still have questions? If you have questions about a reverse proxy implementation not answered in this article, or if you have implementation questions specific to your proxy configuration, discuss them with your Khoros Customer Success Manager.500ViewsSign in to react to this post0CommentsAurora SEO: Exempt domains from rel = “nofollow” attribute set
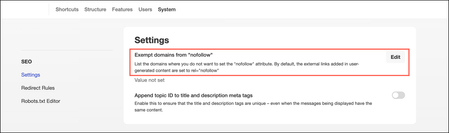
Generally, when a search engine finds a page with links on it, the standard process is to index the page and then follow all the links on the page. However, when it sees “nofollow” on the link, it: Does not follow the link to the specified URL. Does not count the link towards its popularity score in their ranking engine (using “nofollow” causes Google to drop the target links from their overall graph of the web). Does not include the link text in the relevancy score of those keywords. Note: Different search engines might handle “nofollow” in slightly different ways. Adding a follow to the suboptimal external links can diminish community content’s ranking in search results. By default, external links added to content are set to "rel=nofollow." However, there are always exceptions. Khoros enables you to override this default and add specific domain links you may want to make exceptions from this rule, such as any company-owned domains. Admins can access the SEO settings page (Settings > System > SEO) and create a list of domains to be exempted from the “nofollow” attribute set. To create a list of domains where you do not want to set the "nofollow" attribute: Sign in to the community as an Admin. Go to Settings > System > SEO. Click Edit. Enter the domains separated by commas for which you want the “nofollow” value set and click Save. Note that you can include * (wildcard) character in the beginning of the domain to consider all the links pertaining to the domain. For example, *.sample.com.305ViewsSign in to react to this post0CommentsAurora: Configure SEO settings
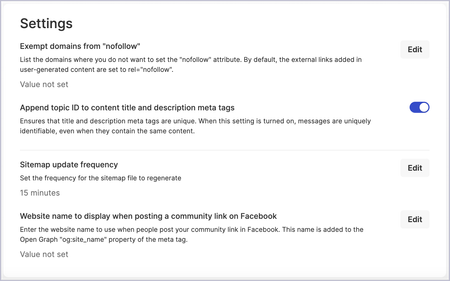
In the community, you can configure various SEO settings to optimize your content to attract more readers to your site. Khoros offers several out-of-the box SEO features such as custom metadata and structured markup. From the SEO Settings page, admins can configure SEO settings such as redirect rules, robots.txt editor, and more. To configure SEO settings: Sign in to the community as an Admin. Go to Settings > System > SEO. Under Settings, configure the following: For the Exempt domains from "nofollow" option, click Edit and enter the domains (separated by commas) for which you want the “nofollow” value set. Learn more about Exempt domains from rel = “nofollow” attribute set. Toggle on or off Append topic ID to title and description meta tags. For the Sitemap update frequency option, click Edit to adjust how often, in minutes, the sitemap file should be regenerated. This value cannot be lower than 15 minutes. For the Website name to display when posting a community link on Facebook option, click Edit to enter the URL (up to 200 characters) you'd like to display when users copy/paste community links on Facebook. This name is added to the Open Graph "og:site_name" property of the meta tag. Go to Redirect Rules and configure rules to map one community URL to another. Learn more about managing URL redirects for community pages. Go to Robots.txt Editor, where you can view the Default Rules. In the editor, you can also add Custom Rules that are appended after the default rules. These rules instruct the web crawlers to crawl only the relevant pages and ignore the pages that don't require crawling activity. Learn more about regulating content crawling by search engines using robots.txt.300ViewsSign in to react to this post0CommentsAurora SEO: Avoid duplication of content title and description meta tags
Often, the first impression you make with people trying to find your community content is how that content appears in web search results. Clear titles and descriptions are important factors in attracting more visitors to your site. Effective SEO titles and descriptions help your content achieve higher rankings in search engines. Khoros Communities offers out-of-the-box SEO metadata for your forum discussions, blog posts, ideas, and knowledge base articles to attract more readers to your site. Learn more about custom metadata. By default, Khoros sets the SEO title and description for a post based on the title and a snippet of its content. The SEO title and description added to your content appears in web search results as shown below: In some cases, a community may contain multiple pages with the same meta titles or descriptions. These duplications can confuse search engines and make it harder for them to prioritize the right content and reduce search results. To ensure that the metadata for your titles and descriptions are unique, Khoros enables you to append the topic ID of individual posts to your title and description metatags. This avoids duplication of the tags and improves search engine rankings. Admins can navigate to the SEO settings page (Settings > System > SEO) to enable the Append topic ID to title and description meta tags option. To append the topic ID to title and description metatags: Sign in to the community as an Admin. Go to Settings > System > SEO. Toggle on Append topic ID to title and description meta tags.199ViewsSign in to react to this post0Comments



You’ve seen all recent content