Aurora Upgrade Playbook
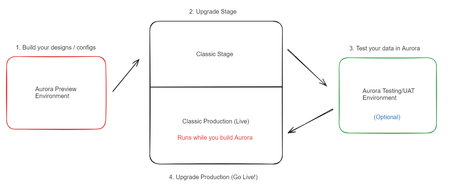
Getting Started What is Aurora? "Aurora is a game-changing update to the industry-leading Khoros Communities solution, with a set of transformative capabilities that make it easier to deliver an exceptional member experience." Aurora is the major upgrade for Khoros Communities (Classic). First released officially on July 31st, 2023, Aurora is a total transformation of our top-notch community platform. We've completely revamped it, utilizing cutting-edge technologies and adopting a modern headless architecture. We have intentionally bolstered Aurora with powerful APIs that provide flexibility and robustness. From the very beginning, we've focused on creating an exceptional user experience, designing it with mobile-friendliness, performance, SEO, and accessibility in mind. It's a fresh start with a foundation built for the future of online communities. Jump to Features. Discovery: Am I ready for Aurora? The first step is to determine your readiness for upgrading to Aurora. There is no rush to move from Classic as of 2024, so it is essential to review where you stand and what you need in order to upgrade successfully. Secondly, it's good to remember that any change to your community presents an opportunity to revisit what success means and how your community experience supports success today and in the future. With this in mind, we encourage you to challenge yourself at each step of planning and ask, "How does this align to and support our business goals?" Getting started Understand Your Goals: While Aurora improves drastically upon the day-to-day community design, admin configuration, moderation, and end-user experience, in evaluating your readiness to upgrade to Aurora, ask yourself: What are your plans for the community in the coming year? How do they align with your business goals & strategy? Do you require certain features or integrations to support your community strategy and day-to-day management? How do you use them? Do you use SSO authentication? How does the authentication process work? (You may need to gather this information from the team that manages SSO at your organization.) How long will it take to gather resources to help you in the upgrade to Aurora? Evaluate Customizations: As a best practice, customizations should be limited to those where there is a clear business value and no alternative feature. With this in mind, we recommend you evaluate existing customizations in line with your community goals, and as part of your upgrade plan, consider your path to sunset any customizations you use today that do not provide measurable value to the community experience and its success. You may have custom features today (like widgets, special pages, etc.)—many of these can now be replaced with Aurora's built-in features. Where you can, we recommend switching to Aurora's features. It will not only save you the cost and effort to rewrite those components using new Aurora development tools but also help maintain your technical debt to that which is absolutely required. You can refer to the feature table on available features in Aurora. If you need help in this step, reach out to your development team, development partner, and/or your Khoros account team for assistance. Scope Customizations: If upon completing evaluation of your existing customizations you identify key customizations you need to maintain when moving from Classic to Aurora, send a request to your Khoros account team to start the process on scoping the Aurora upgrade work and cost for updating your customizations. Structure Changes: The community structure informs the user path through community and supports their ability to find content relevant to their need. As best practice it should be reviewed annually or whenever a change occurs in community or the business (e.g., redesign, product/service changes, etc.) Simply upgrading to Aurora takes your community structure, content, and members as is. As part of your upgrade planning, we recommend that you review the effectiveness of your structure in its current form, identify opportunities to improve, and plan to implement those changes. Structure changes can be made in advance of an upgrade. In fact, we highly recommend that you identify any opportunities to make these changes ahead of time—it can only positively impact the existing experience. If you would like structure changes to be included as part of your Aurora upgrade, this requires a migration to be added to your upgrade scope, which is an additional cost. Please review this need and communicate to your Khoros account team. Consider Previewing Aurora: If you think you might be ready to upgrade to Aurora in the next few months, you can request a temporary Aurora Preview instance with your CSM. Read on for more info on Aurora Preview instance set up. Engage with Khoros: If you have questions, please ask in this forum: Community Aurora Discussions Aurora Upgrade Tasks Overview & Recommended Actions When a community is upgraded to Aurora, automated tasks run in the background to ensure the data from Classic is now supported in Aurora. Here is a run-down on how that works: Upgrade Task What happens in the upgrade? Required Actions for Khoros Customer Tags and Labels Tags and Labels both merge into "Tags" in Aurora. Similar to Labels in Classic, you can set pre-defined and freeform tags. Root-level labels and tags are carried forward as is, but reply-level tags are not. Pre-defined labels are carried forward and set in the Aurora admin as "pre-defined tags." If a particular Tag and Label have names identical to each other in Classic, these will merge into one collective tag in Aurora. Before Aurora upgrade, it is recommended (but optional) to clean up tags and labels as they will come over to Aurora as is when you upgrade your community. If you decide to clean up tags after the Aurora upgrade, you will still have the options to replace and remove tags. URL Redirects URLs to pages in Classic have 301 redirects automatically set to the corresponding pages in Aurora. None Images & Videos Images and videos are now associated with content in Aurora. Images and videos contained within galleries (and not attributed to content) will not be moved to Aurora, but all images and videos within content will be moved forward. User avatars are kept on the upgrade to Aurora. Any custom avatars collections in Assets within Studio are not moved forward into Aurora. If you plan to move forward your custom user avatars, save these assets. Once your stage community has upgraded to Aurora, upload your custom user avatars in Designer. Roles & Permissions All existing roles and permissions configurations will be moved forward to Aurora. None Community Settings (Nodes, Content, Users) All applicable community settings in Classic will be applied in Aurora automatically. Certain settings are not available in Aurora, so expect discrepancies between Classic and Aurora. None Ranks All ranks and existing criteria will be moved forward. The icons will not be moved forward, you will need to add icons back in Aurora. There are new options for visual styles in ranks for the customer to choose. Review ranks and set the new visual style for the ranks that you'd like after the upgrade. Badges All "live" badges and existing criteria and badge icons will be moved forward. Badges in the "Create" tab in Classic will not be moved forward. Badges will be unorganized and placed in a single set right after the upgrade. Badges can now be organized into "sets." Review badges and organize badges into newly created sets after the upgrade. Idea Statuses All predefined idea statuses are carried forward. Statuses will be unorganized and placed in a single set. Idea statuses can now be organized into "sets." Review idea statuses and organize them into newly created sets after the upgrade. Upgrade Process Overview During an Aurora upgrade project, you can expect these steps: Customer Preparation: Use your temporary Aurora Preview environment to configure and design your community. You can request that Khoros import your existing stage admin settings (Structure, Roles/Permissions, and Ranks are supported) to this environment. Upgrade Stage to Aurora: Once you kick off your project, your Stage environment is upgraded first, and Khoros moves your configurations over from your Aurora Preview environment. In this step, configure Stage with structure, ranks, designs, customizations, etc. Test and validate everything on this instance primarily. In this step, you no longer have access to your Aurora Preview instance. Important Note: You are no longer able to use Studio Self-Publish after Stage is upgraded. Testing Your Data in Aurora (optional): Khoros Services team sets up a special temporary environment for you to test your Aurora configurations & designs with a scrubbed (no PII) copy of your production data (with content & members). This step may not be available if you upgrade on your own or with a partner. Final Validation and Launch: After testing and approvals, your Classic Production environment is upgraded to Aurora. Upgrade tasks are run in the background to make your data compatible with Aurora. In this step, you perform final validation and testing for go-live. Completion and Cleanup: Once the upgrade is complete and validated, you have successfully upgraded to Aurora! Aurora Preview Environments Once you have an Aurora Preview instance set up, you can collaborate with your Khoros account team on steps you can take before your Aurora upgrade. We recommend starting to complete these tasks when you first gain access to your preview environment: Explore Aurora features and capabilities. Collect assets, style guide, and taxonomy from your brand. Once you have an admin account, begin to customize the look and feel using the Theme editor (colors, fonts, design). Set up the community structure and create test content as needed. Add badges & ranks, and adjust designs if necessary. Review and validate preset tags. Customize pages using the Page Templates builder (page layouts, widgets, text). Review roles and permissions, and test user access levels. Fine-tune miscellaneous settings such as Robots.txt and Content Settings. We are confident that you will become comfortable with using Admin and Designer tools as you progress through this list, but feel free to leverage the Aurora educational material in Atlas: Getting Started in Aurora. Features Feature Description Accessibility WCAG 2.1 AA VPAT (in progress) Admin & Permissions Content Features, Audit Logs, Roles & Permissions Analytics Dashboards, Reports, Bulk Data API, Analytics APIs Authentication Registration, Sign-In, MFA**, SSO (SAML, OAuth), Multi-Auth (multiple SSOs) Blogs Blog Posts, Content Workflow and Approval, Co-authoring & Contributors, Version History Developer Experience GraphQL APIs, SDK, GitHub, Metadata, Custom Components (Handlebars & React**), Endpoints, Custom Pages, Forms Events Events, Zoom Integration Follows & Notifications Follows, Notifications, Email Templates Forums, Threading & Comments Forums, Solutions, Replies, Comments, Likes, Deep Linking Gamification Ranks, Badges, Top Members Privacy Cookie Banner, Terms of Service, GDPR/CCPA Ideas Ideas, Statuses, Filtering, Reporting Inbox & Private Messaging Inbox, Private Messages, Broadcast KBs Articles, Content Workflow and Approval, Co-authoring & Contributors, Version History Localization** Localized Text, User/Node Settings, Navigation, Text Overrides, Localized Community Rich Media & Video Images, Videos Embed, Video Hosting/Streaming Message Editing & Posting RTE, Attachments, emojis, Embedly, Autosave Content Moderation Abuse/Content Reports, Spam Management, User Bans, Content Filters, Flood Controls, Moderation, DSA Site Structure & Navigation Community Structure, Header, Footer, Breadcrumbs, Hover Cards, Navigation Links, Featured Places & Content, Recent Top Content, Custom Text/HTML Designer Page Templates, Widgets, Theme Editor, Custom Fonts, Avatars, Design Language Elements Search Spotlight, Embedded Search, Auto-Suggest, Related Content SEO Page level SEO, Sitemap, Robots.txt Groups Groups (Open, Closed, Hidden), Group Membership SFDC Integration User Sync, Case Portal, Escalations Tags Preset, Freeform, Management of Tags, Tags Widgets User Profile & Settings User profile, settings **In development The improvements to community in Aurora help community managers easily manage the day-to-day community with low hassle, are more intuitive for building customizations in the community, and allow for greater extensibility to bring outside platforms closer to your Khoros community via integrations. To discover more, check out the following resources: Aurora 2024 Roadmap (Now, Next & Future) Getting Started in Aurora Aurora Release Notes Developer Documentation Frequently Asked Questions Am I able to migrate data into or within my community during an upgrade? In the scenario where you need to migrate another community into your community, it is an option to engage with Khoros Services for migration during your Aurora upgrade project. Consult with your account team to discuss further and define your requirements. Can I update my structure or do a re-structuring during my upgrade to Aurora? When you upgrade your community to Aurora, it will upgrade it 1 to 1. There is no need for a migration map as the upgrade process is not a migration. All content, members, structure, and settings remain in place as your community is upgraded. This means that if you need to move content around in your structure or do a re-structuring during an Aurora upgrade, it is recommended that you do this prior to the Aurora upgrade. If your restructuring is extensive, it may require a migration, which will require scoping with Khoros and additional cost. Will I retain access to Classic Community Analytics (also known as LSI - Lithium Social Intelligence)? After you upgrade to Aurora, you will have access only to Aurora Analytics (metrics definitions can be found here). Though you will no longer have access to Classic Community Analytics dashboards, up to 2 years of historical data will be available in the Aurora Analytics Dashboard. Also, Bulk Data API v3 is available in Aurora, so you will be able to continue usage of the API for your own internal analytics needs. 4KViewsSign in to react to this post
 10Comments
Khoros Communities: Aurora 25.04 Release Notes
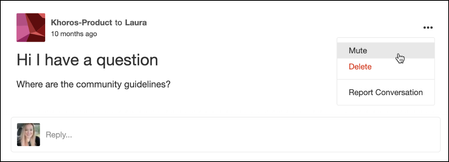
Member Experience Performance optimizations In this release, members will notice the following performance improvements: GraphQL query optimization: We've improved the performance of GraphQL queries by optimizing how they are processed, resulting in faster load times and reduced overhead. Text key reusability: We've streamlined how text is managed across components, reducing duplication and improving consistency throughout the platform. Improved page stability: We've made changes to improve page stability and reduce layout shifts, ensuring a smoother and more visually stable experience. Faster load times: We've enhanced caching for commonly used data, making frequently accessed pages load faster. Better experience for guest users: We've optimized the experience for users who aren't signed in by ensuring only necessary data is loaded, improving performance and responsiveness. Muting conversations in the Inbox Community members can now mute conversations in their inboxes to avoid receiving notifications for them. This can be useful if there is an extensive conversation occurring and a member does not need to view every update but may still need to reference the conversation. In your Inbox, you can mute or unmute a conversation by opening the Options menu for the desired message. To learn more about muting conversations, see About Inbox privacy. Calendar Invitation Email on Event RSVP Previously, members had to manually add the ICS file to their calendars. With this release, when you RSVP an event with Attending or Interested, a calendar invitation is automatically added to the calendar associated with your registered email address. The following screenshot shows an event that is automatically added to the member’s calendar. Learn more about adding events to your calendar. Additional Embedly support We've enhanced Embedly integration in the community to support additional content types. You can now embed and preview the content from following platforms directly within posts and comments: Typeform Vidyard Loom For Vidyard and Loom videos, members can either play the video directly within the community, after accepting cookies, or choose to view it on the provider’s native platform. The following screenshot shows a banner that prompts members to accept cookies or continue to the external site. Note: To enable previews for these types of content, make sure both External Link Previews is turned on under Settings > Content Features > Links. Learn more about managing external link previews and warnings and adding rich text previews. View history option Previously, members could view edit history only for blog posts and knowledge base articles. With this release, this capability extends to all content types—including replies and comments. Members with the View edit history permission can now see changes made to any post, giving you greater control and transparency over content edits. The following screenshot shows the History option available for an idea. Learn more on how to view and compare different versions of published content. Tags autosuggest Previously, tag suggestions appeared only after you started typing in the tag field. Now, when you select + Add Tags, a list of relevant tags—both preset and freeform—immediately appears, relevant to the board you're posting on. Read more on tags. Admin Experience Community Experience Surveys Admins can enable community experience surveys, which prompt members to provide feedback about their experience in the community. Survey responses and scores can be collected via an export. Creating a survey requires several configuration steps, including: designing the branding: select naming, logos, and colors designing its behavior: select who to present the survey to, when, and how often selecting its questions: select which questions to present to your visitors turning it on for visitors: easily toggle your survey on when you’re ready to go live—and easily turn it off To access survey configuration options, go to Settings > Content Features > Community Experience Survey. To view specific setup steps for customer experience surveys, refer to Create community experience surveys. To export your survey result data, in Content Features > Community Experience Survey > Questions and Answers, select Export (refer to View community experience survey results). Designer: removal of page-load time option As of this release, the Optimize page-load time option previously available in More options on widgets is no longer available because enabling it had a negative impact on the CLS (Cumulative Layout Shift) Web Vitals metric. If you still want to use this option, a developer can modify the quilt directly in the plugin. Widgets that were set to use this option prior to this release will also continue to respect that selection. Designer: logo navigation menu In previous releases, we introduced the ability to add navigation text links and side menu navigation links. With this release, you can now add a drop-down navigation menu from the logo in your community. This is a prime location for adding links to your main categories to make it easy for your members to navigate to the most important areas of your community. Refer to Header and Footer configuration for steps on adding navigation links to your header. Move and merge content across content types Duplicate content and evolving conversations are common in the community. Sometimes, a discussion is better suited to a different content type.For example, a community Discussion might be valuable as a knowledge base article. Similarly, an active Discussion might align better with an existing Idea in development. To maintain continuity and preserve valuable conversations, it should be easy to move or merge content between content types without losing context.To support this, we've introduced the ability Move content from one content type to any other content type Merge a Discussion or Idea as a reply or comment to any other post Following is a screenshot of the options you receive when you try to move content to any other content type. By moving content from one content type to another, you have the flexibility to consolidate similar posts and reclassify content when its purpose changes - like turning a discussion into an idea. While moving content, prompts will inform you of any potential metadata loss during conversion. By merging posts, you can bring similar content or conversions to one place in the community. Merged posts retain all replies, and prompts will inform you of any potential metadata loss during conversion. Learn more about moving and merging content. Automatic spam detection for images Starting this release, all images along with the text content will be scanned for automatic spam detection. Hyperlinking content in private messages In Aurora Communities v25.03, we introduced the Turn on link hyperlinking permission. This allows members with the permission enabled to post URLs that automatically appear as clickable hyperlinks. For those with the permission set to Deny, URLs are displayed as plain text. With this release, we’ve extended the same functionality to Private messages, ensuring consistent behavior across public and private interactions. Learn more about Content permissions in About Content permissions. External link warning settings Previously, to generate previews for external URLs, you had to enable Rich text preview under Settings > Content Features > Rich Content. With the upcoming support for Embedly, we've updated how this works. You’ll now find two separate settings under Settings > Content Features > Links: External link previews – Toggle on to generate rich previews for external URLs, allowing members to see linked content directly within the community. External link warning – Toggle on to show a confirmation message when members select a link that leads them outside the community. These changes give you more control over how external content is handled and displayed. Developer Experience Previewing local changes on the SDK Staging site In this latest update, we are excited to introduce a new feature that allows users to preview the SDK staging site from the perspective of various user roles. This functionality is designed to help developers and stakeholders understand how the changes will appear to multiple user types before going live. Non-admin/Anonymous Admin Moderator Standard See Previewing Local Changes as Different User in the Staging Site for more information. Move Content across content types As discussed in Move and Merge content across content types, we also provide GQL support to move content across different content types or discussion styles. In Khoros Communities Aurora, members have already been able to move replies either to a new post or under an existing one. However, merging duplicate root posts — whether forums or ideas — was a missing piece. With the release of the Merge Root Posts feature, community managers and moderators can now easily consolidate similar or duplicate topics into a single root post. This enhancement simplifies content organization, improves community navigation, and reduces redundant discussions. See Merging Root Posts in Khoros Communities Aurora for more information. Migrating from REST API to GraphQL With Aurora, we are transitioning to a GraphQL framework for APIs. While REST APIs are still supported in Classic, we strongly recommend adopting GraphQL for all new components, endpoints, and integrations in Aurora. Our long-term strategy is to phase out REST APIs in favor of GraphQL. Although we have not announced a sunset date yet, GraphQL is where we are focusing all new development and enhancements. We encourage all customers upgrading to Aurora to begin transitioning as early as possible. Early adoption will help ensure a smoother and more efficient migration experience in the future. See Migrating from REST API to GraphQL for more information. Custom Field Access Control We've created a new guide detailing the ins and outs of controlling access to Custom Field data within your Community. This includes configuring custom fields for specific roles and node levels, including how to set up and scope custom field visibility. See Configuring Custom Field Visibility for more information. GraphQL Support for Page Scripts You can now add GraphQL Queries and Fragments to Page Scripts and run them via the Page Script Handlebars Templates. This is a huge advantage for use cases such as personalized survey popup that enables you to dynamically render the name of the user as part of the popup to encourage engagement among members. We've detailed this use case, including an example workflow in GraphQL Calls for Page Scripts. Handlebar Templates for Salesforce Integration Notification Emails In addition to the email notification fix in the 25.03 release, we added handlebar templates for the Salesforce integration notification email to let members know when the integration fails. You Found It. We Fixed It. Accessibility Added "Filter by" to the ARIA label for the tags filter on the search results page to improve screen reader accessibility. Spotlight Search results are now read out by screen readers. All buttons on an event page are announced successfully by screenreaders. Analytics The accuracy of visit-related metrics has been restored—communities no longer significantly underreport visits due to issues with different visitors sharing the same visitor ID. APIs Group invitations no longer require grouphub:example formatting in the nodeId field when sent via a GraphQL mutation. The node ID now behaves as it does for any other node. Admins can now perform an SQL update and rollback of a site of the report ID column. Members can now migrate any content or content with widgets from Community Classic to Community Aurora using GraphQL API. Members can now delete a forum, blog, or KB post via GraphQL API calls. When you retrieve the full number of net likes and the member’s likes count via GraphQL, they are now consistent and match correctly as per the member’s action. Badges The avatar_changed metrics for badge criteria now reflect “true” and “false” instead of a number of times. The badge requirement for the number of videos uploaded now increments as expected. Counts Hovering your cursor over a specific note in the Admin notes now shows the absolute date and time of creation of that note. The Places widget shows the correct count for unread posts. CWA The Schedule to publish button is visible when blog posts are turned off for comments. Designer The image upload maximum size settings in Designer are no longer tied to the max upload settings set in admin, so admins now experience an error when uploading a banner in Designer only if they attempt to upload an image of 20 MB or larger. If the Hide category in place widgets, place picker menus, and search setting (under the Display settings of a category)is enabled for a category or board, it still appears in the list for assigning custom page templates. Follow and notifications When you update the Advanced Settings in your Follow and Notification settings, they now save as expected. Ideas Anonymous or non-authenticated users can no longer vote for ideas. Languages and localization You can now remove English as an available language for your community so that your community is available in the language of your choice. Chinese localization text files no longer break custom components. Member profile The member profile page now shows the correct count for Likes received. All members, irrespective of their role, can now view their profile information. Navigation Anonymous users are redirected to the login page when they try to access the URL of a draft. Selecting Submit for Review for blog posts or knowledge base articles, correctly redirects to the preview page. When you select the browser’s back button when you are on the Notification feed page, you are redirected to the previous page you visited and not stay on the same page. On the Header & Footer template, in the Edit Navigation panel, the Show bottom border and Show bottom shadow options now save correctly and appear appropriately in preview mode. Topic links on the All Topics page now redirects you to the correct page. Private messages When an admin uses the Switch Member option and sends a private message, the message is now sent from the member they switched to instead of from the admin. Selecting an @mention in a private message redirects to the right content, place or member profile. All links added to private messages are now visible as links. RTE Anchor tags added in source code are now visible as links. Search and SEO Requests to community vanity URLs are now correctly redirected, resolving issues that may have impacted SEO traffic. URLs with .tsx extensions are no longer exposed to search engines, preventing 404 errors on Google search console and protecting SEO performance. The Show more links on search results page now load content correctly on mobile devices. Autosuggestions now work for search queries containing special characters in non-English languages. Tags The tag list populates automatically when you attempt to add a tag to content that was moved to a board requiring tags.2KViewsSign in to react to this post18CommentsKhoros Communities: Aurora 25.02 Release Notes
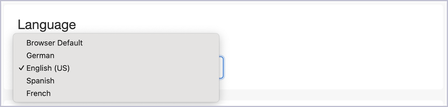
Member Experience Performance improvements As an ongoing improvement to community performance, we optimized several general components across the application. My Settings: Language On the My Settings page Preferences tab, under Language, the Community language drop-down menu now includes the Browser Default option. Your browser stores your preferred language, and by default, the community uses your browser preferences. If you change the language in your settings, you can override the browser default for your account. If you selected a language in this drop-down menu prior to v25.02, your selection is retained. Refer to Manage community preferences for your account to learn more about your settings. Content Workflow notifications As a community member, you can now receive content workflow email notifications when someone completes the following actions on blog posts or knowledge base articles: Edited or saved a draft Submitted a draft for review Submitted a draft for publication Recalled a draft Scheduled a draft for publication Returned a draft to its author Returned a draft for review Updated the publication schedule for a draft Canceled the publication schedule for a draft Added you as a co-author Removed you as a co-author The New Follow (Digest) and New Follow (Immediate) email notifications also contain content workflow updates. To manage these notifications, refer to Manage Follow and Notification preferences for your account. For a list of all possible email notifications, refer to About Aurora Email Notifications. By default, Co-authors receive the notifications workflow updates Immediately. Admin Experience Designer: Search Results Page template Community designers can now customize their search results page using the Search Results Page template. This enables communities to promote the content, places, and people that are the most relevant to their community members’ needs. Updating the look and feel of this page template also encourages cohesion in branding across the community. This page template includes the following four widgets out of the box that cannot be deleted: Search bar widget (with filters) Content Results widget (shows content matching the search query) People widget (shows people whose usernames match the search query) Places widget (shows places with names matching the search query) To update this page template, open your Account menu, go to Designer > Page Templates, and select Edit on the Search Results Page. For more information about this page template and others, refer to About Aurora Page Templates. For configuration information, refer to Using Aurora Page Templates. Salesforce connector upgrade Currently, when you integrate a community with a Salesforce application, the authorization request from Salesforce may fail if the Salesforce’s IPs are not allowlisted in the community. With many upgrading to Salesforce Hyperforce, where Salesforce IPs change dynamically there is a risk of frequent integration failure. To mitigate this risk, we have upgraded the Salesforce connector to version 4.4 . Now, the authorization request originates from the Salesforce to authorise the Salesforce Integration API App configured in the community. After the authorization is successful, the access and refresh tokens are verified and stored in Salesforce. This ensures a stable and seamless integration. Note: Contact support to add the required configs in the configuration file. The authorization needs to be performed by a member with elevated permissions, for example, an Admin. Learn how to enable the new connector. Media moderation To help maintain a safe and compliant environment in your community, we have introduced the Default Media Status setting to review content with media (includes images, videos, and attachment files). You can find this setting under Settings > Moderation > General > Default Media Status. The screenshot below shows this setting at the community level. Media moderation can be configured at both the category and board levels, with board-level settings taking precedence over the parent category. When you try to publish a post that contains media, the moderation settings for both content and media are checked. The post’s visibility depends on the moderation rules applied. For example, in the “Pet Lovers” forum settings shown below, text content moderation is set to Auto-approve, while media status is set to Required. This means any post containing media is published only after the media content is approved by moderators. When members (without Bypass moderation permission for Media) try to publish a discussion in the forum, they receive a notification that the post requires approval and is not visible in the community. Moderators can approve or reject the post from the Moderation tab in the Manage Content dashboard. Note: Media moderation is available for: Discussions and their replies Blog comments Knowledge base comments Ideas and Idea comments Event comments To facilitate faster search results while moderating content, we have introduced a filter for media in the Moderation tab in the Mange Content dashboard. Media Moderation Bypass feature Along with the media moderation feature, we are introducing the Bypass moderation permission, allowing trusted members to post media (includes images, videos, and attachments) without requiring moderation. This ensures a smoother experience for verified users while maintaining content control for the broader community. You can find this permission under Settings > Moderation > Users > Media. Activity limits We've introduced the Activity Limits settings to limit rapid actions like publishing, commenting, or private messaging within short intervals in your community. For example, if a member attempts to publish, send private messages, or post images too frequently, they are temporarily restricted, ensuring the community remains focused on meaningful engagement rather than automated or disruptive behavior. You can find this setting under Settings > Moderation > Activity Limits. Below is a screenshot of Activity Limits feature options: Note: The Bypass flood control permission that was introduced in Aurora version 24.12 is now renamed to Bypass activity limits. As shown in the screenshot above, there are three sections under Activity Limits: Default Limits: These limits are set at the community level and apply to all members. Role-Based Overrides: You can specify roles from your community and set different activity limits. This helps you manage user engagement by applying stricter limits to new members until they earn a certain role or rank. For members with these roles, the limits defined in this section override the default limits. Role Exclusion: You can specify community roles whose members should be exempt from activity limits. These are trusted members, most often Admins and Moderators. When added, all members with these roles are automatically granted the Bypass activity limits permission. When removed from here, this permission is set to Deny. For Default Limits and Role-based Overrides, the activity limits include: Posts: Specify how many posts members are allowed to publish in 30 seconds, 10 minutes, and in 1 hour. Private Messages: Specify how many private messages members are allowed to send in 30 seconds, 10 minutes, and in 1 hour. Images: Specify how many images members are allowed to publish in 1 day. Learn more about Activity Limits. Analytics: Thread ID filter We have introduced a new filter called Thread ID. You can use this filter to view the metrics related to a particular thread or topic in your community. The Thread ID is the ID found at the end of the community URL. For example, in the below URL, “236502” is the Thread ID for a topic in the community: "https://community.khoros.com/kb/supportinformation/khoros-cookies-datasheet-community-care-marketing-khoros-bot/236502". You can add this filter under Dashboard and Reports by selecting the Filter option. You can add more than one Thread ID to the filter. After you select Add, the dashboard displays the metrics for the added Thread IDs or, in other words, the topics with those Thread IDs. Learn more about filter options. Developer Experience Message Constraints GraphQL Updates With this release, we have added the following update to the message constraints: hasVideo constraint to show the messages that have videos hasImage constraint to show the messages that have images hasAttachment constraint to show the messages that have attachments. Bypass Media Moderation Permission In this release, we have added a new bypass media moderation permission that allows members to post content with media such as images and videos without moderation. Note: Only Administrators and Moderators have access to this permission. See Working with Bypass Media Moderation for more information. Media Moderation Setting In this release, we have added a new mediaModerationStyle setting to enable members to post content with media such as images, videos, or attachments. Based on this setting value, the post will be sent for moderator review. See Working with Media Moderation for more information. Optimize Your Community Experience To optimize your community developer experience, we introduced an ability to add JavaScript files for handlebars and HTML components. With this, you can use Page Scripts in both the handlebars and HTML components to render your component. See Adding Javascript files to HTML and Handlebars Component for more information. Additional Policies for Content Workflow User Notification In this release, we added three additional policies for content workflow user notification actions: canAccessCWAAuthorNotificationSetting canAccessCWAEditorNotificationSetting canAccessCWAPublisherNotificationSetting See Using the Content Workflow for more information. Updates to Aurora Handlebars Helpers and Context Objects We have updated the Khoros-provided Handlebars helpers and context objects you can use for your Custom Handlebars Components. These updates include new helpers for GraphQL queries, localized text strings, category and message lookups, and more. See Handlebars Helpers and Context Objects for more information. Allowed Dependencies for Custom React Components In Aurora version 25.02, we introduced validation to the build to ensure that only allowlisted dependencies already installed by Aurora are used for custom React components. The following dependencies are currently allowlisted and can be added to a custom React component if needed: react react-bootstrap react-hook-form react-uid react-dropzone moment-timezone @coveo/atomic-react @coveo/atomic @coveo/headless-react @coveo/headless See Allowed Dependencies for Custom React Components for more information on this update and how to add additional dependencies to future Aurora releases. You Found It. We Fixed It. Search All content types that are enabled within your community can now be selected from the drop-down menu on the community's Search page. The search bar in the +tag button works as expected, with the keyboard appearing properly and enabling tag searches. The userSearch query with the searchTerm field no longer breaks the GraphQL API. Ranks You can now move a rank to the top of the rank list as expected. Localization The display issue that occurred for some languages when creating a custom ban time has been resolved. In localized communities, external links added to the navigation bar are now updated in the expected language’s JSON file. Images Image upload metrics are now respected in Badge criteria. When you add an image asset to a react component, turning off the SDK and merging via GraphQL API, the react component is now rendered properly. Videos Video uploads with filenames containing JavaScript scripts are now validated and blocked, preventing potential security risks. You can no longer upload a video that triggers a JavaScript message when you view it on the From My Videos tab. Attachments: You can now add .cmd attachments to posts. Ideas When you select the Show more button on the Ideas board, all replies are immediately displayed. When an Idea with more than 3 threaded replies is moved to another board, all replies are also successfully moved along with the Idea to the destination board. Knowledge base Read-only knowledge base articles are no longer editable by general members. Replies and comments You can now edit events even when comments are turned off. When you add nested replies to a post and generate a permalink, those replies are no longer duplicated. As expected, members can now mark only one reply as a solution, as opposed to marking multiple replies as solutions. On the permalink page for a comment, you can now add or remove a solution as expected. Rich Text Editor When you add an invalid color option in the advanced table properties in the content editor, the previous color is now saved instead of the table reverting to the default settings. When you migrate your community from Classic to Aurora, the Table of Contents (TOC) now retains proper styling, including correct indentation and list formatting. Various fixes were made on the editor, including UI, on the text formatting, toolbar functions, media insertion, accessibility, and keyboard navigation. A11y When mentions results match multiple keywords, keyboard navigation now works as expected. API Members can now successfully create, update, or delete custom entity fields using GraphQL API. The rate-limit issue of the Github API with the repository has been resolved. The userLink react component now generates links without UID. Color values for links and buttons changed via GraphQL are now respected in email templates.1.5KViewsSign in to react to this post10CommentsIntroducing AWS Bot Control: Enhanced Security for Khoros Communities
To bolster the security and integrity of your community platforms, we are rolling out AWS Bot Control for all Khoros Communities customers this month. This AI-powered solution is designed to detect and block malicious or unapproved bot traffic, safeguarding your platform against scraping and unauthorized access while maintaining optimal performance. We’ve rigorously tested this update to ensure a seamless deployment with minimal impact on legitimate users, ensuring there’s no associated downtime. Should you notice disruptions to approved bot traffic, such as crawler integrations, please contact support to request an exception classification. This initiative underscores our commitment to providing a secure and reliable experience for all Khoros Communities. For more information about AWS Bot Control, refer to Amazon’s documentation. While AWS Bot Control offers an efficient way to battle spam from bots, there are additional tools and strategies available. For more information, check out the following resources: About Khoros Communities Classic spam management tools About Khoros Communities Aurora spam management documentation Recap how to mark, report, and manage spam posts with this on-demand Instructor-Led Training on Spam Management Khoros Communities Aurora Spam Management Khoros Communities Classic Spam Management Sign up for 1-to-1 training in Aurora spam management with our new product coaching session Note: This update is for communities on AWS.1.4KViewsSign in to react to this post2CommentsKhoros Communities Aurora 24.11 Release Notes
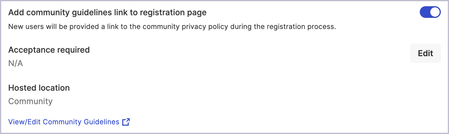
Announcement Enhancing security with AWS Bot Control To strengthen the security of our communities, we are rolling out AWS Bot Control for all Classic and Aurora Communities customers this month. This advanced feature is designed to block unwanted bot traffic, preventing your platform from experiencing performance degradation. We’ve conducted thorough testing to ensure a seamless deployment with minimal impact on the end-user experience and that this change is implemented without any associated downtime, ensuring uninterrupted access for all users. Member Experience Community languages Community pages and email notifications are now available in English (UK), Chinese (Simplified), and Korean. Note: We mistakenly included Swedish, Spanish (Mexico), and Norwegian in the initial announcement. These will be available in a future release. Refer to About Aurora community languages for more information and a full list of available languages. Admin Experience Community Guidelines & Privacy Policy Admins can now enable community guidelines and privacy policies for their communities. These can be linked to an external URL or built within the Aurora community itself. Depending on what you’re going for, building your guidelines or privacy policy within Aurora creates a seamless experience with consistent branding, while linking to an external URL enables you to use one central location where these documents live so you don’t have to update them in multiple places. After the community guidelines and privacy policy are created, admins can also designate these as required reading for registration and/or provide a link on the registration window for new members. For communities in multiple languages, you can provide guidelines and policies in all your available community languages to ensure that all members of your community are aligned on expectations and security regardless of language. To learn more about creating and enabling these documents, refer to Configure community guidelines and Configure privacy policy. Content Archive We’re excited to introduce the content archival feature in this release! Admins and moderators can now effortlessly maintain community hygiene by reviewing and archiving content that is no longer accurate, timely, or relevant. While this feature is enabled for all communities by default, you can manage the feature’s enablement on the Content Archive option under Settings > Features > Moderation > Content Archive. Note: This feature is set only at the community level. Admins, moderators, or members with the Manage content archival permission can archive community content. With the appropriate roles or permissions you can: Archive content directly from the Options menu for any content type. Add a link to a community or external page to redirect members to related content. Access the Archives tab in the Manage Content dashboard to view, unarchive, and manage all archived content in one place. Search for archived content using filters. Learn more about Content Archive. Conversation display formats Previously, replies and comments on community content were displayed exclusively in a threaded format, where all replies (or comments) appeared in the context of the main reply (or comment). In this release, we’ve introduced an option to display replies and comments in either a linear or threaded format, allowing you to tailor the conversation view to better suit your community’s needs. Admins can set the Display format to Linear or Threaded from Settings > Content Features > Replies and Comments. Note: This can be set at the board level. When the board-level settings are different from that of the community level, you are notified of the override with a label. Below is an example of conversations displayed in a linear format. Below is an example of conversation displayed in a threaded format. Learn more about linear and threaded replies. Developer Experience Updating Conversation Formats In addition to introducing the Admin experience for setting a default conversation format, this release also includes GraphQL support to update the place (node) or user conversation to either linear or threaded format. Learn more about Setting the Replies Format. Content Archive In addition to the Admin experience to archive a message, we also provide GraphQL support to archive and unarchive messages Learn more about Working with Content Archive. Email Styling In the previous release, we introduced GraphQL support to update the email template. With this release, you can add styling, such as changing the font colors of the email and styling the email buttons. Learn more about Styling the Email. JWT SSO Support for Multi-Authentication We introduced the JWT SSO authentication in the 24.09 release. With this release, you can add it to your multi-authentication mechanism. Learn more about Configuring the Multi-authentication Mechanisms. Multi-theme Support via GraphQL You can now use the GraphQL API to apply multiple themes to your Community by assigning different themes to specific places (referred to as nodes in the API). Theme assignments are automatically inherited by child places. Find out more about Multi-theme Support. You Found It. We Fixed It. Abuse Management Admins can now ban members from the Content Management dashboard Private Message tab as expected. Case Portal Members no longer see a blank screen and can now successfully use the My Cases option in the Account menu to create a support case. Inbox & Messaging Broadcast messages no longer have a recipient limit. When you send a standard private message to a number of recipients that is higher than designated in the admin settings, you receive an error message that indicates the allowed number of recipients. Member Registration Administrators can now add hyphens (-) and underscores (_) to usernames without receiving an error. Custom fields now consistently appear during registration. Permissions The Manage ideas and comments permission is no longer required to update an idea’s status. Now, only the Change idea status and Read ideas and comments permissions are needed. Posts On a post, when you select the latest timestamp that is related to a comment, you are now taken to the list of comments sorted by Newest as expected. The Create Post button on Ideas, Events, and Blog pages no longer mistakenly directs you to create a discussion. When you mention a member in a post, text you include after the mention is no longer included in the mention, and the comment no longer disappears. User Interface Hover text now appears as expected when you hover your cursor over the Settings and Follow icons. The navigation bar is now updated to show that the user is signed into the community. Error pages now reliably display the correct text. Widgets The options in the Event Type filter on the Event widget are now selectable as expected. You can now successfully edit the Featured Places widget in Google Chrome. Developer Experience Fixes Incorrect page script identifiers in the groups.scripts.json file no longer triggers an internal server error. The switch branch feature is fully operational, and SDK preview is accessible for branches that have been pushed to Git. However, SDK preview is not yet available for local changes that have not been pushed to a branch. We are actively working on enhancing this functionality in an upcoming release.691ViewsSign in to react to this post0CommentsKhoros Communities: Aurora 24.10 Release Notes
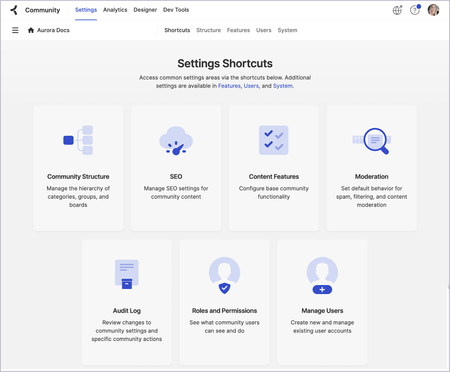
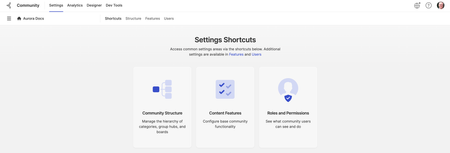
New Features Table of Contents Member Experience Community languages Administrator Experience Admin console Ranks Featured Guides Enabled KB Helpfulness by default Content filters: Ignore diacritics Replies and comments sort order Developer Experience Featured Guides Update Email Content Template Sorting Replies and Comments Bulk Data API Updates Moderation Temporary Log Information for Endpoints You found it! We fixed it! Member Experience Community languages Community pages and email notifications are now available in German, Italian, Portuguese (Brazil and Portugal), Dutch (Netherlands), Polish, and Russian. Refer to About Aurora community languages for more information. Administrator Experience Admin console In this release, we’ve made some user interface improvements to the admin area, including new shortcuts and updated icons. Ranks The userInfo member metric can be used in ranking formulas in Aurora. It enables you to include a custom field that is present on the user entity. For more information about ranking formulas, refer to Create a ranking formula and Member metrics for ranking formulas. Featured Guides With the Featured Guides widget, admins can showcase curated Guides, providing members with quick links to essential content. The guides listed on this widget allows community members to easily discover and access highlighted Guides on your community pages. They can be made available for use on designated community pages and helps drive engagement by featuring important or popular Guides. Featured Guides is enabled by default, and you can add up to 100 guides to the Featured Guides. Learn about configuring this widget Learn about configuring this widget with APIs Enabled KB helpfulness by default In this release, the "KB Helpfulness" rating, which was previously available as an option, is now enabled by default for all Aurora Communities. This ensures that members can effortlessly provide feedback on knowledge base articles to promote continuous improvement and better content quality across the community. Content Filters: Ignore diacritics When you create or edit a content filter, you can now specify whether you want the filter to ignore diacritics or to recognize characters with diacritics as unique characters. For example, when you turn on Ignore diacritics, “chëēse” and “cheese” are treated as the same word. If you do not turn on this option, “chëēse” is not recognized in a filter that prevents a user from posting the word “cheese.” Keeping this option off is useful for communities with diverse languages to allow more precise moderation of words with diacritic variations. To enable this setting: Go to Settings > Features > Moderation. In the left column, select Content Filters. If you are adding a new filter with this setting, select Add Filter. If you are enabling this option on an existing filter, open the Options menu for the desired Filter Name in the list and select Edit. Turn on Ignore diacritics. Select Add or Save depending on whether you added or edited a filter. Refer to Set up content filters for more information. Replies and Comment sort order Admins now have the ability to customize the sort order for replies and comments at both the community and board levels, offering control over how content is organized and displayed to members across different content types. This setting is under Settings > Features > Content Features > Replies and Comments. Members can choose to see comments in their sort order of their preference. It can be done from Settings > Preferences under the Options menu. A member’s preference takes precedence over the defaults set on the board. For example, if a member has chosen to view replies and comments in Oldest to Newest order, but the admin has set the default to Most Liked, the member sees them displayed according to their personal preference of oldest to newest. If members choose the Community Default option, the admin's settings apply across all boards. Also, members can change the order from the community post page containing comments or replies. Changes to the sort order on the post page are saved in member’s preferences. Note: By default, the admin setting is set to order by Most Liked, and for members, it is set to Community Default. Learn more about replies and comments Developer Experience Featured Guides In addition to the Admin experience in this release, we also introduce the GraphQL support for the Featured Guides feature. With this feature, admins can: Feature specific guides on any page of your community. Search for a featured guide. Delete a guide removes its association with the featured guides and its relevant article. Learn more about Working with Feature Guides. Update Email Content Template With this release, we introduce the ability to update the email content template using GQL. With text keys, you can: Update the email content as per your preference Remove the email text key Learn more about Updating the Email Content Template. Sorting Replies and Comments In addition to the Admin experience in this release, we also introduce GraphQL support for sorting the replies and comments. Learn more about Sorting the Replies and Comments. Bulk Data API Updates With this release, we are adding Badge related action and its field information to the Bulk Data API V3.0. Learn more about Bulk Data API (v3.0). Moderation We have added a new moderation guide that covers all the mutations and queries for spam and abuse management. Learn more about Working with Moderation and Working with Content Filters. Temporary Log Information for Endpoints In this release, you can download the temporary log information for your custom endpoints. Learn more about Working with Endpoints. You found it. We fixed it. KB Guides The article count for a chapter of a KB guide now shows correct count when more than 25 articles are added. Widgets Alt text for banner images in blog posts now appears correctly in the Featured Content widget when the image is not rendered. Selecting the Most Recent, Most Viewed, or Most Likes filters in the widget now dynamically loads the relevant content within the widget without reloading the entire page. Selecting Show More on a widget no longer prompts the member profile preview to pop up. The Tag widget displays the correct count without a page refresh, eliminating incorrect counts caused by caching. Accessibility The Marked as solution element on community pages is now displayed as a tag instead of a button. Buttons like Attachments and Remove File now have clear, descriptive labels for screen readers, improving navigation for users with disabilities. Content that appears on hover or focus, such as file type information, can now be dismissed with the Escape key or by moving focus, ensuring it doesn't obscure other content. Tooltips remain visible until dismissed by the member, helping low-vision or cognitively impaired users read the content without it disappearing too quickly. Publishing content Members are no longer blocked by incorrect flood limits when posting multiple messages within the allowed limits in the community. The page heading in the banner now follows the H1 font styling specified in the Theme as expected. Enabling read-only mode now successfully hides the edit option from the Options menu for replies and comments. Selecting the +Tag button on mobile devices no longer causes the keyboard to rapidly open and close on Android, and it appears as expected on iOS. You can now successfully publish a post that contains a hyperlink within a spoiler tag without receiving an error. The experience of adding new columns to a table in the content editor is improved. When you use a Hidden input type within a form to include information the user doesn't manually enter or change themselves, the input box and associated label are now hidden as expected. Non-admin members can now upload a cover image and save their message without an intermittent permission related error. .har and .cer are now supported as attachment types on posts and cases. When content mentions are disabled and a member does not have permission to add them, the mention flow is no longer visible or accessible. Members are no longer blocked by errors faced while inserting videos with "youtu.be" URL format. Private messages Windows in the Inbox (such as the Create New Message window) are now displayed correctly for all screen resolutions. When you send a private message to another member, the emoji search now works as expected. Images We resolved an issue that intermittently prevented images from loading successfully. Notifications When you click the Notifications (bell) icon, the in-app notification feed now populates correctly even when one of the notifications is from a deleted community member. Spam management Words blocked in a content filter can no longer be used in a group ID. Posts in the Abuse Dashboard with short content now display the See More option, enabling moderators to view content directly from the dashboard without the need to go to the post’s page. Security Internal hostnames and Cloudfront domains are no longer indexed or exposed by Google, preventing access to broken pages when members click these links in search results. Local changes to a custom React component on a non-production instance no longer cause errors through the Content Security Policy. The password validation tooltip now appears during registration as expected. IP address text in My Settings > Security and Account no longer overlaps or spills outside its box boundaries. APIs The API to fetch the total count of members of a group along with sort now returns the correct count. A null "use" parameter during JWT signature validation no longer causes validation to fail. SDK linting no longer fails when encountering an empty directory or no matching files. The SDK now supports Windows for GraphQL operations, as expected. Stage instances no longer require a restart to pick up endpoint changes. Community performance Replies now load smoothly without flickering, and selecting Show more loads additional replies without reloading the page or displaying a blank screen; avatars also no longer reload frequently. Members no longer receive a 502 proxy error when visiting their communities. On Windows machines, the emoticon plug-in no longer causes slow loading times on the page.1KViewsSign in to react to this post2CommentsCommunity Aurora 23.6 Release Notes
Aurora Video Tour We've put together this video training course to help you get familiar with key features and concepts about Khoros' re-imagined Community Experience. This 12-video series is grouped into three community personas: Managers Moderators Members The entire course takes about 1 hour to complete. Note: We will be updating these videos and adding new ones as we continue to roll out new Aurora features. Subscribe to this article to be notified when new videos are available. Member Experience Content Workflow for Knowledge Base articles and Blog posts We are excited to announce the release of a content workflow system to publish Blog posts and Knowledge Base (KB) articles. This 3-step content-creation workflow provides for authoring, editing, and publishing to focus on collaboration and usability. You now have more granular control over author, editor, and publisher permissions, enabling you to clearly define who can perform each task in the publishing workflow. Each blog post or KB article moves through different states, and members can view the latest state of articles and blog posts via Manage Content Dashboard. This flowchart shows how an article moves through the publishing workflow and the tasks members with specific roles can perform. Feature Enablement Admins can enable content workflow in your community. To enable it, go to Account menu > Settings > Features > General and enable Content Workflow. Learn more on how to enable Content Workflow in the community. Key Features Granular Permissions: After you enable the feature, you can see different roles to support the Author, Editor, and Publisher content roles for the purposes of creating, reviewing, and publishing, respectively. The roles include BlogAuthor, BlogEditor, and BlogPublisher as well as KBAuthor, KBEditor, and KBPublisher. 3-step workflow: After you assign the above roles to members, every draft will go through the process of publishing articles with a 3-step workflow that provides for authoring, editing, and publishing. Below is an example of a blog post’s draft page that was written by a member with a BlogAuthor role and submitted for review. You can see the status of the draft, version number, and perform further actions depending on your role in the workflow process. Different states of a draft in the workflow process: Draft: Article or blog post has been created or edited but isn't ready to be reviewed or published. Awaiting Review: Article or blog post draft is ready for review. Awaiting Publication: Article or blog post has been reviewed and is ready for approval and publication. Published: Article or blog post has been published. If this article or blog post was a revision for an already published article or blog post, this new version replaces the previous version in the community. Version History: Click Version History on the draft page to track every action performed on a draft or an article or blog post until it is published. This records what action was done by whom and at what date and time. Manage Content Dashboard: From the Manage Content page, you can track a draft of an article or blog post’s journey in the publishing workflow. You can also take relevant actions from here. Note: Email notifications are not sent to members when the draft’s state changes. This feature will be available in a future release. Learn more about Content Workflow for blog posts and KB articles. Email Notifications for Ranks You will now receive an email notification when you achieve a new rank. Learn more about email notifications and how to manage them. Reporting Private messages Members can now report private messages that they find inappropriate. In a private message, they can either report an entire conversation or a specific reply they find inappropriate. To report a private message: Sign in to the community and click the envelope icon to go to the Inbox. In the left panel, click the message you want to report. To report an entire conversation, click Options icon > Report Conversation next to the root message. To report a reply, click Options icon > Report Message next to the reply. (Optional) In the Report Conversation or Report Message window, enter the Details about why the message is inappropriate. Click Report. After you report the message, the message is sent to the Abuse tab under Content Management dashboard, where a Moderator reviews and confirms or ignores the reported message. Learn more about reporting inappropriate private messages. Auto-suggest Similar Posts With this release, when you try to create new content (Forum discussions, Blog posts, or Knowledge Base articles) and the title of the content matches any posts that already exist in the community, an “i” icon is displayed that you can click to view a list of similar posts. With this, you can avoid creating duplicate content in the community 8393092687.png Administrator Experience Inbox permissions The Inbox permission previously named Send and receive private messages has been updated to Send private messages. If the Private Messages feature is enabled for an Aurora community, members will always be able to receive private messages. Therefore, the permission no longer includes "receive." Additional Inbox privacy settings for members will be available in a future release. Learn how to configure private message settings and permissions for the community. Member Permissions Lookup With the new Member Permissions page, you can look up the permissions and roles of an individual member of the community to see what they have access to do. You can also assign them to more roles (or remove them) from this page. Note: You cannot change the individual permissions of a member. Instead, you must add them to roles that have the permissions you want that member to have. If you want a member to have unique permissions, create a role just for that member and adjust the permissions as desired. To look up a member’s roles and permissions at the community level: Note: If you want to look up a member’s permissions at a category, board, or group level, you must select that place in the place picker first on the Roles and Permissions page. Go to Settings > Users > Roles and Permissions. In the left column, click Member Permissions Lookup. In the field, enter the username of the member whose permissions you want to view. On the Member Permissions page scoped to the community level, view Member Information, Community Roles, Group Roles, and Community Permissions. Roles are shown with the level at which they were assigned, and permissions show the grant or deny status in addition to the role that granted or denied that permission for the member. Note: When you have chosen a lower-level place, instead of Community Roles, you’ll see Category Roles (this section also contains roles for lower-level places within the category), Knowledge Base Roles, Blog Roles, or Forum Roles. Also at lower levels, you’ll see Category Permissions, Group Permissions, Knowledge Base Permissions, Blog Permissions, or Forum Permissions. At the board level (Knowledge Base, Blog, or Forum), the Group Roles section is not available. (Optional) In the Community Roles area, you can also assign more roles to the member or remove existing roles from the member. Note: When you have chosen a lower-level place, any roles you assign or remove are applied only at that level. For more information, see Look up a member’s roles and permissions. Edit Community Info Admins can now change the name of the community within the site structure. Go to Settings > Community Structure, and then click the gear icon. On the Edit Community Info window, enter the updated name in the Community name field. See Change your community’s name. Ranks updates To improve the rank experience, we’ve made some changes to what is supported during the rank creation process. At this time, to establish the best quality images, only PNG rank icons are supported. Additionally, to ensure that no community members are granted access to more permissions than they should have, and alternatively that no community members are revoked access to permissions they should have, the option to add or remove the Administrator or Moderator role via Ranks is not available. To learn more about Ranks, see About member Ranks and ranking formulas. Rank Filter in Analytics Dashboard In the Aurora 23.5 release, we introduced a filter option in the Analytics Dashboard to filter by Roles, New topics, and User Name. With this release, we’ve added the Ranks filter. Learn more about filtering your dashboard. Community-level configurations in Analytics dashboards You can now configure the Trending Discussion Definitions configurations as well as the staff roles for your community. Persistent values in the Trending Discussion Definitions configuration: The values you set for the Trending Discussion Definitions configurations in the Analytics Dashboard settings will persist until you manually change the values and save again. Defining staff roles: With this release, we've introduced an Exclude Employee feature, which allows you to filter out the metrics corresponding to staff members, identified by specific role(s). You can search for and select the roles in the Employee Roles field in the Dashboard’s settings. As an example, let's consider the roles "Admins_Org_StaffOnly" and "AnalyticsUser_Org_StaffOnly," which are designed exclusively for administrators and analytics members who are employees or staff of your organization. Enter these roles in the Employee Roles field in the Dashboard’s settings and click Save. Now, navigate to the Dashboard and scroll down to the Observing vs. Participating vs. Contributing Members trend chart. When you don't enable the Exclude Employees option and hover your cursor over the trend lines, you see the count of engagement from all community members for a specific date. If you select the Exclude Employees option, the trend lines provide the actual count of engagement solely from your community members, excluding any contributions from employees or staff within your organization who have the "Admins_Org_StaffOnly" or "AnalyticsUser_Org_StaffOnly” roles. Learn more about the Exclude Employees filter. Note: The Exclude Employees filter is available only in the Observing vs. Participating vs. Contributing Members widget. This option will be available in other widgets in future releases. Visits by User Type widget (Member vs. Anonymous visits) The Visits by User Type widget gives you the number of signed-in and anonymous users visiting your community. A trend widget also shows the trend of these visits in your community. You can see which area in the community contributed to a spike in its visits. To have a better understanding of these numbers, click the date to which you want to compare the change. A window opens that displays the counts for Visits, Previous Visits, and the % change for these visits in a tabular format for that date. By default, the table shows the count for signed-in members. The first row displays visits metrics for the landing page of the scoped place that you set in the Dashboard Settings. To view the visit metrics by boards , select the Visits by boards checkbox. To view the visit counts for each of the topics in these boards, select the Visits by topics checkbox. Similarly, you can view the visits metrics by boards or topics for Anonymous users. Learn more about Visits by User Type Registration and Sign-in settings In the Registration settings, admins can now ensure that new members of the community are automatically assigned a role. From the account menu, go to Settings > System > Account & Privacy. In the Registration section, turn on Auto-assign role upon registration and click Edit. On the window, enter the role you want to assign to new members. Admins can also now turn on the option for community members to stay signed in to the community. From the account menu, go to Settings > System > Account & Privacy. In the Sign in section, turn on Keep me signed in. With this setting turned on, members of the community can select the Keep me signed in checkbox on the Sign In window. Learn how to configure registration and sign-in settings for the community. Content filters Sometimes, members post objectionable content that might offend other members and negatively impact the community’s overall health. Objectionable content can include inappropriate language or any other terms you might not want to be displayed. Aurora now offers content filters as part of its moderation tools to prevent objectionable content from appearing in posts, replies, tags, private messages, profile information, and member registration. When members use inappropriate words across the community, the content filters identify them and prevent the content from being published or replacing the words with pre-defined replacement terms. Aurora includes several default filters that can be triggered when someone registers, posts, adds a tag, sends private messages, or updates their profile information. You can add terms to these default filters or edit default filters as needed. You can also create new filters to perform various actions when the filter terms are identified in the community: Do not allow: Prevents members from posting content or replies, registering to the community, adding tags, updating profile information, and sending private messages until the filter term is removed. This more heavy-handed approach runs the risk of either challenging members to find a way to defeat it or alienating them. When a filter term is identified, the following error message is displayed: Replace term: Replaces the offensive term with another term. This is the most common way of handling smut filter infractions. You can configure what term to replace words that match this filter in the Replacement term field. When the filter term is identified, it is replaced with the configured term after you post the content. Check inline HTML and do not allow: Prevents the members from posting anything that contains a filtered term after ignoring inline HTML. For example, the term “crap” written in inline HTML format, “c<b>r</b>a<br>p” in any new post is identified as the filter term after ignoring the inline HTML. Take no action: Does not take any action on the filtered terms that appear across the community but records them in the Content Filters dashboard for moderators to review the usage of these terms in the content. Admins, Moderators, and members with appropriate permissions can access the Content Filters in the Moderation settings area (from the Settings > Features > Moderation). The Content Filters tab includes the default filters as shown below: To add a new content filter, click Add Filter. Learn more about content filters and setting up the content filters. Managing reported private messages To manage inappropriate private messages reported by members, moderators (and other members with the appropriate permissions) can go to the Abuse tab on the Manage Content dashboard, accessible from your Account menu: On the Abuse tab, go to Filters and select Member for Reported by and Private Messages for Found In: Learn more about managing reported private messages. Manage URL redirects for Community pages Over time, content on your community changes, moves, is deleted/archived, or is replaced. When this happens, you want to make sure that the web searches don’t show results that go to obsolete or missing pages. Or, sometimes, you might want to point people to newer or more relevant content. To help optimize these search results and make sure that people get to the right content, you can create redirect rules. Redirects enable you to keep the page and link authority of your website when a website’s URL is redirected to another URL for any reason. The most common types of redirects are 301 (permanent) redirects and 302 (temporary) redirects. Permanent redirects are for the pages that you do not want to retain and might want to permanently delete. Temporary redirects are for the pages you plan to keep in place for a finite time period. Admins and members with the Manage Redirect Rules permission can access the Redirect Rules section on the SEO Settings page (Settings > System > SEO). To add a redirect rule: Sign in to the community as an Admin. Go to Settings > System > SEO. Click Add Rule. The Add Rule window opens. Enter the Source and Destination URLs. (URLs must be from one of your company’s community pages.) Select Redirect Type: 301 (Permanent) or 302 (Temporary). Click Save. Note: It takes an hour for the redirect rules to be reflected on the site. Learn more about Redirects Rules. Review tags added in the Community From time to time, you may want to review the tags used across the community to understand how the content is being categorized and organized. It can also help you understand members' engagement and contribution to the community. Admins and members with the Manage Tags permission can access the Tags tab on the Manage Content dashboard, where they can review the complete list of tags. To review tags added in the community: Sign in to your community as a Moderator. Open the Account menu and go to Manage > Content. The Manage Content page is displayed. Go to the Tags tab. By default, The Tags tab is displayed with the list of tags that are associated with posts across the community. When you scope the tab to a different node, the Tags tab lists the tags that are associated with the posts of the respective node. Learn more about reviewing tags added in the community. Developer Experience Dev Tools admin page The Dev Tools admin page is where you develop and test custom solutions for your Aurora community. This area includes a Git flow command guide, an SDK token generator, and a branch-switching tool for validating any updates. Think of it as your one-stop shop for your development teams. To access the Dev Tools page, open the Account menu and click Dev Tools. Refer to our Dev Tools documentation for more information about: Navigating the Dev Tools Admin Understanding Development Flow for Aurora customizations Generating an SDK Token Operating branch switching to preview changes Quilt Overrides You can customize Quilts in Aurora using overrides that can be applied to your community through either GraphQL mutations or directly through your community's GitHub repository. Our Developer Docs Portal now includes guides to help you: Become introduced to the concept of Quilt overrides in Aurora Create and update Quilt overrides via GraphQL Create and update Quilt overrides manually Add a background image to a Quilt Delete an existing Quilt override Theme Overrides Theme overrides enable you to take the default Aurora theme and customize it to meet your brand's needs. While you can override the default Theme using Aurora Designer, we've made it possible for you to create and manage your custom themes through GraphQL mutations as well as via your community's Git Repository. In the new Working with Themes chapter of the Developer Docs Portal, you can learn: How to create or update a theme using GraphQL or Git Which Theme fields are available for customization How to add an asset to a Theme How to assign a theme to a specified Quilt template How to set a new default theme How to delete an existing theme How to delete a theme Quilt scope API Tutorials We have added five tutorials to enhance the developer experience. Create a Blog Article Update a Blog Article Create a Knowledge Base Article Update a Knowledge Base Article Delete a Forum, a Blog, or Knowledge Base Article588ViewsSign in to react to this post0CommentsWhat's changed in Aurora from Community Classic
This article captures some of the high-level changes (terminology, features, and concepts) that have changed (or will be changing) in Aurora from Community Classic. Terminology changes For Aurora, we have updated several terms that were previously used in Community Classic. Kudos are now called Likes. Subscriptions are now called Follows. Discussion Styles are now called Content Types. Content Types is the collective term used to describe the different types of boards community supports (forums, knowledge bases, blogs, etc.). Group Hubs are now called Groups. Tags and labels have been combined are now just all called Tags. There are two types of tags (preset and freeform). Tool changes and enhancements The site-building tool Studio has been replaced with Designer and Dev Tools. In Aurora Designer, you can edit your site’s Theme and manage Page Templates. In a future release, you'll also use this area to manage Email Templates and text strings. In the Dev Tools, you will find the tools needed to develop and customize your site. The Content Editor has been enhanced with several new features and meets accessibility requirements. Auto-save is enabled by default for all content types. Members have access to full version history of content with the ability to Delete, Edit, Compare, and Restore versions. Integration with Unsplash image libraries for Blog cover images and Page Template sections. Community Analytics is no longer a separate tool and now is built into the Community application. Where did it go? Not sure where something moved to? Here’s a list of some of the bigger things that have moved to a new place in Aurora: Admin Settings: Several of the settings pages have been simplified (or removed) and grouped differently. Settings pages that used to be in the “Community Admin” or “Admin” area are now available under Settings. Each card (tab) groups related settings into a new page. As we continue to build out more Aurora features, more cards/tabs will be added to the Settings area. Content Management Areas: Most content-related management tasks (find and edit drafts, review and manage reported abusive content, Spam Quarantine, and Moderation) are now performed from the Manage Content space: Developer Experience Aurora is built on the philosophy that internal and external developers should have access to the same development tools, empowering everyone involved with your community's user experience while providing a seamless, simple, and powerful SDK to help you get the most our of Khoros Communities. Why React? We chose React to power the web layer of our technology stack because of its ubiquitous nature and powerful built-in toolset. React, coupled with React Bootstrap, offers developers the ability to create powerful customizations to the user interface without losing out on the popular Bootstrap DLS that has been a part of the success of Khoros Communities over the years. Add the powerful Apollo Client state management library makes takes the communication between your React components and your community's data to the next level. It provides GraphQL call management, a catchable data store that monitors and responds to data updates. This update gives developers a better toolkit without taking away some of the most popular time-saving capabilities our developer community has come to appreciate. Why GraphQL? GraphQL is the query language for all of Aurora's APIs. This solution is consistent across our entire user interface, giving external developers the same backend experience we use to create Aurora's built-in features. REST API served us well in Khoros Communities for many years, but in Aurora, we wanted to give developers access to a more precise, flexible, and capable API to make data more accessible across the board. Where communities once relied on custom REST endpoints or multiple individual calls to retrieve necessary data, GraphQL can handle multiple operations at one time, and return only the data you need when you need it.3.4KViewsSign in to react to this post8CommentsCommunity Aurora 24.2 Release Notes
Member Experience Badges Community members can now earn badges based on their participation and actions in the community. These badges are featured on the top of the Member Profile: Click View All Badges to see a complete list of badges for that member. Badges are included in badge sets so that you can view your own or other members’ progress in the set. To learn more about badges, see About Badges and Badge sets and View badges from the member profile. Badge Notifications Starting with this release, you will receive in-app notifications regarding badges you earn. When you click the notification, you are redirected to your member profile where you can see featured badges. From here, click View All Badges to see a complete list of your earned and yet-to-be-earned badges. You will also receive updates about earned badges in your digest emails. Note: Other email notifications for badges may be available in a future release. See About Notifications for more information about in-app notifications and About Email Notifications for a list of email notifications. Enhancement for reporting inappropriate content With this release, we’re improving the member experience around reporting inappropriate content to ensure compliance with the Digital Services Act (DSA). It is essential to maintain the cleanliness of the online communities and ensure a curated experience free from inappropriate content such as objectionable images, abusive language, spam, harassment, and more. We have enhanced the Report Content reporting feature to align with DSA standards, empowering community members to report undesirable content. Now, they can report community posts (including comments and replies), Private Messages, and Member Profiles. Anonymous reporting is available for both posts (including comments and replies) and member profiles, ensuring a safer and more compliant online community experience. Note: To enable this feature, contact Support. With this enhancement, users can choose the reason for reporting the content. Moderators can view this report in the Manage Content dashboard on the Abuse tab. From the Abuse tab, moderators can either approve or reject the report or mark the content as spam. Similarly, users can report: Private Messages Member Profiles When users report a post/member anonymously (without signing in), they'll be prompted to enter their Name and Email address. This feature comes with a reCAPTCHA protection. Note: To enable reCAPTCHA protection, contact Support. If it's a registered email ID, members are asked to sign in before reporting; if not, they can proceed with reporting the content anonymously. Learn more about reporting inappropriate content Administrator Experience Badges Administrators can now create badge sets and badges for their Aurora communities to encourage members to use different community features and spend more time engaging with the community. Note: The ability to migrate badges from Community Classic to Aurora will be available in a future release. A badge is a type of visual reward that community members can earn for completing specific community actions or for achieving important community milestones. Badges are a great way to encourage members to use different community features and spend more time engaging with the community. Badge sets are groups of related badges that are often used to reflect progress in a particular achievement. For example, a badge set titled “Likes” could have badges in it that reflect a member receiving 10 likes, 20 likes, 50 likes, 100 likes, and so on. Badges in a set could also be related in a different way that does not require a progression, such as in a badge set called “Helping Hand,” in which there is a badge for creating a post, a badge for replying to a post, a badge for receiving a like, and a badge for having an accepted solution. To create badges and badge sets: Go to Settings > Users > Badges. Click Add Set. On the Add Set window, enter a Name for the set. Click Add. Add badges to the set as desired by clicking Add Badge and filling out required fields. For more information about Badges, check out the following articles: About Badges and Badge Sets Create badge sets and badges About badge rules and supported badge criteria Feature badge sets on the member profile Delete badge sets and badges View badges from the member profile Enhancement on events With this release, we have introduced the following features for the Events content type: Event reminder The Events reminder feature automatically sends an email reminder before the start of an event to all attendees' registered email addresses. This reminder is sent exclusively to those members who have responded that they will attend the event. To set this notification, go to Settings > Features > Event and edit the Send event reminder (minutes) option. By default, this is set to send reminder emails to all attendees 30 minutes before the event starts. This notification is sent to the attendee’s registered email address. Internet Calendar Scheduling (ICS) file support: Click the Add to calendar option to download ICS files, and add community events to any other calendars of your choice. This file downloads only the upcoming events. Learn more about Events Enhancements on moderation Bypass moderation Members generally want to post content without moderation review. With this release, admins can grant the Bypass comment moderation permission, allowing users to post or comment without moderation review. This option applies when the Moderation type is Selective or Required. See the screenshot below for the Discussion (forums) permission. This setting can be applied to all discussion styles. Learn more about configuring moderation modes for various content types Learn more about Moderation Moderate content at board level As of today, moderators can moderate content at the community level. With this release, they can opt to moderate content at any node or board level. To grant or deny this permission, go to Options menu > Settings > select the category (or board) > Category(or board) Permissions > Edit > Moderation. Addition/ deletion of tags while moving content Previously, tag settings of the board were not considered when moving content across different boards or when moving a reply as a topic within the same board. With this release, you can now move content while honoring the destination board's tag support status or requirements. Learn more about moving tagged content Enhancement on Analytics Events dashboard With this release, we introduce the Events Dashboard. This dashboard shows the metrics related to Events in the community. Click View Details on the Events widget on the main dashboard. Alternatively, go to Options menu > Analytics > Dashboard > Events Details to view Events related metrics for the selected place and time period: 180.png Breakup of Ideas – Since last update date In the 23.12 release, we introduced the Ideas by Age widget, which displayed ideas grouped by the time since their creation. With this release, we've enhanced it to also allow grouping ideas by the time since their last status update. You can specify a maximum time limit in the dashboard settings for the Ideas by Age chart. This setting determines the range of time considered for grouping ideas. The data shown in the Ideas by Age chart adjusts based on the maximum time limit set in the dashboard. In the above bar chart, 8 ideas had their last status update 3 months ago. The default maximum time limit is set to 6 months. For the above bar chart this is set to 12 months. All the ideas that had their last status update or were created 12 months ago or earlier, will be grouped together. Learn more about Ideas by Age chart Idea Status Set trend In this release, we've introduced the Idea Status Set trend widget on the Ideas Dashboard (Options menu > Analytics > Dashboard > Ideas Details) to display the change in Status Sets and Statuses of ideas. Idea Status Set/Idea Statuses: When the dashboard is scoped to the community or to a Group, the widget shows the trend along with the breakdown of ideas based on Idea Status Set. When the dashboard is scoped to a specific Idea board, the widget shows the trend along with the breakdown of ideas based on the Statuses defined for that board. Khoros Connector for Salesforce With this release, we have introduced the following enhancements to Salesforce connector: Escalate discussions to Salesforce: This release offers both manual and automatic options to escalate Forum discussions to Salesforce. These options cater to member preferences and ensure timely resolution of critical issues, allowing for tailored management of discussions within Salesforce. Manually escalate discussions and replies to Salesforce: Enable members to manually escalate forum discussions as a case to Salesforce, ensuring only relevant issues are escalated. Automatically escalate discussions and replies to Salesforce: Set up automatic escalation for timely resolution of discussions, especially those raised by members with elevated roles or requiring prompt attention within the community. The screenshot below shows the various options available to automatically escalate forum discussions and replies: View details of the Salesforce case: Members with permission can view the details of the escalated case: Case portal field customization options With this release, you can enable members to access and update custom Salesforce fields directly within the case portal and streamline the process of managing cases.. Below are the new custom fields introduced with this release for Create Case, Case details view, and the Case Portal pages. Learn how to add these custom fields Learn more about Enable and configure Case Portal in Community Community Email settings The Aurora Community sends emails for a variety of notifications. With the new Email settings provided in this release, you can specify the sender name and address for these emails. To edit the community name and email address that displays in community emails: Go to Settings > Features > Inbox > Email. Click Edit. Enter the Mailer Sender Email Address and Mailer Sender Name to display in the “From” field on email messages. Click Save. For more information about email settings, see Edit the Aurora community email sender name and address. Add a custom font to your theme In a previous release, we added the ability to paste code from Google Fonts so that your community’s theme could use a custom Google Fonts family. With this release, we are providing the ability to upload your own custom font family file. To add a custom font family via file upload: In the Fonts panel, click to open the font picker in the Headings or Body text section depending on which type of text should use the new font family. Click Add Custom Font. Click Upload File. In the Font file field, click Browse to locate the font file on your local machine. (Optional) Edit the pre-populated Font family name field. In the Style drop-down menu, select the desired style for the font. Click Add Font. To learn more about your theme’s font settings, see Set the font style and size for your community. Places widget: small card layout When you select a Layout of Card for the Places widget, you can now select Small as the Card size. To change the Places widget card size to small: Navigate to the page template where the widget is located or where you want to add the widget. Add or edit the Places widget. Select a Layout of Card. Select a Card size of Small. Save and publish your changes. See Places widget configuration for more information. Featured Idea Statuses widget: click status names We’ve enhanced the Featured Idea Statuses widget so that members can click a status name to view the All ideas page scoped to that status. On this page, the member can then view all ideas currently in that status. To learn more about the Featured Idea Statuses widget, see Featured Idea Statuses widget configuration and Feature content, places, and idea statuses on a page. Developer Experience Update to Salesforce integration In the 24.1 release, we introduced the integration of Salesforce and Khoros Community. In this release, we have introduced two updates to the Salesforce integration. Escalations: To ensure timely resolution of your discussions Custom Fields: To add your custom fields to the case portal Escalations We have added the ability to escalate your discussions to Salesforce, either manually or automatically based on the configuration. Learn more about Using escalations. Case Portal custom fields We have introduced custom fields where you can provide different field names for Salesforce based on your preferences. Learn more about Creating custom fields in Salesforce Case Portal. Report Abuse User Profile As discussed in Enhancement for reporting inappropriate content, we have added Reason and Reported For as mandatory fields to report an abusive user profile. Learn more about Report User Profile as Abuse. Custom Fields In this release, we have added the new custom fields where you can define and implement the custom field configuration into LIA and GraphQL. Custom fields are defined using the custom field descriptor and custom field container descriptor. Learn more about custom fields in our detailed developer documentation: Introduction to Custom Fields Creating or Updating Custom Entity and Field Definitions Deleting Custom Entity and Field Definitions Custom Field Descriptor File Format Custom Field Container Descriptor File Format Setting Custom Fields on Different Entities Retrieving Custom Fields for Different Entities Querying for Different Entities Using Custom Fields Badges As described in the Badges section, we have introduced the Badges feature. Using the badges feature, you can: Know about the badge rules and supported badge criteria Create a badge set View badges from the member profile Edit a badge set Delete badges Learn more about Badges and Using a badge set and a badge.1.4KViewsSign in to react to this post12CommentsKhoros Communities: Aurora 24.07 Release Notes
Member Experience Knowledge Base (KB) Guides We're excited to announce the release of KB Guides. KB Guides is designed to enhance the way you host and navigate knowledge base content within your online community. KB Guides offer a structured and user-friendly approach to presenting valuable information, making it easier for members to find what they need. With KB Guides, brands can efficiently organize and share resources such as training materials, onboarding documents, FAQs, and more. This ensures a seamless and informative experience for community members, helping them access relevant content effortlessly. As a member, you can enjoy a structured and efficient learning experience with easily accessible and followable content, enhancing your learning outcomes. The KB Guides can be created on the Knowledge Base board for members to view and read. By selecting the KB Guide, they can navigate through the set of articles that will guide them in achieving a particular goal. Depending on the way the KB Guides are created, members can either: view and navigate the content in the sequence you prefer: have a structured and efficient learning experience with easy to find and follow content, improving their overall engagement and learning outcomes. In this example, the Guide titled “Analytics Guide” contains two Chapters: “Analytics Dashboard” and “Reports,” and an article: “Metric Definitions.” The “Analytics Dashboard” Chapter includes two articles, while the “Reports” Chapter comprises five articles. The Chapters are expanded to display the list of their articles. The Guide also has a standalone article, “Metric Definitions.” Note: With the introduction of KB Guides, the Articles feature does not change. Every article is independent, giving members the ability to like, follow, tag, and publish. With KB Guides, articles can be related to each other, sorted, and ordered into Chapters. Here's how KB Guides are enabled. Learn more about: KB Guides Adding KB Guides General Actions on Guides Audit logs on CRUD action on Guides, chapters and articles Notification Options for Message and Reply Actions To comply with DSA requirements, we've added a feature that notifies members when their replies or comments are edited, moved, or deleted by members with appropriate permissions. Additionally, all members who have replied to the post will receive these notifications. Below is an example of the confirmation message you receive when you try to delete a comment on an article. Members will receive email notifications on their registered email address. A similar confirmation window opens when you try to edit or move replies or comments to any content in your community. Content Workflow and Approval enhancement We have streamlined the Content Workflow and Approval process to minimize the steps involved in publishing blog posts and articles based on their status and the permissions the member has. Member permissions Article Status Members can Blog or KB Author, Blog or KBEditor, and Blog or KBPublisher In Draft Publish the draft at any stage Blog or KBEditor and Blog or KBPublisher Awaiting Review Publish the draft directly Email language In localized communities (see About Localized Communities), members can now indicate in which language they want to receive their email notifications. To adjust your email language in a localized community: Open the Account menu and select My Settings. Select the Preferences tab. Scroll down to the Language area and select your preferred Email language from the drop-down list. Select Save. Refer to Manage community preferences for your account for more information about adjusting your preferences. Administrator Experience Knowledge Base (KB) Guides As mentioned above, we have released KB Guides, designed to enhance the way you organize and navigate knowledge base content within your community. As an Admin, KB Guides enables you to: Manually sort knowledge base articles on the KB board by dragging and dropping them into the desired order. This enables members to view and navigate the content in the sequence you prefer. Create a hierarchical structure for listing and ordering articles into Guides and Chapters to enhance organization, improve navigation, and provide a more structured learning experience for members. In this example, the Guide titled “Analytics Guide” contains two Chapters: “Analytics Dashboard” and “Reports,” and an article: “Metric Definitions.” The “Analytics Dashboard” Chapter includes two articles, while the “Reports” Chapter comprises five articles. The Chapters are expanded to display the list of their articles. The Guide also has a standalone article, “Metric Definitions.” Notes: With the introduction of KB Guides, the Articles feature does not change. Every article is independent, giving members the ability to like, follow, tag, and publish. With KB Guides, they can be related to each other, sorted, and ordered into Chapters. Until you add an article to a KB Guide, the guide will not be visible to members. Audit CRUD logs. We have included comprehensive audit logging for all Create, Read, Update, and Delete (CRUD) actions. The following actions will be recorded in the audit log: Guides: Added, moved, deleted, and reordered Chapters: Added, moved, deleted, and reordered within/to guides Articles: Added, moved, deleted, and reordered within/to chapters or guides Additionally, audit logs cover actions taken on Manually-sorted articles, including: Adding articles Clearing the list Reordering articles You can access the audit logs from Settings > System > Audit logs Hide Guides that are not yet ready to be published in the community for members to view. When creating a KB Guide, and drafting articles, you can choose to hide the work-in-progress guide from the community. When you’re ready, select Unhide to make it visible in the community. Enable Knowledge Base (KB) Guides in your community KB Guides are enabled by default in Communities Aurora v24.07 and above for all communities using Knowledge Bases. Permissions Members with the Create, edit, publish, and manage articles permission on the knowledge base board can add a KB Guide to it. Guides widget In conjunction with the release of the KB Guides feature, we are providing the Guides widget on Knowledge Base Dashboard page templates. This widget enables you to organize your content either by Guides or by Manually-sorted Articles. To add the Guides widget: In Designer, open the Knowledge Base Dashboard template where you want to add the widget. On the template, locate the area where you add the widget and select Add widget (plus icon). In the Edit Widget panel, select Content. Select the Guides widget. Configure the widget as desired. Be sure to set the Type as per your requirement. To view articles as a: Type Structured guide Guides Manually-sorted list Manually-sorted Articles Save and publish your changes. For more information about configuring this widget, refer to Guides widget configuration. Add KB Guides After you add the widget, navigate to the Manage Content page and select the KB board where the widget was added. On the tab labeled Guides, you can add, organize, and reorder articles to determine their appearance in the Guide. From here, there are 2 methods in which you can organize articles: By selecting the Guides option By selecting the Manually-sorted Articles option By selecting Guides option: Use this method to create a structured Guide with Chapters and Articles inside the Chapters. Add a Guide: Select Add Guides to add a Guide. You will be prompted to give a title to the Guide. Here is an example of a KB Guide created: Add Chapters to Guide: Open the Options menu (3 dots) near the title of the Guide and select Add Chapters. You will be prompted to give a title to the Chapter. From here, you can add Chapters to Guide, edit, hide or delete the Guide. Below is an example of two empty chapters in a guide. Add Articles to Chapters: Select Add Articles (plus icon) to search for and add articles to the Chapters. You can refine your search by switching between Knowledge Base and Community. Here is an example of an article in a Chapter: Add Articles to Guides: Select Add Articles (plus icon) to search for and add articles to the Guides. You can refine your search by switching between Knowledge Base and Community. In our example, we have added 2 Chapters and an article to the Guide we created: The Guide is now available on the Knowledge Base board for members to view. By selecting the Guide, they can now navigate through the set of articles that will guide them in achieving a particular goal. 2. By selecting the Manually-sorted Articles option: Use this method when you prefer a simple list of articles sorted in a specific order on a Knowledge Base board, without the need for a Guide-like structure. When you select Add Articles, you are prompted to choose the way you want to order the list of articles. In our example, we choose to order them by recency. From here, you can drag and drop articles to reorder them, or clear the existing list and start fresh to create a new KB Guide. Here's an example of the manually-sorted articles on the Knowledge Base board: And the below shows how members are presented with the sorted articles: Create Post Button widget On the Blog Dashboard, Forum Dashboard, Event Dashboard, Ideas Dashboard, Knowledge Base Dashboard templates, and any of the content type templates (Blog Post, Forum Discussion, and so on), you can now add and configure the Create Post Button widget to enable members with appropriate permissions to create content in that particular place. To add the Create Post Button widget: Open the Account menu and select Designer. Select Page Templates. Open the page template where you want to add the widget. Locate the area where you want to add the widget and select Add widget (plus icon). Select the desired Button style (Standard, Large, or Hero). Designate the button width (Width of label or Width of column). If you selected Width of label, select the right, center, or left alignment. (Optional) Use the Button label field to adjust the default text (dependent on content type) that appears on the button in the widget. Click Save and Publish. Refer to Create Post Button widget configuration to learn more. Close Account Admins now have the option to allow members to close their own accounts. This new feature can be found under Settings > System > Account & Privacy > General > Allow community members to close their account. To enable this feature, contact Support. Set a default display name for deleted members Admins can now assign a default display name to be shown on all content created by deleted members in the community. You can set the default name under Settings > System > Account & Privacy > General > Display name for a deleted member. Select Edit to enter the name you want to display for all deleted members and save it. Here’s an example of the display name of deleted members on their posts. To enable this feature, contact Support. Developer Experience Knowledge Base (KB) Guides In this release, we have introduced the KB Guides feature. With this release, members who have the Create, edit, publish, and manage articles permission can do the following actions in a KB board. Creating a guide under a KB board Fetching the KB Guides information Fetching a KB Guide information Fetching the Previous and Next Article Creating a chapter under a guide Fetching a chapter information Updating a guide Fetching a guide avatar properties Updating a chapter Adding an article to a chapter Adding an article to a guide Moving an article under a guide to a chapter Moving an article under a guide to another guide Moving an article in a chapter to another chapter Moving an article in a chapter directly to the same or another guide Reordering a guide Reordering the articles or chapters under the guide Reordering a chapter article Deleting a guide Deleting a article or chapter from guides Deleting articles from chapters Manually Sorted KB Articles With the release, members who have the Create, edit, publish, and manage articles permission can sort the KB articles based on their preference using GraphQL. With the sorted KB articles data, you can do the following: Fetch the KB Articles to know whether the KB articles are sorted. Reorder the KB articles based on the sorted KB articles Optionally, delete the sorted KB articles See Manual Sorting of KB Articles for more information. You found it. We fixed it. We resolved an issue on the Recent Content widget that caused the author and timestamp elements to bleed into each other. Previously, in localized communities, text keys were sometimes displayed instead of actual text content upon refresh. This has been resolved. Previously, when you tried to add a tag with unsupported characters, the error message incorrectly indicated that the tag types failed to be set. Now, in these circumstances, the error messages indicates that tags cannot contain the following characters: /, \, #, ?, ; We resolved an issue in which an Event showed only 25 confirmed attendees even when more than 25 attendees had confirmed attendance. Previously, when a member selected the Options menu (ellipsis icon) to open the list of tags on a piece of content, they had to select it a second time to keep the list open. This has been resolved. Previously, when both OAuth and multi-auth had been configured and an admin edited the values of the OAuth provider, the name and ID in the metadata of the multi-auth provider was overwritten with the Provider Name and ID fields. This has been resolved. In SAML communities, during authentication, an error was incorrectly returned that indicates that the SAML Response from the IDP is incorrect. This has been resolved. There was an issue where video previews were broken, and accepting the cookie banner required a page refresh to apply to all videos. This has been fixed. Previously, live events that are configured to be watched anonymously could not be viewed by anonymous users. Now, when configured, anonymous users can watch events without signing in to the community. Previously, when you filtered a member report and downloaded it, all members in the community appeared in the report regardless of what you selected in the filter. This has been resolved.848ViewsSign in to react to this post11Comments