Aurora: Bypass flood control
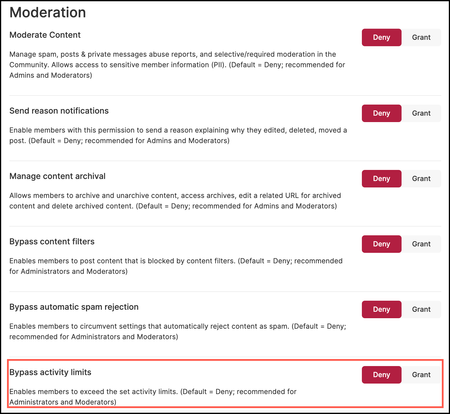
If you want to allow trusted members to publish content without being blocked by flood limits, grant the Bypass flood control permission. To deny or grant this permission for a role Sign in to the community as an Admin. Go to Settings > Users > Roles and Permissions > Moderation. Select Grant or Deny for the Bypass activity limits permission. If this permission is denied for any role and a member with that role exceeds the flood control limit while attempting to publish content, an error message appears at the bottom of the page and the content is not published. Note: Members can be granted this permission from the Activity Limits setting. 464ViewsSign in to react to this post
 0Comments
Aurora: Bypass content filters
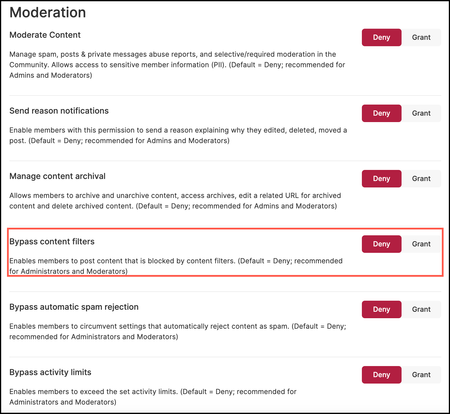
If you want to allow trusted members to publish content without being blocked by any content filters, grant the Bypass content filters permission. To deny or grant this permission for a role Sign in to the community as an Admin. Go to Settings > Users > Roles and Permissions > Moderation. Select Grant or Deny for the Bypass content filters permission. If this permission is denied for any role and a member with that role attempts to publish content containing any words listed under Content Filters, they receive an error message at the bottom of the page. For example, below is a screenshot of the error message when a user without this permission cannot publish their content because the word “cannibalism” is listed under Content Filters.411ViewsSign in to react to this post0CommentsAurora: Bypass automatic spam rejection
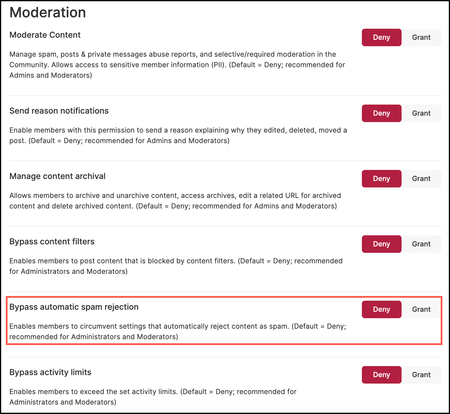
Aurora Communities are equipped with automatic spam detection. If you would like to allow trusted members to publish content without getting scanned by the spam detection engine, you can do so by using the Bypass automatic spam rejection permission. To deny or grant this permission for a role Sign in to the community as an Admin. Go to Settings > Users > Roles and Permissions > Moderation. Select Grant or Deny for the Bypass automatic spam rejection permission.517ViewsSign in to react to this post0CommentsAurora: Redirect user to related content
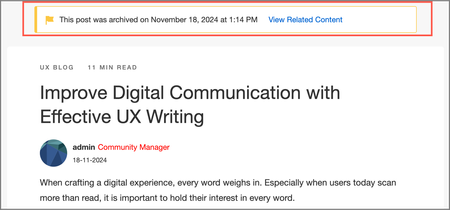
When you archive content, you can provide a permanent redirect link to related content within the community or an external page. Members who attempt to access archived content (via permalink) see a notification indicating that the content has been archived and redirected to relevant information. Though this is optional, it is best practice to provide a related link to relevant content while archiving. For instance, if a Google search result suggests a piece of content that was archived in your community and members select that link, they are automatically redirected to the related content in your community. As the redirection occurs for several members, the Google crawlers understand that the old link is replaced and boost up the new link's ranking instead of the old link. If you didn’t do this when you archived the article, you can opt to add it later from the Archives page. Add a URL to related content Sign in to the community Select Archives on the Manage Content dashboard. Select the Options (...) menu and select Add Link to Related Content. A window to enter the URL opens. Enter a link to the relevant content in your community. Select Add. The entered link is added. After an article is archived: Members who are not admins or moderators are redirected to the page that was added as related content. If no redirect URL is provided, they land on an empty page as shown below. Community admins and moderators land on the original page and see a notification that the page was archived. A link to the related article is provided. Furthermore, you can edit the added link from the archived page by opening the Settings menu and selecting Edit Link to Related Content. Add a URL to an external page You can also redirect members to external pages outside the community. To achieve this, toggle on External URLs under Settings > Features > Moderation > Content Archive.320ViewsSign in to react to this post0CommentsAurora: Unarchive Content
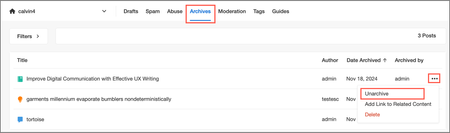
When content is unarchived, it returns to its original location in the community before it was archived. The position of the original board list is also retained. The article's publish/last updated date is retained. Also, you cannot unarchive content whose board has been deleted. Assume that topic B was archived from the board list with topics A, B, C, D, and E. If topic B is later unarchived, it returns to its original position, and the board list again shows topics A, B, C, D, and E and not A, C, D, E, and B. To unarchive content: Go to the Manage Content page. Select Archives. Select the Options menu (...) in the row of the content you want to unarchive. Select Unarchive. The original location of the archived post is selected by default: You can also choose to unarchive the content to another location in the community. 5. Select Unarchive. You receive confirmation that the post is unarchived to the selected location. As shown below, you can also unarchive the content from the content page by opening the Settings menu and selecting Unarchive.202ViewsSign in to react to this post0CommentsAurora: Delete Archived content
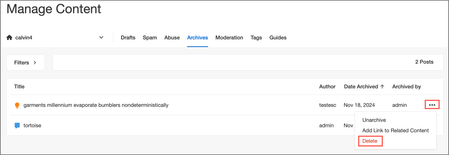
To delete content: Go to the Manage Content page. Select Archives. Open the Options menu in the row of the content you want to unarchive. Select Delete. A window to confirm the delete action opens. 5. Select Delete. The archived content is permanently deleted from the community and cannot be retrieved.275ViewsSign in to react to this post0Comments
Aurora Product Coaching Session: Spam Management Best Practices
Khoros Communities platform offers several settings and features that allow you to mitigate Spam in your community. Join our Spam Management Best Practices coaching session to identify, filter and deal with spam effectively. Our coaching session will guide you through the practical tips and techniques to help combat spam and help maintain the hygiene of your community. Topics covered in the coaching session Overview of Aurora spam settings and functionality Manage Content dashboard related to spam management and its features Using roles and ranks to configure permissions to check spammers Content Filters Best practice tips Notes - Admin permissions are required to conduct the call. 👉Click here to Sign Up Related Resources Enable Spam Management Community Spam Management Review Posts Captured as Spam Khoros Academy: Communities Moderation Essentials Khoros Academy Instructor Led Training: Spam Management for Communities Aurora1.1KViewsSign in to react to this post0CommentsAurora: Featured Guides Widget configuration
The Featured Guides Widget allows community members to easily discover and access highlighted guides on your community pages. With this widget, admins can showcase curated guides, providing members with quick links to essential content. They can be made available for use on designated community pages and helps drive engagement by featuring important or popular guides. Open the Account menu. Go to Designer > Page Templates. The Page Templates page opens. Select the page template where you want to add this widget. In this example, let’s open the Community Home template. The designer page for Community Home opens. Find where you want to add the widget and select Add widget (plus icon). Select Content from the Add Widget pane. A list of widgets that you can add appears. Select the Featured Guides widget. Layout The Featured Guides widget includes the List and Card layouts. From the Edit Widget panel, select one of these options to change the layout. List The List layout gives you a simple view of the guides featured. Card The Card layout showcases the guide’s name in the center of the card. The options in the List style section for List layouts are the following: Space: Uses whitespace to create space between items. Divide: Adds a horizontal line to divide items. Border: Creates a border that separates items into individual boxes. Widget title Enter a title to appear at the top of the widget. If the Visible only to screen readers toggle is on, the title is relayed only through screen readers. Edit Sample Featured Guides Select Edit Sample Content to open a window where you can select a sample guide to preview how the widget will look in the community. Search for the guides you want to feature on the community page. You can then reorder the content by grabbing it with your cursor and dragging it to the desired location. Select Preview to return to editing the widget. Number of items Use the slider to indicate how many guides (up to 20) can be displayed on the widget. Max lines of description text Use the slider to set up to 20 lines of text for the Featured Guides description. Lead with From the Lead with menu, select one of the following: the author’s Avatar the Icon None More options Additional configuration options for the widget include: Include “More Guides” link: Creates a Show More link if there are more guides than designated on the Number of items slider. Notes If there are no articles in a guide or if a guide is hidden, and you choose that guide to be featured in the Featured Guides widget, that Guide will not be visible on the widget on the published page. As shown below, “Analytics Dashboard” is an empty guide. Let’s add this guide to the Featured Guides widget. After publishing the page template, the “Analytics Dashboard” guide is not visible to the community.1.5KViewsSign in to react to this post1CommentPreview published URL
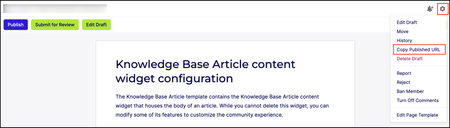
Members who have access to the workflow page of an article, can preview the published URL (the final URL when published) on the workflow page of the draft. They can share this URL with others, who might need to link to this article when it’s published. To view the URL when the artilce or blog post is the in draft state: Open the draft of the article or blog post. Open the Options menu. Select Copy Published URL. The URL will be copied to your clipboard.308ViewsSign in to react to this post0CommentsAudit Read, Update, and Delete (CRUD) actions
Administrators can have a comprehensive audit logging for all Create, Read, Update, and Delete (CRUD) actions on KB Guides. The following actions will be recorded in the audit log: Guides: Added, moved, deleted, and reordered Chapters: Added, moved, deleted, and reordered within/to Guides Articles: Added, moved, deleted, and reordered within/to chapters or Guides Additionally, audit logs will cover actions taken on Manually-sorted articles, including: Adding Articles Clearing the List Reordering Articles You can access the audit logs from Settings > System > Audit logs Related topics: About KB Guides Adding KB Guides Guides widget configuration General actions on KB Guides, Chapters, and Articles459ViewsSign in to react to this post0Comments