About Aurora badge rules and supported criteria
For each community badge you want to create, you must define the rule that determines how a member achieves or receives the badge. For simpler rules, you can use the built-in tool that enables you to select a criterion and additional qualifiers. However, if you want a more complex rule for a badge, you can use the Advanced Editor to enter badge formulas. Badge formulas include a combination of a formula clause type, a keyword, an operator, and a value. When the calculation of a value in a formula returns a true result, the member achieves the badge. The badge achievement is then reflected in their profile and badges page. To create more complex badge rule expressions that require multiple rules be met before awarding a badge, you can use the “AND” operator. Common use cases for badges with multiple rule criteria include profile completion tasks and more complex engagement options. For example, you may want to award a “VIP Contributor” badge to members who: Have received at least 100 likes Have had at least 25 answers marked as Accepted Solutions Have posted at least 10 blog articles Tip: You can also use community roles as an additional requirement for any badges based on activity. By taking advantage of the “unlocking” game dynamic, you can set certain badges to be earnable only after a community member has reached a rank that grants them the required role. Create a complex badge rule Go to Settings > Users > Badges. To add a rule to a badge in an existing badge set, click the name of the badge set that contains the desired badge and then click Add Badge. Otherwise, create a new badge set where you want the badge with complex rules to live (see Create badge sets and badges). After entering the badge Name, Description, and Icon, in the Criteria drop-down menu, select Advanced Editor. In the Advanced Editor field, enter your custom badge rules. Enter each rule you want met (making sure that each rule has an identifier, operator, and value). Enter AND between each rule. Select the Hide from member profile until earned checkbox to ensure that the badge is displayed on member profiles only when the rules are met. Click Add Badge. Let’s say you want to create a badge for new members to encourage them to begin participating in the community. You might create a rule like this: metric.net_overall_threads >= 5 AND metric.net_kudos_weight_received >= 20 AND metric.net_accepted_solutions >= 3 This complex rule may be great for a badge that rewards users for creating new content with great quality. Feel free to use this example for your own community! Note: You cannot create complex rules with OR or NOT. Supported badge clauses and badge criteria A badge formula can include one of five types of clauses depending on the type of behavior you want to reward. You can chain rules together to create complex criteria using these clause types: Metric: Assigns a badge based on the value of a… 1.4KViewsSign in to react to this post
 9Comments
Aurora: Manage Mentions permissions (admin)
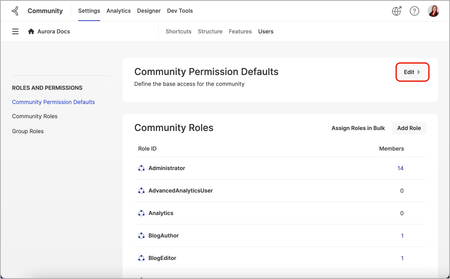
As an admin, you can manage the permissions to allow members to @mention posts, members and places. The permission is enabled by default to all community members. To manage the ability for community members to use Mentions: Go to the Roles and Permissions page for the community. Beside Community Permissions Defaults, select Edit. In the left column, select Mentions. In the Mentions section, select Deny or Grant as required for Mention content, Mention places and Mention members. Unless you have specified different permissions for certain roles or levels below the community level (a category, group, or board), this selection affects all members of the community. Related topics: About Roles and Permissions Create a role Add members to roles Permission descriptions338ViewsSign in to react to this post2CommentsAbout Aurora Mentions
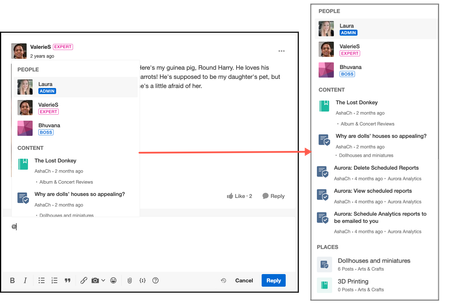
Mentions enable members to call out other community members and community content within a post. Aurora supports three kinds of mentions: Member Mentions Content Mentions Places Mentions Note: Product Mentions will be available in a future release. With Member Mentions, community members can call out other members in their posts and invite them to join the conversation. You might mention a community member when you know they can answer a question or provide valuable insight into a thread. Or, you might just want to make sure they see it when you want to say thank you or give public praise. Content Mentions enable community members to call out specific posts within the body of a post. Additionally, you can use Content Mentions to mention other places in the community, such as a specific category or board. It’s a way to quickly embed a link to other content in the community. Places Mentions allow community members to highlight specific locations, such as categories or boards, making it easy to reference and link to other content within the community. Mentions are supported in all content types and in replies/comments. When you enter the @ symbol while creating a post, suggestions are displayed in this order: Members: Participants from the conversation thread based on relevancy Content: Content you created, by recency Places: Places you follow Mention notifications When members are mentioned in posts, they are sent emails to let them know. The email uses the Member Mention notification email template. (If members are mentioned multiple times in a post, they are sent only one email.) Additionally, members mentioned in private forums that they cannot access will not receive notification emails. When a member’s content is mentioned in posts, the member is also sent an email to let them know. The email uses the New Content Mention notification email template. Mentions you receive are also shown in your community notifications (bell icon). Related topics: Manage Member Mentions permissions (admin) About Email Notifications579ViewsSign in to react to this post9CommentsAurora: Member metrics for ranking formulas
You can include any per-member metrics in your ranking formulas. However, you cannot use per-post metrics or metrics that relate to general areas of the community, like groups. You can include any of the following member metrics as variables in your ranking formulas. Note: This is not a complete list but rather a list of the more common member metrics that you may consider using in your formulas. Accepted solutions accepted_solutions The member’s total number of accepted solutions. This number includes any accepted solutions that might have been revoked. See also net_accepted_solutions. net_accepted_solutions The member’s total number of solutions that were accepted during a period minus those that were revoked during the same period. net_other_solved_accepted_solutions The member’s total accepted solutions to someone else’s question minus those that were revoked during the same period. net_self_solved_accepted_solutions The member’s total accepted solutions to the member’s own questions minus those that were revoked. author_accepted_solutions The total number of solutions accepted by the author. author_revoked_solutions The total number of solutions that were revoked by the question's author. mod_accepted_solutions The total number of posts written by any member that were marked by a moderator as solutions. You can view this metric for specific moderators or for all moderators. mod_revoked_solutions The number of times a moderator has revoked an accepted solution. net_solved_threads The number of solved discussions started by a member minus the number of solved discussions started by the same member or that were revoked. This is the net change in the number of solved discussions started by this member. net_solved_threads_to_net_threads ratio The number of net solved discussions divided by the number of net discussions. Note: This ratio is not cumulative; it covers activity only during the period selected. The longer the period, the more useful this metric is likely to be. solution_revoked_threads The number of times solutions written by any member were later revoked. solutions_marked The number of times the member has marked a post as a solution. solutions_unmarked The number of times the member has revoked a post marked as a solution. solved_threads The number of times discussions written by any member have been marked as solved. other_solved_accepted_solutions The me…1.1KViewsSign in to react to this post7CommentsAbout default Aurora community ranks
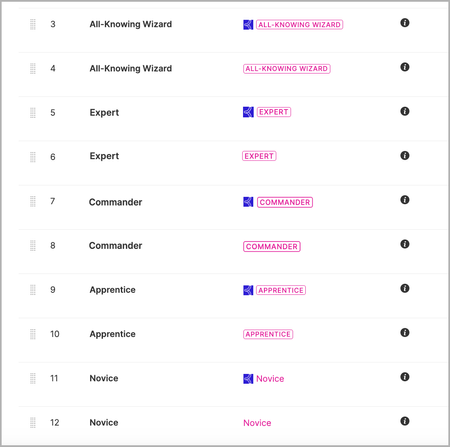
Aurora communities include a set of pre-defined, default ranks. Review these out-of-the-box ranks and their associated ranking formulas and decide which ones you want to include in your community rank structure. The default ranks we’ve provided have the following names and ranking formulas: Rank Formula Khoros hasRole("Khoros") Community Manager hasRole("Administrator") Moderator hasRole("Moderator") Honored Contributor (registrationAge >= 300000) && ((net_threads) + (net_replies*2) + (net_blog_articles*10) + (net_blog_comments*1) + (net_idea_threads*5) + (net_idea_comments) + (net_published_tkb_articles*10) + (net_tkb_comments) + (net_accepted_solutions*15) + (net_kudos_weight_given*2) + (net_kudos_weight_received*4) >= 222500) Esteemed Contributor (registrationAge >= 250000) && ((net_threads) + (net_replies*2) + (net_blog_articles*10) + (net_blog_comments*1) + (net_idea_threads*5) + (net_idea_comments) + (net_published_tkb_articles*10) + (net_tkb_comments) + (net_accepted_solutions*15) + (net_kudos_weight_given*2) + (kudos_weight_received*4) >= 100000) Respected Contributor (registrationAge >= 200000) && ((net_threads) + (net_replies*2) + (net_blog_articles*10) + (net_blog_comments*1) + (net_idea_threads*5) + (net_idea_comments) + (net_published_tkb_articles*10) + (net_tkb_comments) + (net_accepted_solutions*15) + (net_kudos_weight_given*2) + (kudos_weight_received*4) >= 50000) Trusted Contributor (registrationAge >= 175000) && ((net_threads) + (net_replies*2) + (net_blog_articles*10) + (net_blog_comments*1) + (net_idea_threads*5) + (net_idea_comments) + (net_published_tkb_articles*10) + (net_tkb_comments) + (net_accepted_solutions*15) + (net_kudos_weight_given*2) + (kudos_weight_received*4) >= 30000) Valued Contributor (registrationAge >= 150000) && ((net_threads) + (net_replies*2) + (net_blog_articles*10) + (net_blog_comments*1) + (net_idea_threads*5) + (net_idea_comments) + (net_published_tkb_articles*10) + (net_tkb_comments) + (net_accepted_solutions*15) + (net_kudos_weight_given*2) + (kudos_weight_received*4) >= 20000) Super Contributor (registrationAge >= 120000) && ((net_threads) + (net_replies*2) + (net_blog_articles*10) + (net_blog_comments*1) + (net_idea_threads*5) + (net_idea_comments) + (net_published_tkb_articles*10) + (net_tkb_comments) + (net_accepted_solutions*15) + (net_kudos_weight_given*2) + (kudos_weight_received*4) >= 5000) Regular Contributor (registrationAge >= 86400) && ((net_threads) + (net_replies*2) + (net_blog_articles*10) + (net_blog_comments*1) + (net_idea_threads*5) + (net_idea_comments) + (net_published_tkb_articles*10) + (net_tkb_comments) + (net_accepted_solutions*15) + (net_kudos_weight_given*2) + (kudos_weight_received*4) >= 2000) Frequent Contributor (registrati…965ViewsSign in to react to this post11CommentsAurora: Revoke a badge
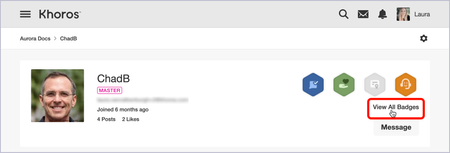
As an admin, you may want to remove a badge if it was awarded in error or if you suspect that the member “gamed the system” to receive the badge. Note: To revoke badges, you must be assigned a role with the Revoke Badges permission granted. To revoke a badge: Go to the Member Profile of the member whose badge you want to revoke. At the top right of the page, click View All Badges. At the top right of the member badges screen, open the Settings (gear icon) menu. Click Manage Badges. Hover your cursor over the right side of the row of the badge you want to revoke. When the button appears, click Revoke. Revoked badges remain in the list on the Manage Badges window but are grayed out and displayed with a date indicator of when the badge was revoked. If you revoked a badge by mistake, you can hover your cursor over the right side of the revoked badge in the list and click Re-Grant. Related topics: About Badges and Badge Sets Delete badge sets and badges408ViewsSign in to react to this post4CommentsAurora: Create a ranking formula
For a rank to work as intended, you need to write a ranking formula outlining the criteria needed for a member to achieve that rank. Our default ranks already have criteria associated with them; you can use these for a quick Ranks setup or you can view them for more examples on how ranking formulas are written. The format for a formula is: (variable operator value) Boolean operator (variable operator value) A variable is one of the member metrics captured by the system. Examples of member metrics include number of accepted solutions, number of posts, number of post views, and number of minutes online. Note: To view a list of the Aurora member metrics you can use in your ranking formulas, refer to Member metrics for ranking formulas. A value is the measurement that you want the metric to have. A value can be numeric or alphabetic. For example, if the metric is minutes online, the value will be a specific number of minutes. If the metric is user ID, the value will be a username. The operator indicates the relationship between the metric and the value. The relationship can be numerical or text-based. These are the operators you can use: Operator Description == Equal (numeric or text) != Not Equal (numeric or text) >= Greater Than or Equal <= Less Than or Equal + Text Concatenation + Numerical Plus - Numerical Minus * Numerical Multiply / Numerical Divide The Boolean operator defines a relationship between two or more variable expressions. Each variable that you set as a criterion is a separate expression. You can use these Boolean operators: Operator Description ! Boolean Not && Boolean And || Boolean Or You must enclose each variable expression (variable + operator + value) in parentheses. You can also combine variables to calculate values that the system may not otherwise provide. For example, to calculate the number of posts a member has made, you would start with the posts metric and subtract the deleted_posts metric. In a formula, it would look like this: (posts - deleted_posts>=35) Posts - deleted_posts is the variable, >= is the operator, and 35 is the value. Here is a more complex example containing many metrics—it defines the age of the account, the number of content contributions (e.g., posts, articles, and comments), and the community engagement level (e.g., number of accepted solutions and likes) required for achieving the rank: (registrationAge >= 259200) && ((((net_threads) + (net_replies*2) + (net_blog_articles*10) + (net_blog_comments) + (net_idea_threads*5) + (net_idea_comments) + (net_contributed_posts*5) + (net_published_tkb_articles*10) + (net_tkb_comments)) >=7000)||(overall_posts >10500)) && (((net_accepted_solutions*10) + (net_kudos_weight_given) + (net_kudos_we…1.1KViewsSign in to react to this post5CommentsAurora: Create a mirrored (duplicate) ranking structure
Some communities might want employees or partners to have a special icon associated with a rank unique to one group but still have them go through the same basic ranking structure as other community members. In these scenarios, you can create multiple rank ladders, each associated with a different role, so that regular community members "climb" one rank ladder, and the employee or partner community members climb another similar ladder. If you want a particular audience (a group of Community members) to have a specific rank icon that is different from the standard rank icon but still follows the regular ranking structure, you need to create a duplicate ranking structure that mirrors the standard ranking structure. (This duplicate ranking structure is often called a mirrored ranking structure or dual ranking structure.) To create a dual ranking structure: Go to Settings > Users > Roles & Permissions and create a special role (for example, “Ambassadors”) for this audience. Go to Settings > Users > Ranks. Create a duplicate of each level of your ranking structure. (Do not duplicate ranks that are already tied to roles.) Do this by clicking Add Rank and then copying over each setting. For each duplicate level, complete the following steps: Roles granted: Enter the role name. You must enter the exact role text with the same spacing and capitalization. (For example, if the role name is “Ambassadors,” entering “ambassadors” does not work.) Ranking formula: At the very end of the rank formula, enter the following: && hasRole("role name") Icon: Browse for and select the icon you want to use for this rank. Follow the steps above for every level in your ranking structure but not for ranks that are already tied to roles. When you’re done, you’ll have a dual ranking structure, similar to this: Related topics: About member Ranks and ranking formulas Create a rank Create a ranking formula307ViewsSign in to react to this post0CommentsAurora: Accept or revoke a solution
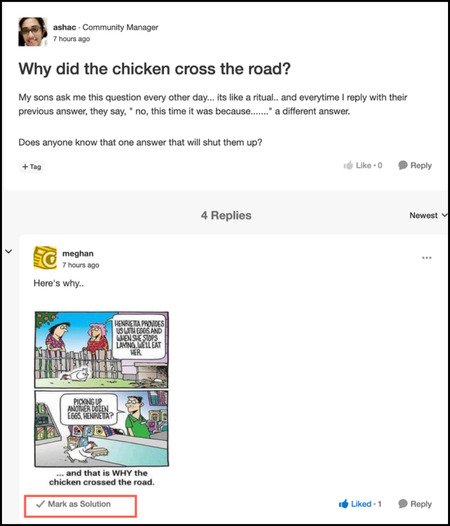
If you’ve posted a question to a discussion, you can choose the reply that best answers your question and mark it as an accepted solution. Marking a reply as a solution not only lets someone know that they helped solve your issue but also helps future members with the same question quickly find an answer to it. Note: Admins and moderators can also mark replies as solutions. If you later find a reply that is a better solution, you can revoke the current solution and accept the other reply as the solution. To mark a solution as accepted: Click Mark as Solution on the reply. After you mark a reply as a solution, the original question is marked as Solved and the reply is tagged with Marked as Solution. The accepted solution appears right below the original post as well as in its original position. Notes: There can be only one solution for a discussion. When you migrate from Community Classic to Aurora, all the accepted solutions are retained, including cases in which there are multiple solutions marked. However, after migration, you cannot mark any other reply as a solution. To do that, you must first revoke the original accepted solution. If you change your mind about the quality of the answer, or if another reply provides an even better answer, you can revoke the first selection and accept the second reply. To revoke an accepted solution: Click the X next to Marked as Solution to revoke the accepted solution. The original post and solution return to their normal appearance. You can choose another solution or leave the question unsolved.295ViewsSign in to react to this post0CommentsAurora: Enable Accepted Solutions
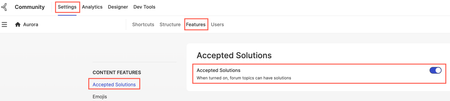
To use Accepted Solutions in discussions, you must enable them in your community. You can enable accepted solutions for the community as a whole or just for select categories or forums. Enable Accepted Solutions Go to the Settings at the level (community or lower-level place) where you want to enable accepted solutions. Tip: If Accepted Solutions is enabled at the community level, it is enabled for all lower-level forums. You don’t need to enable each one. If it’s turned off at the community level, you need to enable it for specific forums. Go to Features > Accepted Solutions. Turn on Accepted Solutions. When this setting is turned on, authors, admins, and moderators can mark a reply as a solution. The Mark as solution option is not visible to other members. Here’s how Mark as solution looks in a discussion: Manage Accepted Solutions permissions As an admin, you can manage the permissions for Accepted Solutions, Manage solutions. The permission is turned off by default to all community members except Administrators and Moderators. To manage the ability for community members to mark posts as accepted solutions: Note: To manage this permission at a lower level, go to the [Place] Permissions page and edit the permission defaults for that level. To manage this permission for a particular role, go to the [Place] Permissions page at the desired level of the community and edit the permissions of the individual roles. Go to the Roles and Permissions page for the community. Beside Community Permissions Defaults, click Edit. In the left column, click Accepted Solutions. Beside Manage solutions, select Deny or Grant as required. Unless you have specified different permissions for certain roles or levels below the community level (a category, group, or board), this selection affects all members of the community.355ViewsSign in to react to this post0Comments