About Content permissions
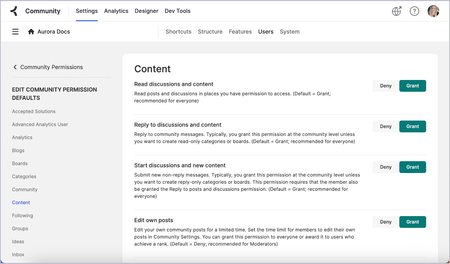
You can adjust permissions related to content at the community, container (category & group), and board level. Some permissions are set to Deny by default while others are set to Grant by default. At the container level and the board level, permission defaults and role permissions are inherited from the parent level. In those cases, the Inherit button is displayed in green to indicate that the permission was set to Grant at the parent level or red to indicate that the permission was set to Deny at the parent level. As an admin, you can manage these permissions. To manage content-related permission defaults at the community level: Note: To manage this permission at a lower level, go to the [Place] Permissions page and edit the permission defaults for that level. To manage this permission for a particular role, go to the [Place] Permissions page at the desired level of the community and edit the permissions of the individual roles. Go to the Roles and Permissions page for the community. Beside Community Permissions Defaults, select Edit. Review permissions in the following areas: Blogs Content Events Ideas Knowledge Bases Select Deny or Grant as required. Unless you have specified different permissions for certain roles or levels below the community level (a category, group, or board), these selections affect all members of the community. Content permissions While Forum permissions are granted by the Content permissions, Blogs, Event Boards, Ideas boards, and Knowledge Bases have distinct permission sections for content type-specific tasks. The Content permissions are provided for general content access and tasks and relate to all content types. Follow the links in the table below to learn more about the tasks granted by these permissions. Permission Default Related permissions in content type sections Read discussions and content Grant Blogs: Read posts and Read comments Ideas: Read ideas and comments Reply to discussions and content Grant Blogs: Comment on posts Events: Comment on events Ideas: Comment on ideas Knowledge Bases: Comment on articles Start discussions and new content Grant Blogs: Start new posts Events: Post new events Ideas: Post new ideas Knowledge Bases: Create, edit, publish, and manage articles Edit own posts Deny Blogs: Edit own published posts Events: Edit own events Ideas: Manage ideas and comments Knowledge Bases: Edit own published articles Edit any post Deny Blogs: Edit any published post Events: Edit all events Ideas: Manage ideas and comments Knowledge Bases: Edit any published article Move content Deny Blogs: Manage any posts and Manage own posts Delete own post Deny Blogs: Manage own posts Events: Delete own events Knowledge Bases: Delete own articles Delete any post Deny Blogs: Manage any posts Events: Delete all events Ideas: Manage ideas and comments Upload file attachments Deny Embed external content Grant Turn on link hyperlinking Grant Use simple HTML in posts Grant Use advanced HTML in posts Deny Use full HTML in posts Deny Make content read only Deny Post read-only content Deny Bypass moderation Deny Blogs: Bypass comment moderation Events: Bypass comment moderation Ideas: Bypass moderation Knowledge Bases: Bypass comment moderation Related topics: About Aurora Community site structure About Aurora Content Types 762ViewsSign in to react to this post
 0Comments
Aurora: Send reminder notifications for events
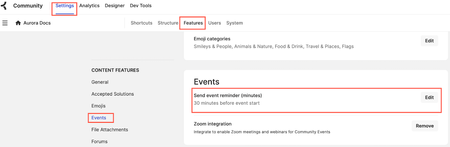
The Events reminder feature automatically sends an email reminder before the start of an event to all attendees' registered email addresses. This reminder is sent exclusively to those members who have responded that they will attend the event. To set this notification, go to Settings > Features > Event and edit the Send event reminder (minutes) option. By default, this is set to send reminder emails to all attendees 30 minutes before the event starts. This notification is sent to the attendee’s registered email address.380ViewsSign in to react to this post0CommentsAurora: Internet Calendar Scheduling (ICS) file support for Events
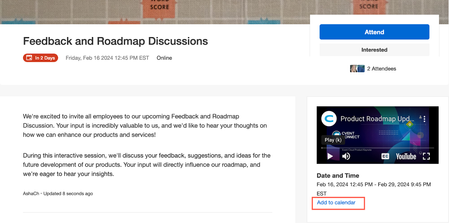
You can add an event invitation to your calendar either manually or automatically. To add an event manually to your calendar: Select Add to calendar to download ICS (Internet Calendaring and Scheduling) files. Add community events to any calendars of your choice. Note: The ICS file downloads only upcoming events. To add an event automatically to your calendar: Select Attending or Interested for an event. A calendar invitation is automatically added to the calendar associated with your registered email address. The following screenshot shows an event that is automatically added to the member’s calendar. From here, you can RSVP and read the content of the event.518ViewsSign in to react to this post0CommentsAurora: Remove members who have RSVP’d to the event
As an Event admin, you can remove members who have RSVP’d to the event. After a member is removed from attending the event, they will no longer receive any update on the event. Follow the below tutorial on how members can be removed from the list of attendees.231ViewsSign in to react to this post0CommentsAurora: Send messages to event attendees
You can send messages to members who have RSVP’d to an event. Send messages to provide updates, build excitement, or clarify any details or questions you’ve been asked about by other attendees. Follow the tutorial below on how to send individual messages to event attendees: Follow the tutorial below on how to send bulk messages to all event attendees: Related topics: Send invitations to members and nonmembers386ViewsSign in to react to this post0CommentsAurora: Send invitations to members and non-members
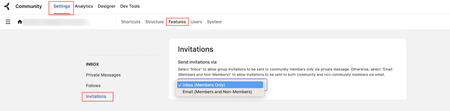
You have the option to send Event invitations to members using their username or email ID. If you enter the member's username, they receive the invitation in their registered email ID. You can send invitations to non-members through their email ID. Note: Only members with Create Events permission can send invitations. Invitations can be sent via Private Messages or Email based on the setting shown below: Note: If set to Inbox (Members Only), messages are sent to member’s Private Message Inbox. If set to Email (Members and Non-Members), messages are sent via the email address only. Invitations can be sent to non-members only if the above is set to Email (Members and Non-Members) Follow the below tutorial to invite members and non-members to an event:353ViewsSign in to react to this post0CommentsAurora: Events with Zoom Webinar
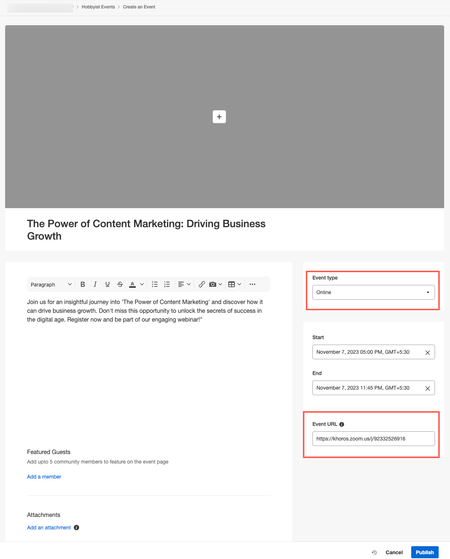
This article describes how to: Create an Event to host a Zoom webinar Host a Zoom webinar Attend a Zoom webinar event Leave a Zoom webinar event Create an event to host a Zoom webinar Note: These steps assume that you have already created the Zoom webinar URL as described in the prerequisites. The Zoom URL must be in the following format: https://\ {company_name}.zoom.us/j/{meeting_number}?{passcode} The meeting passcode is optional. Note that the webinar URL created from Zoom is different from the required format and you must manually change the URL to this format. You cannot use personal meeting links (for example, zoom.us/my/{name}). Events with Zoom webinars support registration to attend the event. Therefore, members who want to join such events must register or sign up for the webinar. Events with Zoom webinars do not support authentication. To create an event to host a Zoom webinar: While creating the event, select either Online or Hybrid from the Event type drop-down menu. In our example, we choose Online. Enter the Zoom URL of the webinar in the Event URL field. Enter all other required information about the event and click Publish. Your event is published in the Events board. Host a Zoom webinar event The Zoom webinar host can start the webinar on the Zoom application. The host cannot start the webinar from the Community Event. Attend a Zoom webinar event After setting up the event in the community, the host can start the webinar on the Zoom. Note: If the webinar requires you to register to attend the event and you have not registered earlier, you are prompted to register while joining the webinar. To join the webinar from your community: Go to the event details page where the webinar is published. Click the title of the event for the webinar. The event page opens. If the webinar has started already, the page displays that the event is in progress and prompts you to join. Note: If the webinar requires registration and you have not registered earlier, the event prompts you to register yourself when you join the event. Click Join. Depending on the browser settings, you may need to allow using a microphone for the community. Click Join Audio by Computer. You are now added to the webinar and can view the presenter’s screen. You have access to the options and features that Zoom provides. Notes: If you join again using another tab, a message displays to indicate that you have already joined the meeting and cannot join from the second tab. Anonymous users cannot join the webinar from within Events. Leave a Zoom webinar event To leave an event that hosts a Zoom webinar, click Leave. When the host ends or leaves the webinar, you receive the message that the host has ended the webinar. Related topics: Integrate Zoom with Community Events Events with Zoom Meetings434ViewsSign in to react to this post0CommentsAurora: Events with Zoom Meetings
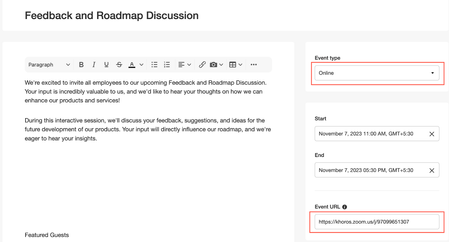
This article describes how to: Create an Event to host a Zoom meeting Attend a Zoom Meeting Event Leave a Zoom Meeting Event Create an event to host a Zoom meeting These steps assume that you have already created the Zoom meeting URL as described in the prerequisites. The Zoom link must be in the following format: https:// {company_name}.zoom.us/j/{meeting_number}?{passcode} The meeting passcode is optional. You cannot use personal meeting links; for example, zoom.us/my/{name} Events with Zoom meetings support authentication to attend the event. Events with Zoom meetings do not support registration. To create an event to host a Zoom Meeting: While creating the event, select either the Online or Hybrid option from the Event type drop-down menu. In our example, we choose Online. Enter the Zoom URL of the meeting in the Event URL field. Enter all other required information about the event and then click Publish. Your event is published in the Events board. Note: The banner is not displayed until 60 minutes before the start of the meeting. Prior to that time, the preview of the meeting is shown. Similarly, the banner continues to show 60 minutes after the event finishes. Attend a Zoom meeting event After setting up the event in the community, the host can start the meeting on Zoom. To join the meeting from your community: Go to the event page where the meeting is published. Click the title of the Zoom meeting. The event page opens. If the meeting has started, the page displays that the event is in progress and prompts you to join. Click Join Meeting to join the meeting. A video preview screen appears. You can turn on or off your audio and video. Click Join. Depending on the browser settings you may need to allow using a microphone for the community. Click Join Audio by Computer. Note: You cannot change the background of your video. You are added to the meeting and can view the presenter’s screen. Notes: If the meeting requires authentication and you have not signed in to your Zoom account, you are prompted to authenticate yourself If you join again using another tab in the same browser, a message displays to indicate that you have already joined the meeting and cannot join from the second tab. Anonymous users can join as guests. Leave a Zoom meeting To leave an event that hosts a Zoom meeting: Click Leave on the meeting page. Click Leave meeting. You are disconnected from the meeting and the screen to join the meeting appears. When the host leaves the meeting, the meeting ends. Related topics: Integrate Zoom with Community Events Events with Zoom Webinar426ViewsSign in to react to this post0CommentsAurora: RSVP to events
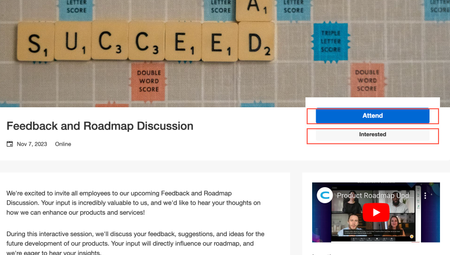
Members have the option to respond to community events by selecting either Attend or Interested. These options are available on the event page. You can see the list of members who have responded that they will attend. Click the attendees to view a list of attendees and those who are interested in attending the event. Related topics: Events permissions and settings Create an event Integrate Zoom with Community Events387ViewsSign in to react to this post0CommentsAurora: Integrate Zoom with Community Events
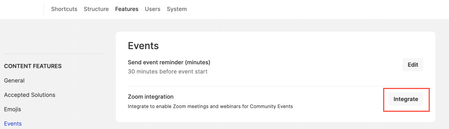
Integrating Zoom with your Community Events enables you to offer real-time user engagement from within the community. With Events, you can host both Zoom Meetings and Zoom Webinars. Zoom Meetings: All participants can share their screen, turn on their video and audio, and see who else is in attendance. Zoom Webinars: Webinars enable view-only attendance. The host and any designated panelists can share their video, audio, and screen. Participants have the ability to interact via Q&A, Chat, and answer polling questions. The host can also unmute attendees. Attendees in webinars cannot rename themselves. Participants can join a meeting on your website without having the Zoom app. Authorize Zoom To host Zoom calls within the Events feature, we use the Zoom App SDK. To integrate Zoom with Community Events, you must manually specify your organization's Client ID and Client Secret values in the Community Admin panel. These values are encrypted and stored in Khoros’ database. Prerequisites We recommend that you create an admin account in Zoom. During authorizing Zoom in the community, you must sign in with the same account to grant access to the Zoom event. Note that the Zoom app can be unpublished. Generate the Client ID and Client Secret from the Zoom SDK App. Learn more about how to generate Client ID and Client Secret from the Zoom SDK App. Add the follwoing to the Scope in the Zoom App Marketspace: Meeting scopes: meeting:read:meeting meeting:write:meeting Webinar scopes: (QandA and chat options also come up with just below scopes) webinar:read:webinar webinar:write:webinar In the Zoom SDK App, you must specify your community's redirect URL in Redirect URL for Oath and Oath Allow list fields. Sample redirect URL format: https://<community hostname>/t5/s/community name/api/2.1/zoom/oauth2callback Admins can manually enter and delete the Zoom Client ID and secret key values in the community’s Admin Settings, which are encrypted and stored in Khoros’ database. To authorize Zoom: Sign in as an Admin of the community. Open the Account menu. Select Settings. The Settings page opens. Select Content Features. Select Events. Beside Zoom integration, select Integrate. A window to enter Zoom's Client ID and Client secret opens. Enter the Client ID and Client secret. Select Configure. You may be asked to sign in to the Zoom app. After you sign in, you are redirected to the settings page. If the integration is successful, a success message appears. The Zoom integration is successful when you see the Remove button. To remove the Zoom Integration: Sign in as an Admin of the community. Open the Account menu. Select Settings. The Settings page opens. Select Content Features. Select Events. Beside Zoom integration, select Remove. The Zoom integration is removed and the button changes back to Integrate. Related topics: Events permissions and settings Create an event Event types Events with Zoom Meetings Events with Zoom Webinar1.3KViewsSign in to react to this post5Comments