Pull different Aurora community content into an RSS feed using URLs
You can pull different community content from different levels in the community in an RSS feed using URLs. To pull the most recent RSS results for the entire community, use: https://yourdomain.com/t5/s/[CommunityID]/rss/Community For example, for Atlas, you'd use: https://community.khoros.com/t5/s/lithosphere/rss/Community To pull content over the RSS for a category, use: https://yourdomain.com/t5/s/[CommunityID]/rss/Category?category.id=[CategoryID] For example, if Atlas had a category with the ID of "Social," you'd use: https://community.khoros.com/t5/s/lithosphere/rss/Category?category.id=Social Note: Category IDs are case sensitive. To pull content over the RSS for a KB, use: https://yourdomain.com/t5/s/[CommunityID]/rss/Community?interaction.style=tkb For example, for Atlas you'd use: https://community.khoros.com/t5/s/lithosphere/rss/Community?interaction.style=tkb 2KViewsSign in to react to this post
 7Comments
Aurora: Update community vanity URL
There are several actions you must take before we can change a vanity name on our end. The change is straightforward if your community is a non-SSO community, but if you use SSO there's a broader range of things to cover. As always, all changes should first be tested on stage if possible, and this is especially true if you're using SSO. Note: We highly recommend contacting our Professional Services team to complete this process, especially when using a custom SSO setup. Preparation Create a CNAME in your DNS. Point the CNAME at your internal community hostname (for example, communityid.community.com). Allow 48 hours to pass after steps 1 and 2 so the DNS can propagate the internet. Update the community URL Check your community settings and change any hard-coded URLs pointing to the old vanity name. A redirect largely covers this, but eliminating any non-needed page requests/redirects is always a recommended best practice. If you're using SSO and this change affects your SSO sign-in/sign-out/registration URLs, be sure to update them in Community Settings > System > Account and Privacy after the change is made on the Khoros side. IMPORTANT: if you're using SSO, make sure this domain change will not affect your authentication process. In most cases, SSO is domain-centric and works only for requests coming from the domain specified in the cookie, so if the domain is not updated in your SSO it could completely break authentication. For example, if your community URL was community.abc.com and your SSO was set for requests only from .abc.com, changing your vanity name to community.def.com would break authentication, since a cookie from one domain cannot be read by another. You need to update your SSO to ensure it's set to work with the new domain. If you're using a Salesforce integration, check with whomever handled that integration to ensure the change won't cause any unwanted problems. In some cases, that person might have to make changes to accommodate the change. Multiple vanity names are not officially supported, but if you plan to use more than one vanity name you MUST contact Khoros Support to have all of your domains added to a vanity domain allowlist. Any domain not in the allowlist redirects back to the active vanity name we have on record. After all of the above have been reviewed, tested, and you're ready to proceed, the remaining is completed by Khoros: Update the vanity name. Add any desired redirects (301) from the old vanity name to the new one so anyone who has bookmarks/favorites is redirected to the same page using the new domain. Add any other optional redirects you'd like in place. Depending on the number and/or type of redirects requested (for instance, more than a dozen), this may require an engagement through our Professional Services group. Restart the community during the next available maintenance window to apply changes. As noted, if you're using SSO we need to coordinate with you so that you can make any required SSO changes on your end at the same time we update the hostname on our end.601ViewsSign in to react to this post0CommentsAurora: Set community to offline mode
If you are performing maintenance on your community, you may want to prevent activity from taking place as you resolve issues. With offline mode, you can present a notice to visitors so they know maintenance is underway and that they cannot participate until the community comes back online. When the community is in offline mode, members cannot: sign in read content create new posts or reply to any content like posts, mark posts as solutions, tag posts, or edit posts reply to messages in their inbox or create new private messages follow or manage existing follows update their member settings Members can still receive email notifications if content is posted by admins during the time the community is offline. When the community is in offline mode, admins are still able to: sign in to the community post content modify site settings update the theme use back-end functionality such as APIs Enable offline mode Open the Account menu and go to Settings > System. Below General, toggle on Enable community offline mode. Confirm this action by selecting Take Community Offline. Customize your maintenance page You can customize the title and message on your maintenance page so that your visitors know what to expect when they reach your community while it is offline. To customize the message: On Settings > System > General, below Enable community offline mode, select Edit beside Title and Description. In the Edit Offline Text window, edit the Title and Description as desired. Select Save.714ViewsSign in to react to this post0CommentsAurora: Configure community guidelines
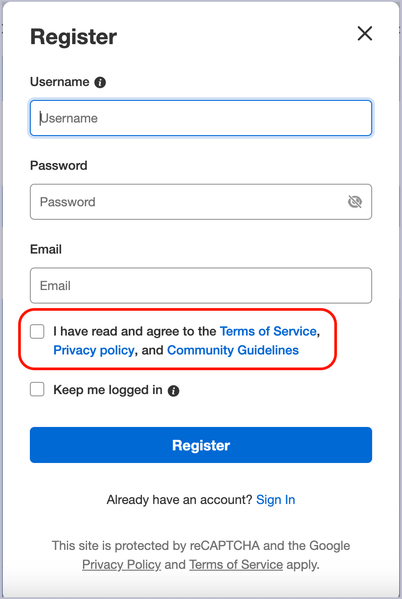
You can enable community guidelines for your community to ensure your members know what is expected of them in the community. These can be linked to an external URL or built within your Aurora community itself. You can designate your guidelines as required reading for registration or just provide a link on the registration window for new members. Depending on what you’re going for, building your guidelines within Aurora creates a seamless experience with consistent branding, while linking to an external URL enables you to use one central location where your document lives so you don’t have to update it in multiple places. For localized communities, you can provide guidelines in all your available community languages to ensure that all members of your community are aligned on expectations regardless of language. Provide link to guidelines on registration window Open the Account menu and select Settings. Go to System > Account > Registration. To add your guidelines to the registration window, turn on the Add community guidelines link to registration page toggle. (Optional) To require new members to select a checkbox indicating that they read and agree to the community guidelines, select Edit, and then select the Acceptance required checkbox. To designate whether you want to host the guidelines on your community or link to an existing page, select Edit, and then select Community or External. Set up guidelines on your community Whether your members reach your community guidelines from the registration window or elsewhere in your community, you can edit them from right within your community to ensure a seamless experience. After selecting Community, select Save. Select View/Edit Community Guidelines. On the Community Guidelines page that opens, select Edit Community Guidelines. Select a language from the drop-down menu. Select Continue. Enter your community guidelines. Repeat for your other community languages. Link to external community guidelines On the Edit Community Guidelines window, for all of your community languages, enter the URL to your community guidelines. Note: If you do not provide a URL for a particular language, members who select the community guidelines link while in that language are redirected to the community guidelines URL for your community’s default language. If the default language’s URL is also missing, members are redirected to the community-based guidelines page. Select Save.338ViewsSign in to react to this post0CommentsAurora: Configure privacy policy
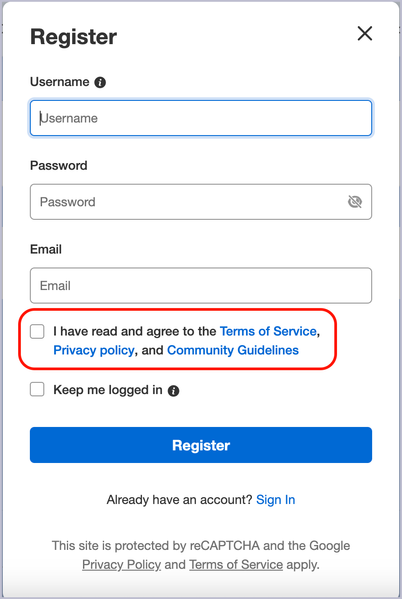
You can enable a privacy policy for your community to ensure your members know how your community collects, uses, and protects their personal data. Your privacy policy can be linked to an external URL or built within your Aurora community. You can designate your policy as required reading for registration or just provide a link on the registration window for new members. Depending on what you’re going for, building your privacy policy within Aurora creates a seamless experience with consistent branding, while linking to an external URL enables you to use one central location where your document lives so you don’t have to update it in multiple places. For localized communities, you can provide privacy policies in all your available community languages to ensure that all members of your community are aligned on security regardless of language. Provide link to privacy policy on registration window Open the Account menu and select Settings. Go to System > Account > Registration. To add your guidelines to the registration window, turn on the Add privacy policy link to registration page toggle. (Optional) To require new members to select a checkbox indicating that they read and agree to the privacy policy, select Edit, and then select the Acceptance required checkbox. To designate whether you want to host the guidelines on your community or link to an existing page, select Edit, and then select Community or External. Set up a privacy policy on your community Whether your members reach your privacy policy from the registration window or elsewhere in your community, you can edit them from right within your community to ensure a seamless experience. After selecting Community, select Save. Select View/Edit Privacy Policy. On the Privacy Policy page that opens, select Edit Privacy Policy. Select a language from the drop-down menu. Select Continue. Enter your privacy policy. Repeat for your other community languages. Link to an external privacy policy On the Edit Privacy Policy window, for all of your community languages, enter the URL to your privacy policy. Note: If you do not provide a URL for a particular language, members who select the privacy policy link while in that language are redirected to the privacy policy URL for your community’s default language. If the default language’s URL is also missing, members are redirected to the community-based privacy policy page. Select Save.329ViewsSign in to react to this post0CommentsAurora: Bypass moderation
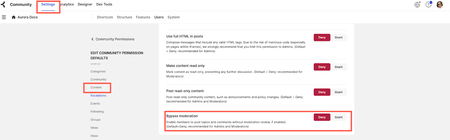
Members generally want to post content without moderation review. Admins can grant the Bypass moderation or Bypass comment moderation permissions to enable certain members to post or comment without moderation review. This option applies when the Moderation type is Selective or Required. Note: At this time, moderation cannot be set up by role, but this feature may be available in a future release. Instead, you can use the Bypass moderation permission to ensure that members with certain roles do not require moderation. See the screenshot below for the Discussion (forums) permission. This setting can be applied to all discussion styles. Learn more about configuring moderation modes for various content types.466ViewsSign in to react to this post0CommentsAurora: Reporting inappropriate content and member profiles
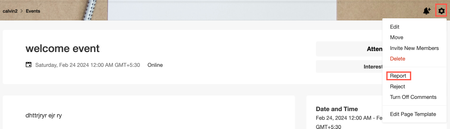
It is essential to maintain the cleanliness of the online communities and ensure a curated experience free from inappropriate content such as objectionable images, abusive language, spam, harassment, and more. The Report Content feature aligns with DSA standards, empowering community members to report undesirable content. They can report community posts (including comments and replies), Events, Private Messages, and User Profiles. Anonymous reporting is available for both posts (including comments and replies) and User Profiles, ensuring a safer and more compliant online community experience. Note: To enable this feature, contact Support. Let’s walk through an example on how to report a post. Go to the community post that you want to report. Open the Options menu. Select Report. A window opens: Select a Reason and optionally add details. Click Report. You receive a confirmation that the report has been sent to the moderation team for review. Moderators can view this report in the Manage Content dashboard. They can then take appropriate action on the report from here. Similarly, you can report: Private Messages: Moderators can take appropriate action from the Manage Content page. Member Profiles: Moderators can take action from the Abuse tab: Report content anonymously: When users report a post/member anonymously (without signing in), they'll be prompted to enter their Name and Email address. This feature comes with a reCAPTCHA protection. If they have a registered email ID, members are asked to sign in before reporting; if not, they can proceed with reporting the content anonymously. Note: To enable reCAPTCHA protection, contact Support685ViewsSign in to react to this post0CommentsAurora: Addition or deletion of tags while moving content
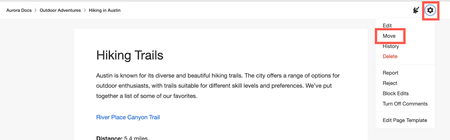
As an admin or moderator, you can move tagged content while honoring the destination board 's tag support status or requirements. Below are examples of different scenarios involving tagged content movement. All discussion styles follow the same behavior. Scenario 1: Move content that has no tags to a board that mandates tag Select a blog post with no tags and a destination board that mandates tags. Click Move. You will be prompted to add a tag. Click +TAG to add tags. If the destination board has a preset-tag list, then you can choose from the list of tags. If the destination board has freeform tags, then you can enter a tag of your choice. The tag is selected: Click Continue. The blog post is moved to the destination board and the chosen tag is added to the post: Scenario 2: Move content with tags to a board does not support tags Consider an example of an article with a tag: And you want to move the article to a board that does not support tags: Select Move from the options menu of the article. Select the destination board. Click Move. A confirmation window opens that indicates that the destination board does not support tags, and if you continue, the post will be moved without the tags, to honor the destination board’s tag settings. Click Continue. The post is moved to the destination board. Also note that the post has no tags. Scenario 3: As an Admin you want to move content to a board which supports preset-only tags. Also, the current tag(s) on the post are not in the preset tag list of the destination board. Consider the below example where the content you want to move has a tag called “GAME” And the destination board mandates tags and does not have “GAME” in its preset tag list. Select Move from the options menu of the article. Select the destination board. Click Move. A confirmation window opens that indicates that the destination board does not have GAME as a listed prest tag. Also, if you continue, the post will be moved with the tags and GAME will be added to the preset tag list of the destination board. Click Continue. The article is moved to the destination board with the same tag, ie, GAME. You can also see that GAME is now added to the destination board’s preset tag list. Scenario 4: As a non-Admin(say moderator) you want to move content to a board which supports preset-only tags. Also, the current tag(s) on the post are not in the preset tag list of the destination board. This scenario is the same as Scenario 3, but in this case, the move is done by a non-admin member. After selecting the destination board, click Move. A confirmation window opens that indicates that the destination board does not have GAME as a listed preset tag. Also, if you continue, the post will be moved without the tags. The tag will not be added to the destination board’s preset tag list. Click Continue. The post is moved to the destination board without tags.443ViewsSign in to react to this post1CommentAurora: Use keyboard shortcuts and Markdown to work faster
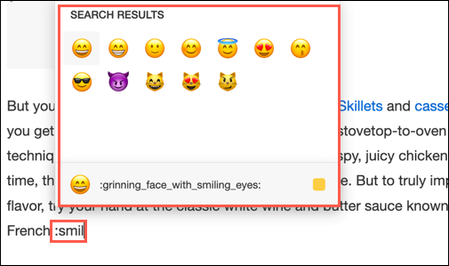
While creating or editing community content, you can make use of keyboard shortcuts and keyboard navigation to work faster and more efficiently. The Content Editor also supports Markdown. Markdown is a plain text formatting syntax commonly used by writers and programmers to write quickly without having to take time using the RTE toolbar options. For example, to bold a word, like “Dishes," you can type **Dishes** instead of having to highlight the text and click the Bold icon in the editing toolbar. In other example, to insert an emoji, you can type colon (:) along with the emoji name and select the required emoji from the search results: While creating or editing any content, you can refer to the Editor Help for assistance using these tools. View the Editor Help by clicking the Options icon > Help in the toolbar. Note: The Editor Help recognizes if you are using a Mac or Windows machine and displays the appropriate keyboard shortcuts and commands. The Editor Help provides the information about these aspects: Shortcuts: Use keyboard shortcuts to quickly apply standard text and paragraph formatting (for example, bold, italics, paragraph headers) to your content. Keyboard Navigation: Describes how you can navigate community pages using the keyboard instead of a mouse to meet accessibility requirements. Markdown syntax: Lists the markdown syntaxes you can use while writing the content instead of formatting the text using toolbar options. For example, to apply Heading 1 while starting a paragraph to a word - “Content Editor” you can type # Content Editor instead of having to highlight the text and click the Heading 1 option in the editing toolbar. Similarly, you can use other markdown syntaxes to format the content. Let’s look at an example where you want to refer to the Editor Help while creating a discussion. To view the Editor Help, Check out the below walkthrough: 11 STEPS 1. Go to the board where you want to create a discussion and click Start a Discussion. 2. The editor window opens. 3. Enter the Title of the discussion. 4. Enter the content for your discussion. 5. To view the Editor Help, click the Options icon > Help. 6. By default, the Editor Help window is displayed with the Shortcuts tab. 7. To view accessibility information, click Keyboard Navigation. 8. To view the list of Markdown syntaxes, click Markdown Syntax. 9. Close this window. 10. Click Publish. 11. The discussion is successfully published. Here's an interactive tutorial ** Best experienced in Full Screen (click the icon in the top right corner before you begin) ** https://www.iorad.com/player/2173528/View-the-Editor-Help981ViewsSign in to react to this post7CommentsAurora: Search for specific content on the Moderation tab
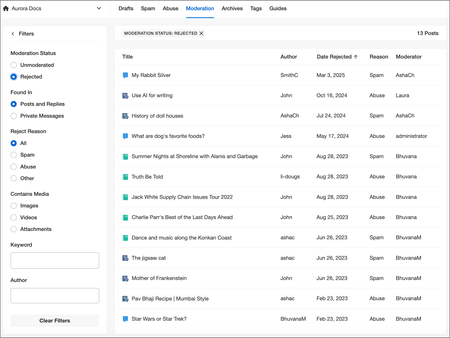
On the Moderation tab, you can filter and search for specific posts that are sent for moderation. You can filter the content by moderation status, publication status, and content types. You can also filter by the title or author of the post. To filter for specific content in the Moderation tab: Sign in to your community as a Moderator. Open the Account menu and go to Manage > Moderation. The Moderation tab is displayed with the list of posts and comments (replies) sent for moderation. To narrow the results displayed, click Filters. In the Moderation Status section, select any of the following: Unmoderated: Displays the posts, replies, and comments that are sent for moderation. By default, this option is selected. Rejected: Displays the posts, replies, comments, and private messages that have been rejected. You can take further actions on rejected posts or private messages. Learn more about viewing rejected posts on the Moderation tab. If the Moderation status is set to Unmoderated, you can further filter the results by: Status: Select the publication status (Published or Unpublished) of the post. Found In: Select the content types (Forums, Blog Comments, Knowledge Base Comments, Ideas, and Event Comments) you want to see. To see everything, select All. If the Moderation status is set to Rejected, you can further filter the results by: Posts and Replies: Displays posts, replies, and comments that have been rejected. You can also select the Reject Reason for which the posts were rejected (Spam, Abuse, or Other) and can search based on the Keyword and Author of the post. Private Messages: Displays private messages that have been rejected. To facilitate faster search results while moderating content, a filter for media is available on the Moderation tab in the Mange Content dashboard. The Moderation tab is updated based on the provided search criteria.629ViewsSign in to react to this post0Comments