Can somebody help me with session keys?
Hello, We'd like to connect one of our group hub with our Power BI report. We'd like to see the list of users synched automatically (it's a hidden group hub, and whoever joins the group grabs a license automatically to our beta software too). So far it seems that Bulk API was not really helpful with that, but Search API would be a great fit. However, this is where we have our problem - it requires a session key, that we don't know how to get. We use SSO on our site (SAML), and I can't seem to find anything useful in the documentation (https://developer.khoros.com/khoroscommunitydevdocs/docs/search-api-overview)... Can somebody help me how to make this work? We're running on Classic currently. Thanks, Noémi 862ViewsSign in to react to this post
 1Comment
Aurora: Archive a group
Archiving a group works differently from other place types. If you put an open group inside a private category, for example, its content is still accessible. To remove a group from all members' views: Communicate to members that the Group is being removed. Move the most interesting discussions, articles, and posts manually to the relevant existing places. Note: Make sure you do not delete the content as it may impact the members' metrics and their ranking. Move the group into a category hidden from lists and menus. To keep the group behind a private category, edit the group's permissions. In permissions for the group, set all the permissions to Deny. Remove all members from the group. In the case where you don’t need the group to be kept in a private category, you can delete the group from the Community Structure. Before deleting the Group, make sure that the relevant content is moved to other places. Note that the list of group members will be lost and if the list matters, it should be saved before deleting the group. This hides the group from navigation menus and makes the node and content inaccessible to all but Administrators.254ViewsSign in to react to this post0CommentsUse Message body
Hi everyone! I'm currently trying to create a custom component, the goal is to display specific messages using a condition. I have the correct QUERY but I don´t know how to use/render the response. This is my code: <#assign apiVersion = "2.0" /> <#assign QUERY = "SELECT * FROM messages WHERE tags.text = 'F5 XC'" /> <#assign messageList = rest(apiVersion, "/search?q=" + QUERY?url).data.items /> <section> <h1 style="color: red;">Message List Component</h1> <#list messageList as messageItem> <h2 style="color: green;">${messageItem.subject}</h2> <p>${messageItem.body}</p> </#list> </section> This is the result: I'm getting in the body html tags as strings, so my question is how can I use the response or how can I render the message body properly?Solved855ViewsSign in to react to this post6Comments MattV3 years agoKhoros Staff
Freemarker auto escaping is turned on for your community. This is a great security measure to prevent arbitrary code from executing on your community.
More details on freemarker auto escape: https://freemarker.apache.org/docs/dgui_misc_autoescaping.html
The safest option is to work around this by removing the HTML markup from the response, and render the text as plain text.
You can also see from that freemarker doc that you can use ?no_esc to prevent escaping on that variable.
BE CAREFUL doing that, especially on the message subject. The message body is USUALLY protected by HTML permissions and prevents users from posting unsafe HTML. But it shouldn't be assumed to be fool-proof.
DO NOT ?no_esc the message subject. The message subject allows arbitrary HTML regardless of HTML permissions in community. Core components escape the subject, but the API does not do this for you, so someone can put javascript in the message subject, and it would execute if you do ?no_esc on it.
Some characters get double-escaped, such as " appearing as "e; , so you may want to add some fixes such as ?replace('"e;','"') on the message subject so safe characters like that still appear as desired
Sign in to react to this post
Aurora: Custom group roles
Community Administrators can create custom group roles at the community, category, and group levels. Group roles are created for a specific group and are not shared across groups. Custom group roles are not inherited from parent nodes. Create a custom group role Edit a custom group role Delete a custom group role To create, edit, or delete a group role for a particular group, go to that group using the Community Structure page and follow the instructions for the task you want to perform. Create a custom group role You can create a custom group role in the following ways: Clone an existing group role Add a new group role Clone an existing group role At the community level, you can create a custom group role either by cloning an existing group role (Owner, Curator, Inviter, or Member role) or adding a new group role. When you clone an existing role, your new role has the proper foundation permissions for operating correctly within a group context. Note: The Clone option for group roles is supported only at the community level and not supported at the category, board, and group node levels. To clone an existing group role at the community level: Sign in to the community and go to Account > Settings. The Community Settings page displays. Go to Users > Roles and Permissions. Go to Group Roles and open the Options menu next to the role you want to clone. Click Clone. Enter the Role ID for the new role. (Optional) Enter a Description for the new role. Click Save. The new role appears in the Group Roles section, and you can start assigning users to this role to group members. Add new group role You can add a new custom group role at the community, category, and group levels and start assigning users to this role. When you add a new role, all the default permissions are assigned for the role and you can modify the permissions based on your requirements. To add a new group role: On the Community Structure page, click the required category or group node where you want to add a new group role. Click the Category Permissions tab. The list of Category Roles and the list of Group Roles of the respective node are displayed. In the Group Roles section, click Add Group Role. Enter the Role ID for the new role. (Optional) Enter a Description for the new role. Click Save. The new role appears in the Group Roles section and you can start assigning users to this role. Edit a custom group role In Community Structure, go to the category or group where you want to edit the role and click Category Permissions. Click Edit next to the role you want to edit. Edit the permissions as needed. Click Save. Delete a custom group role To delete a custom group role: In Community Structure, go to the group where you want to delete the role and click Group Permissions. Open the Options menu and click Delete next to the custom group role you want to delete. Click Delete. When you delete a custom group role, any member permissions associated with the role are revoked.238ViewsSign in to react to this post0CommentsAurora: Delete a group and sub-groups
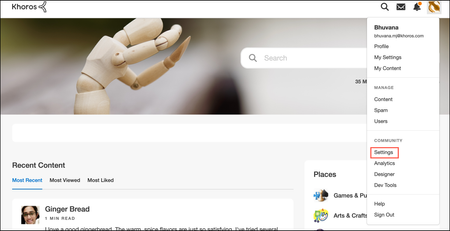
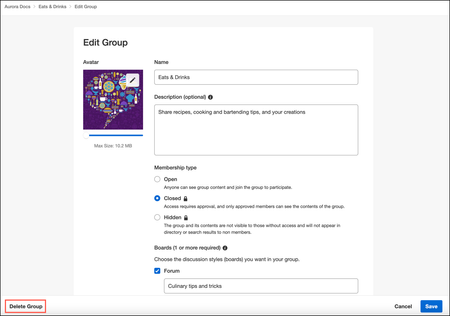
Group Owners and Community Administrators can delete groups. Warning: Deleting a group permanently deletes all of the content, membership, and settings associated with the group. The action cannot be undone. No notification is sent when a group is deleted. Delete a group in Community UI Delete a group in Community Admin Delete a group in Community UI Sign in to the community and navigate to the Group 9age for the group you want to delete. From the Options menu, click Edit Info. In the Edit Group page, go to the bottom left of the page and click Delete Group. Click Delete Group in the confirmation modal. The group is deleted and you are returned to the group parent page (the top-level Community page or the parent Category page). Delete a group in Community Admin Go to Community Admin > Community Structure. Navigate to the group you want to delete. Hover your cursor over the group and select Delete. Click Delete Place to confirm. The group is deleted. Note: You cannot delete the boards with in a sub-group.355ViewsSign in to react to this post0CommentsAurora: Create a post in a group
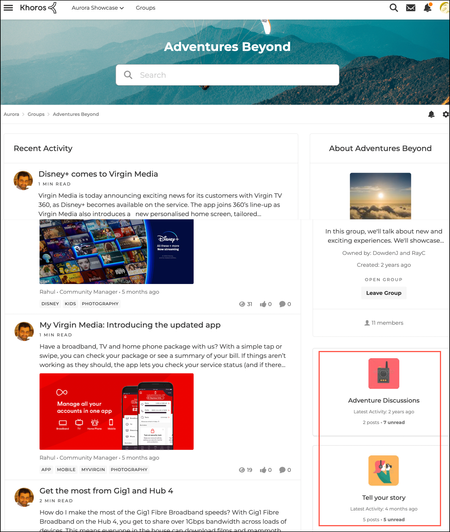
A Group member can start a new post (discussion, blog post, article, idea, or event) on the respective board page (Forum, Blog, KB, Ideas, Event) of the group. Note that when a group is created, only the forum board is available by default. If you want to add other boards to the group, you must include the required board while creating the group. Learn more about creating a group. Let’s take an example where you want to start a discussion in the group. To create a new post in the group: Go to the Group where you want to create a new post. The Group page is displayed. Here, various boards are displayed in the form of widgets as shown in the below screenshot: To start a discussion, go to the forum and click Start a Discussion. Similarly, you can create other types of posts in the respective boards of the group.184ViewsSign in to react to this post0CommentsAurora: Managing group members
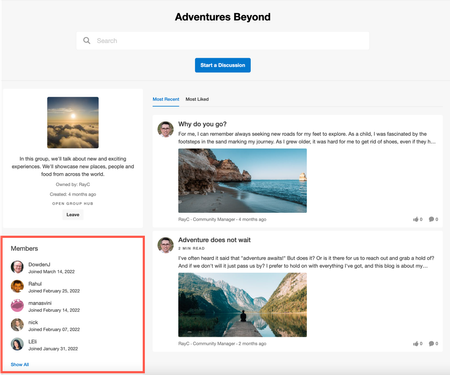
Community Administrators and Group Owners can manage memberships from a group’s Manage Members page. From this page, you can: View group members Assign or edit group member's role Invite new members to the group Remove members from a group Manage pending invitations Manage requests to join Note: Group Inviters and Curators cannot access the Manage Members page. Inviters and Curators invite members using the Invite Members option in the Options menu. View group members Group members (who are not a group owner) can see a list of group members on the main Group page in the Members widget. To view group members in Manage Members page: Sign in to the community and go to a group. Open the Options menu and select Manage Members. The Manage Members page opens with the Members tab by default. Group members are listed along with their membership role and the date that they joined the group. You can sort this list by newest or oldest members or search for a specific member by typing a name in the filter. Change a group member's role Administrators and Owners can change a group member’s role. From the Manage Members page, click the Options icon > Edit Role next to their name in the list, select the role(s) to grant for the member, and click Apply. Invite a member to a group From the Manage Members page, members with the Send group invitations permission can invite other community members to join the group. To invite a community member to join a group: Go to the Manage Members page for a group. Click Send Invitation. Search for the member by entering their username in the To field. Select the Role to grant the person and enter a welcome note (optional). Click Send Invite. Remove a member from a group From the Manage Members page, Administrators and Owners can remove a member from a group. To remove a member in the Community UI: Go to the Manage Members page for a group. Click the Options icon > Remove next to the member you want to remove from the group. Click Remove to confirm. Manage pending invitations To manage pending invitations: Go to the Manage Members page for a group. Click the Pending Invites tab. For each member in the list, you can Resend or Cancel the invitation request. Manage requests to join For Closed groups, community members can request to join the group. You can manage these requests from the Manage Members page for the group. To manage invitation requests: Go to the Manage Members page for a group. Click the Requests tab. Accept or Deny each request in the list.1.1KViewsSign in to react to this post2CommentsAurora Group roles hierarchy
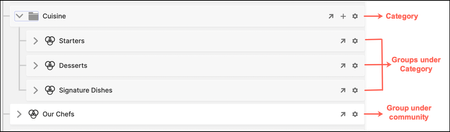
In Aurora, you can set the permissions for group roles at the community, category, or group level. By default, the out-of-the-box role permissions are set at the community level. These roles and the default permissions cascade down to the groups under them. To understand the hierarchy, let’s take an example of a community called “Aurora” with: a group called “Our Chefs” and a category called “Cuisine” with groups such as “Starters,” “Dessert,” and “Signature Dishes” Let’s look at how the permissions of Curator group role are available at various levels: Community level: At the community level (Aurora), the roles and permissions are set to the OOTB values as shown in the below screenshot. Note that you can add members to group roles only at the group level, not at the community level. Category level: At the Category level (Cuisine), the roles and permissions are set to the default values as shown in the below screenshot. Note that you cannot add users to the group roles at the Category level. Group level: At the Group level (Our Chefs), the roles and permissions are set to the default values as shown in the below screenshot. In this level, you can add users to the group roles using Add Members. You can change the permissions of any of these roles at the group level or category level. The permissions at the group level takes precedence over the roles defined at the category level, followed by the roles defined at the community level.375ViewsSign in to react to this post0CommentsAurora: Leave a group
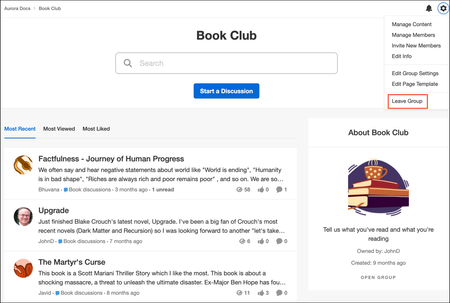
A group member can opt to leave a group at any time. To leave a group: Sign in to the community and go to the group you want to leave. In the group page, click Leave Group button. or Open the Options menu and click Leave Group. The member receives a confirmation once they have been removed from the group. Owners and Administrators do not receive a notification when a member leaves a group. Likewise, Administrators are not notified if the group Owner leaves the group.298ViewsSign in to react to this post0CommentsAurora: Ways to join a group
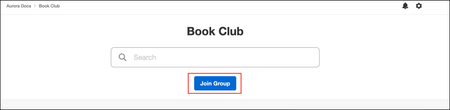
Community members can join a group in several ways: Join Group button Request to join a closed group Receive an invitation to join a group Using Join Group button Community members can join any open group from the Group page using the Join Group button. After someone joins a group, the group appears in the community’s Group page, where you can filter the Groups list to see which ones you’re a member of. You can also see the Groups you're a member of on your community profile page. Request to join a closed group Using the Join Group button, community members can request to join Closed groups from the Group page. After requesting access, a window opens indicating to the member that their request to join was sent and the system sends the group Owner an email with the request. In addition to email notification, group Owners see pending membership requests in the Requests tab of the Manage Members page. The group Owner has the option to Approve or Deny the request. When Owner approves the request, the new member receives a private message in the community that contains a link to the group. If the group Owner denies the request, the owner must confirm the decision. When the request denial is complete, the Owner sees this confirmation message: The member requesting to join receives a private message: Receive an invitation Members with the Owner, Inviter, or Administrator role can invite any community member or external users to any group (Open, Closed, or Hidden). Note that community members can access Hidden groups by invitation only. See Invite members to a group for more information.406ViewsSign in to react to this post0Comments