Lithium Community 18.12 Release Notes
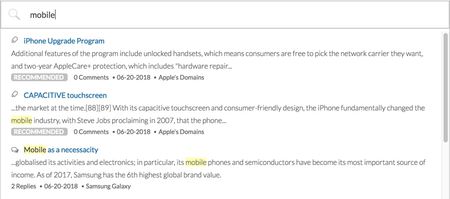
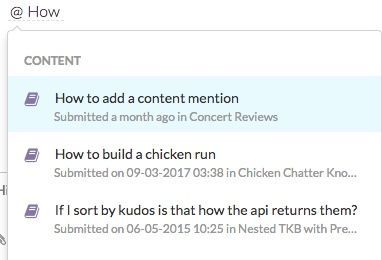
New Features Promoted Search Places included in search results SEO improvement: Rich Google search results for forum pages Updates to the message editor Real-time virus scanner for file attachments Content mentions @Mention notification email template name change Me Too metrics provided in LSI Improved REST API call reporting in Toolbox In-app reference documentation for email template context objects Improved badge assignment performance Update to the Vitality quilt Studio endpoint authentication error handling API changes Promoted Search From time to time, you might want specific community content to display at the top of the search results list when users search for specific keywords or phrases. With Promoted Search, you can now associate specific searches to specific community URLs to “boost” specific pieces of content to the top of the search results list. Here’s how promoted search results mapped to the keyword “mobile” might display: Let's look at a few scenarios where Promoted Search might be useful. A community admin can use Promoted search to point end-users to official company information, such as the GDPR policy or some specific product documentation. An admin could also use Promoted Search to create awareness about company announcements, event campaigns, news items, or certain products. Consider an instance where one of your products is experiencing a service outage. You might create an article that describes the issue and possible workarounds. During the outage, you could promote this article to the top of search when a customer searches for the keyword outage. After the outage is resolved, you could delete the promoted search rule. Note: To use Promoted Search, you must be on Search version 3.0 and or above. Learn more about Feature Versions. Create Promoted Search rules To create a Promoted Search rule: Sign in to the Community as an admin or a user who has permission to create promoted search rules. Go to Content > Promoted Search. By default, all promoted search results display with the “Recommended” label in front of it. For example: To change the default label open the Promoted Search Indicator drop-down menu and choose the label you want. Or, select None. Click Add a Rule. Note: After you start adding rules, the Add a Rule button displays at the bottom of the rules list. Enter the keyword(s) or phrase and the content link (full URL) of the community content you want to promote. Note: Separate multiple keywords/phrases with commas. Multi-word phrases require an exact match. Click Add. Optionally, you can set the priority order of the rules you create. Sometimes, you might want to create multiple rules for the same keywords/phrases. Use the priority field to indicate the order in which content that maps to the same keywords appears in the search results list. Note: For any given search, a maximum of two promoted search results will be shown. To edit or remove existing rules: Go to Content > Promoted Search. Find the rule in the list you want to edit. Click Edit. Edit the Priority, Keywords, and Content Link, as needed. Click Save. To delete a Promoted Search rule, click Remove next to the rule. Turn Promoted Search rules on and off From time to time you might want to temporarily turn off Promoted Search rules. For example, you might want to turn rules off while you add new rules, change existing rules, or change the ranking order of rules. Or, maybe the rules you’ve created promote certain content during specific times or a temporary event on your community. Rather than deleting the rules or turning off Promoted Search, you can temporarily turn off the processing of these rules, effectively turning off Promoted Search. Just click Enabled or Disabled above the rules list. This way, you don’t lose all the rules you’ve built when the feature is disabled. You can continue to manage the rules (add/edit/delete) in the disabled state. Grant users permission to create promoted search rules To create and edit promoted search rules, users must have the Create promoted search rules permission. To grant someone the ability to create promoted search rules: Sign in to community as an Admin. Go to Users > Permissions. Click Edit Users tab and search for the user to whom you want to grant this permission. (Alternatively, you can go to the Roles tab and Edit the permissions for all users with a specific role.) Scroll down to the Search permissions and Grant the Create promoted search rules permission. Click Save. Places included in search results In addition to showing specific content in search results, search results now return community “places”. Places are boards, categories, or groups that include the search term in their name or description. For example, if you searched for “iWatch”, boards and categories with “iWatch” in their name or description will display in the Places search results area. Up to 3 places are displayed in the Places search results area. Note: To include places in search results, you must be on Search version 3.2. Places is enabled by default when you upgrade Search to version 3.2. If you want to disable the Places feature, you must file a ticket with Lithium Support. Learn more about Feature Versions. In addition to Places being returned in the auto-suggest results, the Search Page now includes a Places view: If you see the Places tab, but the listing of Places does not appear, check to see whether your Search Page quilt includes the search.widget.node-search component: Open Studio > Pages. Click Change and select the Search > Search Page to open the Search Page quilt. Click Switch to XML View. Add <component id="search.widget.node-search" useTabVisibility="true" /> to the main-content section: <add to="main-content"> <component id="search.widget.message-search" useTabVisibility="true"/> <component id="search.widget.user-search" useTabVisibility="true"/> <component id="search.widget.note-search" useTabVisibility="true"/> <component id="search.widget.node-search" useTabVisibility="true" /> </add> Click Save. SEO improvement: Rich Google search results for forum pages Starting with the 18.12 Release, the markup for all community forum pages has been updated to support the latest Google Q&A Structured Data guidelines, described here. Now, when someone searches on Google and a forum page from your community appears in the Google search results, a rich preview displays similar to this: Note: Google will not start showing this rich preview for forum topics from your community immediately. The new markup will increase the likelihood that Google will use a rich search results format. Read more about Google's structured data policies here. The search result listing highlights the solved answer (if it exists) and other answers in carousel format with the number of votes/kudos each has received. Updates to the message editor With the 18.12 release, we have updated to the 4.7.13 version of the TinyMCE message editor, which includes a number of fixed issues, listed on the TinyMCE site. Note: We previously announced the availability of the updated message editor in the 18.9 release, but we put the upgrade on hold to investigate some potential issues with the upgrade. These issues have been addressed in the 18.12 Release. All Community customers will be upgraded to TinyMCE 4.7.13 when they are upgraded to 18.12. We strongly recommend testing your message editor and TinyMCE features thoroughly on your stage environment after the state environment is upgraded before your production environment is upgraded to 18.12. Real-time virus scanner for file attachments Lithium’s real-time virus scanner service checks for viruses in files attached to posts to protect your community from becoming a distribution point for malicious software. Basically, this service: Scans all attachments while they are being uploaded and removed any malicious attachments before getting posted to the community. Keeps the service’s virus definitions up to date. Periodically scans previously uploaded files to catch any malicious files based on latest virus definitions and updates. (Infected files are automatically removed, any references to the file are removed.) By default, this service is disabled. To have it enabled, open a Support ticket. As an Admin, you can define who should receive the Virus Scan results email, which is delivered as a daily digest. You can also set the time of day that the email is sent out the recipients. Note: In addition to the daily digest email, real-time notifications are also displayed. If malicious attachments are found, a CSV file is attached to the daily digest email that provides the following information for each attachment: Community User ID of the person who attached the file URL of the post to which the file was attached Date when the attachment was added File name of the attachment To set the Virus Scan daily digest email distribution options: Sign in to Community as as Admin. Go to System > File Attachments. In the Send virus scan daily digest email to field, enter the email addresses (separated by commas) of the people who should receive the email. In the Run the virus scan daily digest at this time field, enter the time of day (PST) that the virus scan email should be sent out. Note: For the real-time virus scanner feature to work properly, you must enter values for both the Send virus scan daily digest email to and Run the virus scan daily digest at this time settings. Click Save. Now, when an error is detected with an attachment, the file is removed and an error is displayed: Email templates and notifications for virus detection emails The Virus Scanner Service includes a new email template (Virus Scanner Digest Report), which is sent to the predefined list of people to report the results of the daily virus detection scan. You can view the content of the Virus Scanner Digest Report in by going to Studio > Text Editor > Email Text and selecting the template from the email template drop-down list. Like all community email templates, you can edit their content to meet your specific needs or company voice. Learn more about editing content of email templates. Content mentions We are announcing the Early Access release of a new feature called Content Mentions. Content Mentions enable users to call out specific posts within the body of a message. It's a way to quickly embed a link to other content in the community. To get started with this new feature: Open a ticket with Lithium Support to enable content mentions. Requirement: Content mentions is supported only on Responsive communities. Set the Mentions feature to version 2 in Studio > Features. (You will not see the Mentions feature in Studio > Feature tab until Support has enabled it for you.) Grant users the Mention content in posts permission in Community Admin. Note: The Early Access release does not support email notifications when a user's message is mentioned in a post, and content keyword search supports only full word searches. Email notifications and prefix search will be included in the GA release. You will see the new email template in Studio, but you will not able to set notification preferences at this time. Content mentions are supported in all conversation styles in both topics and replies/comments. Here’s how it works Let’s say you're responding to a forum topic and you want to link to another post that includes some helpful information. Using the Rich Text editor, type the @ symbol. A default list of suggestions appears in a pop-up. Note: When User Mentions are enabled on the community, users appear at the top of the suggestion list. Type a few letters of a keyword in the subject or body of the message you want to link to. As you type, search results with messages matching that keyword organized by conversation style appear in the pop-up. You may enter multiple words in the mentions pop-up. When multiple words are entered, all words must be present in the subject and/or body. When you select an item in the list, Community adds the subject of the post with a hyperlink in the body of your message. Note: The content mention link does not currently work in Preview Mode. Mentions UI update Mentions v2 updates the look of the mention search pop-up UI. This same change will also affect the look of the Product Mentions search pop-up UI when Mentions v2 is enabled. With Mentions v1, the mention search looks like this: With Mentions v2, the mention search looks like this: Content Mentions documentation To learn more about Content Mentions, see: About @Mentions Enable @Mentions Set @Mentions permissions @Mention notification email template name change We have changed the name of the @Mention notification email template in Community Admin to @Mention user notification to differentiate it from the new @Mention content notification email template. This change does not affect your code and customers will be unaware of the update. The @Mention user notification email template file name (email_content.template.mentions.text) is unchanged. Me Too metrics provided in LSI Me too is a community feature provided in our Forum and Q&A discussion styles that enable users to indicate that they are experiencing the same issue or agree with another user’s comment. Prior to 18.12, this metric was reported only in Admin metrics; now this metric is included in LSI. The Me Too metric helps community moderators understand what the most important topics/issues are. To view Me Too metrics in LSI: Sign in to LSI. Go to Content. Click Forums or Q&A. In the Top # table, open the Settings menu and click Manage Columns. Select Me Too. Click Save. The Me Too metrics are displayed: Improved REST API call reporting in Toolbox We have improved the REST Usage tab in Toolbox to display the LiQL queries used in the page. LiQL queries are used with the Community API v2 /search endpoint. Previously, we simply showed the /search endpoint in the REST Usage table. When more than one LiQL query was made in a component, it was difficult to tell which query applied to the /search entry in the list. Now we show the LiQL query in the table instead of the /search endpoint to help you better identify heavy LiQL queries. In-app reference documentation for email template context objects We have moved email template context object documentation into the Studio > Text Editor > Email Text tab. Because context objects are often specific to the template in which they are used, you will now find the definition of Velocity context objects and methods used in an email template below the email template editor a new Email Template API Reference section. The Email Template API Reference section includes two subsections. The Variables Used in the Template subsection lists the context objects used in the template along with their definitions. Note: Variables used in logic like for loops do not appear in this list. This is because those variables are used specifically within that logic and are not able to be extracted programmatically. If you are familiar with the Velocity template language, the variables in these cases will be easy to decode. The Email Template Context API subsection is for advanced users and developers customizing email templates. This section provides API reference documentation for the top-level, nested, and enum objects available for use in the template. Improved badge assignment performance We have made performance improvements to the Badges feature. Awarding badges to 2 million users now takes less than 2 minutes. Previously awarding badges to 100,000 users would take approximately nine minutes. Update to the Vitality quilt The out-of-the-box Vitality quilt (vitality.quilt.xml) used on the default Community Page includes the Community Metrics component (community.widget.metrics-display) to show the count of registered users. The Community Metrics component currently has the li-metric-name parameter value, which dictates the metrics displayed by the component, set to completed_registrations. This metric includes fully-registered, partially-registered, and in some cases, deleted users. We have updated the out-of-the-box Vitality quilt to use a new li-metric-name value (completed_registrations_computed) which displays the count of fully-registered users only. To see this change, you must update the Community Home feature version to 3.1 in Studio > Features. If you have customized the Vitality quilt If you have customized the Vitality quilt and you want to use the new completed_registrations_computed metric in the Community Metrics component, you must make the following changes in your custom quilt. In the quilt XML, change: <component id="community.widget.metrics-display" li-metric-name="completed_registrations"/> to <component id="community.widget.metrics-display" li-metric-name="completed_registrations_computed"/> Change the CSS class used by the quilt from: lia-vitality-metrics-display-completed-registrations to lia-vitality-metrics-display-completed-registrations-computed Update the text key used by the Community Metrics component. Take the value of the text key: li.community.metrics-display.completed and apply it to this text key: li.community.metrics-display.completed-registrations-computed Studio endpoint authentication error handling We currently allow customers to authenticate Studio Endpoints using a Session Key. Starting in 18.12, Community will throw a 403, Forbidden HTTP response code along with an error response if the session key used has expired. The error response differs depending on the content type. The following table outlines the error response format if the restapi.session_key is an invalid (i.e. expired) token. content type error response text/html 5.8KViewsSign in to react to this post
 79Comments
Khoros Communities 21.1 Release Notes
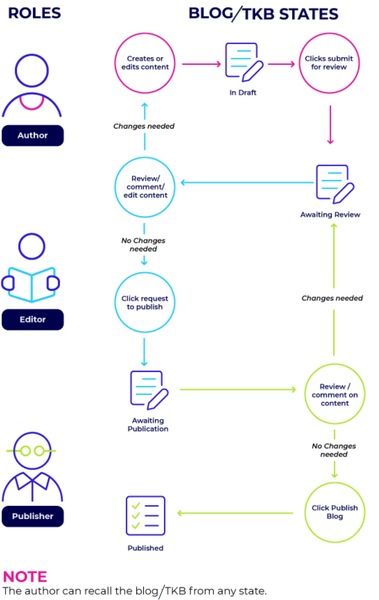
We begin this year with GA releases for Content Workflow and Approval for Blogs and TKB discussion styles along with API, Spam enhancements, Multi-Factor Authentication, Events Analytics, and Billing Metrics. We have also added a new blog just for our developer community! Features API updates Bug Fixes Features Content Workflow and Approval improvements for Blogs and TKBs (GA) Multi-Factor Authentication (GA) Enhancements for Spam Management Billing metrics (GA) Events Analytics (GA) Enhancement to temporarily disable community emails Announcement: Temporarily disabling Print Knowledge Base option in Tribal Knowledge Bases. New Developer Blog Content Workflow and Approval improvements for Blogs and Tribal Knowledge Bases(TKBs) (GA) In the 20.11 Release Notes, we announced Early Access for Blogs v3 and TKB v4 with a 3-step content-creation workflow to publish articles. This is now available for General Availability (GA). These new versions are designed to focus on collaboration and usability for higher quality articles. This flowchart shows how an article moves through the publishing workflow and the tasks members with specific roles can perform. Each article moves through different states and is assigned to members with specific roles. Thus, you always know what state an article is in, and your entire team is clear on their and others’ responsibilities. Content workflow and approval provides these blog and TKB enhancements: Granular Permissions: More robust permission structure to support different content roles - Author, Editor, Publisher for different purposes- create, review and publish respectively. With granular control over author, editor, and publisher permissions, you can clearly define who can perform each task in the publishing workflow. Learn more about roles and permissions in Blogs v3 and TKB v4. Dashboard improvements: Improved article dashboard to track an article’s journey in the publishing workflow and make it easier to take relevant actions. Learn more about Dashboard improvements for Blog v3 and TKB v4 Draft History view: A new component to track every action performed on an article until it is published. This records what action was done by whom and at what date and time. Compare two versions of a draft or published articles: Compare any two versions when the article is in the workflow process or after the article is published. The highlights show the differences between two versions of a draft or article. Internal comments: Provision to add internal notes for the article between the members collaborating on the draft. Notifications: Email Notifications to relevant community members at every stage in the Workflow. Note: When you upgrade Blogs to Blogs v3, all members with the BlogAuthor role in the previous versions will continue to have the BlogAuthor role in v3. However, in v3, BlogAuthors cannot post blogs directly, they can only send it for review. When you upgrade TKB to TKB v4, members with Start new articles and edit drafts permission will continue to have the permission after upgrade. You must assign members the BlogEditor, BlogPublisher, TKBAuthor,TKBEditor and TKBPublisher roles. We recommend that you use the default roles, instead of custom roles, as the workflow notifications are based on the default roles and sent to members who have these roles. Enablement: For Blogs v3, goto Studio>Features>Blogs and choose v3. For TKB v4, goto Studio>Features>TKB and choose v4. Learn more on quilt changes for Blogsv3 and TKBv4 Learn more about Content Workflow and Approval improvements for Blogs and TKB. Multi-Factor Authentication (GA) With this release, we announce the General Availability (GA) of Multi-Factor Authentication (MFA). Enabling MFA in your community enforces an additional layer of security which helps prevent unauthorized account access. After MFA is enabled for a community, the system mandates all privileged users (identified on the basis of certain elevated user permissions) to have this additional level of authentication to access the community. These users must: complete a one-time MFA setup for their account and add their account in an authenticator app provide a verification code generated by the authenticator app, in addition to the username and password for signing into the community. Note: As of now, MFA support is available only for non-SSO communities. To enable MFA for your community, open a Support ticket. Learn more about MFA. Enhancements for Spam Management We’ve introduced enhancements to make it easier to manage spam on your community. With the new Spam Quarantine page, you can seamlessly help combat spam while also reducing the risk of losing legitimate content in your community. We’ve also made it easier to mark all the posts from users you want to ban from your community as spam when you ban them. This eliminates the hassle of searching for the posts and then marking them as spam while you ban users. Note : These spam enhancements are available to all customers. Spam Quarantine Page Following are the list of enhancements to the Spam Quarantine page: A new look and feel of the Spam Quarantine page. You can select multiple posts to mark them as Not Spam. You can see whether a post was auto classified as spam by the system, or by a moderator. You can filter out all the auto classified posts for quick review. You can select multiple posts to Hide them. The spam posts that you hide will not show up on the Spam Quarantine page. By doing so, you can avoid re-evaluating them for their content. However, the hidden posts will show up on the search results when you search in the Spam Quarantine page. Learn more about Spam Quarantine. Ability to mark all posts of a user as spam while banning the user from your community While banning a user from the user’s profile page, check the Mark all content as spam option to mark all the posts of that user as spam and move them to Spam Quarantine. This also deletes all the Private Messages sent by that user. Note: Ensure that the Match exact username and Match exact email address checkboxes are selected and the user details are of the user whose profile page you are on. Learn more about banning users from the community. Deleting Private Messages sent by a member while marking all their posts as spam Earlier, the Mark all content as spam option to mark a member’s posts as spam, did not handle the user’s private messages. You had to manually delete all the private messages from that user. In this release, we extend this functionality to delete all the private messages sent by the user. This option is available under the Moderator Controls section in the user’s profile page. Billing metrics (GA) We now bring you General Availability for Billing Metrics in Community Analytics. With Billing metrics you can access how your billing-related metrics trend against the contractual tier of your Community. This metrics shows the current usage against the contractual tier limits for the metrics subscribed to in your contract. Metrics also shows the timeline view of usage of all the metrics subscribed in the contract. Note: Open a support ticket to enable Billing Analytics in your community. Learn more about Billing Metrics. Events Analytics (GA) We are happy to announce the general availability of Analytics for our brand new discussion style - Events. With Event Analytics you can measure success around the Events in your community and improve engagement and usage. It provides you key metrics to measure the value delivered by Community 'Events' as a discussion style, which includes Events in your community RSVP responses Unique visitors to the Event page List of members By applying the Event ID (Thread ID)filter, you can list the members who were invited to that event responded with an RSVP to that event visited that Event page Learn more about Events Analytics. Enhancement to temporarily disable community emails Up to now, to temporarily pause notification emails to community members, you were required to open a support ticket. In this release, we introduce the ability to enable Admins to temporarily disable emails sent from your community to the community members. Admins can use this option to pause notification emails while performing maintenance work on the community, such as consolidating boards and/or updating the community board structure, refining rank structure, or in the event of a spam attack. However, members will still receive user registration, password reset, and email update notifications. This option is available in the Admin settings under the Maintenance tab. Announcements: Temporarily disabling the TKB Print Knowledge Base option. We are working to improve the performance of the TKB Print Knowledge Base feature. As such, we are temporarily disabling this feature. If you need to use this feature during this time, reach out to our Support team. New Developer Blog A new blog dedicated to our development and engineering community is now available in the Dev Network area of Atlas. Our goal with this new blog is to share information, tip and tricks, success stories, and other topics of interest to developers and engineers working with Khoros' many products and solutions. In a general audience blog format, we rarely get the opportunity to explore how our APIs and software features can help engineers build successful solutions around Khoros products. This is where the new Developer Blog comes in. It's a chance for us to "get into the weeds" about how you can get the most out of Khoros' APIs for your next project. Do you have a successful project or innovative solution that you would like to share with the Khoros dev community? Email us and let us know. We'd love to have you as a guest author. API updates 21.1 introduces several new capabilities to the endpoints responsible for creating and updating messages in Community API v2. These new capabilities are centered around the new content workflow system: Apply a draft status to new TKB articles and blog posts. Perform edit actions on drafts ahead of submitting them for publication. Submit TKB articles and blog posts for publication. Return articles from a review state back to a draft state for additional author action. Return an edited article or post to the editor for additional action. Recall an article to a draft state (performed by an author). Publish an article. Schedule, update, or cancel a publication time for a new post or article. Nominate a forum topic to become a TKB article. Approve/reject a nomination (forum topics nominated to become TKB articles). Add and remove contributors to a blog post or TKB article. We have also added several new LiQL capabilities for the new content workflow system. These include: Retrieve content workflow information for a specified message. Retrieve messages with a draft, in_review, in_approval, or nominated state within a board. Retrieve the current publication status for a message. Retrieve messages for a specified board where a targeted user is listed as contributor or coauthor. You Found It. We Fixed It. We have fixed the issue where images for badges loaded in SVG format were not displayed in the user’s View All page for badges. We have fixed the issue where legitimate posts were marked as spam when they were edited and published multiple times. We have fixed the issue where case creation in our case portal was taking longer than expected3.1KViewsSign in to react to this post21CommentsKhoros Communities 20.1 Release Notes
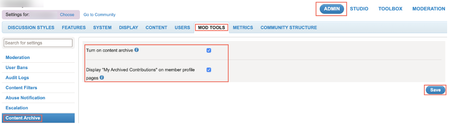
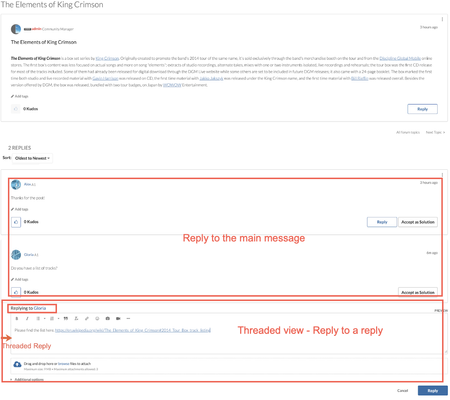
New Features Update to the Khoros Communities release schedule Content Archive (EA) Inline Replies and Threading (EA) Additional Leaderboard filters Community Syndication: Message List EA update API Updates Group Hubs API Membership APIs Content Archive API Update to the Khoros Communities release schedule Khoros Communities is moving away from a monthly release cadence and a staggered upgrade system. Starting with the next release, we are moving to a 6-week release cycle with a 100% upgrade target. We believe this new release cadence will improve overall quality, value in each release, and innovation. We are keeping the same “year.month” release-naming scheme. For example, the next Community release, which all customers will receive, will arrive in March and be called the 20.3 Release. We value all our Khoros Community customers and appreciate your patience as we roll out this new system and any minor bumps we might incur during this change. Learn more about this change. As always, your feedback is always welcome. Content Archive (EA) In the 19.10 Release, we announced the Early Access release of Content Archive. With this feature, Community Managers can archive a topic/article directly from the Options menu for each Forum topic, TKB, or Blog article. To enable the Content Archive feature community admins can go to Admin > Mod Tools > Content Archive. The My Archived Contributions option appears under My Profile > Topics I’ve Participated in component when Display “My Archived Contributions” on member profile pages is granted to the member. Here, members can view all their archived contributions. Use the Content Archive feature to ensure that fresh and relevant content shows up in your community. Moving outdated or low-use content to the archive can help improve the findability of more critical community content. With the 20.1 Release, the Content Archive EA includes some new features. As the contents of the archive grows over time, it becomes more difficult to find the specific article you want. For quick retrieval, use the search options available under Archives in your community. Note: Archived contents can be accessed only by permissioned community members (primarily Community Admins/Moderators). Content Archive analytics With the 20.1 release of Content Archive, we now include Content Archive metrics. Archived Content metric measures the number of contents archived. These new metrics are available in Community Analytics > Content and Community Analytics > Moderators. Learn more about the Content Archive feature. Learn about Content Archive API support below. Inline Replies and Threading (EA) To better organize discussions and keep context meaningful, we have introduced an Inline Replies and Threading feature. With Inline replies, you can reply to another reply and continue the discussion in a separate, single thread. Note: To participate in the In Replies and Threading EA, you must open a Support ticket and request access. Note: By default a post or a reply has 5 levels of threaded(indented) replies. Any reply after the fifth reply would be at the same level of indentation as the fifth reply. This is configurable upto 8 levels. Contact support to configure the levels of indentation. By default, the community setting to display posts is set to Linear Format. Please edit this setting on the Discussion Styles > Posts & Topics > Topic Display tab to enable threading. Enable Forums Version 5 You must upgrade Forums to Version 5 to enable Inline Replies and Threading. Go to Studio > Features. In the Forums drop-down list, select 5. Click Save. Learn about quilt changes for forums that are customized according to community needs. Learn more about the Inline Replies and Threading feature. Additional leaderboard filters We have introduced a new time filter (The last 3 Months) in both the Kudos & Accepted Solutions tabs. Also, under the Accepted Solutions, you will now see the Time Range options in sync with the options available under the Kudos tab. To change the time range filter for Kudos or Accepted Solutions leaderboard components for 3 months: Go to Community Admin > Features. Click Kudos or Accepted Solutions on the left pane. 3. Set the time range option to The last 3 Months. 4. Click Save. Learn more about Kudos and Accepted Solutions. Community Syndication: Message List EA update In the 19.10 Release, we announced the Community Syndication Message List feature and we’re excited to share some new functionality. You can now display content in a Card View similar to what you might see on your .com blog announcements. This enables you to include images from the community as part of the message, creating more visually engaging content to bring users into the community. Toggle back and forth between List View and Card View to refine the look and feel of your Message List using the configuration panel and see the content updated in real-time in the preview window. Additionally, you can now select content from across multiple categories to be viewed in a single Message List. Refine the list of messages by selecting a single discussion style like blogs or select multiple discussion styles (forums, TKBs, blogs or ideas) into a single list. Curate the content by choosing one or multiple tags, labels, or authors to keep in control of what to display. If you’ve imported your product catalog into community and want to bring community content about a specific product into your e-commerce experience, you can pull the content tagged with a product association to refine content only about that specific product. We are finishing up analytics for this feature as well as doing some final performance testing prior to releasing the feature as Generally Available. If you are interested in learning more, send a private message to RayC. API Updates We've added API support for: Group Hubs Node Memberships Content Archival Group Hubs API We've added Community API v2 Create, Update, and Delete support for group hubs. Perform actions involving membership (such as viewing members of a group hub, inviting users, and managing requests to join) using the Membership APIs. Examples Create a group hub curl -X POST \ https://[COMMUNITY DOMAIN]/api/2.0/grouphubs \ -H 'Content-Type: application/json' \ -H 'li-api-session-key: [SESSION KEY]' \ -d '{ "grouphub": { "id": "shutterbugs", "title": "Shutterbugs", "membership_type": "closed_hidden", "conversation_styles": [ "forum", "blog", "tkb" , "idea", "qanda", "contest" ], "parent_category": { "id": "groupHubs" } } }' Edit a group hub curl -X PUT \ https://[COMMUNITY DOMAIN]/api/2.0/grouphubs/shutterbugs \ -H 'Content-Type: application/json' \ -H 'li-api-session-key: [SESSION KEY]' \ -d '{ "grouphub": { "description": "A place where we can talk photography." } }' Delete a group hub curl -X DELETE \ https://[COMMUNITY DOMAIN]/api/2.0/grouphubs/shutterbugs \ -H 'li-api-session-key: [SESSION KEY] Get group hub details GET calls are made using the /search endpoint with a LiQL query passed as the value of the q parameter. curl -X GET \ 'https://[COMMUNITY DOMAIN]/api/2.0/search?q=SELECT+topics.count%28%2A%29+FROM+grouphubs+WHERE+id+%3D+%27knittingGroupHub%27' \ -H 'li-api-session-key: [SESSION KEY]' Make LiQL queries to the v2 grouphubs collection to get details about a group hub, such as the group hub's parent and location in the community structure, and the count of topics and messages in the group hub. Make queries to the V2 messages collection to get message details. You can also use calls on the v1 Message and MessageDiscussion objects. Make queries the v2 nodes collection to get a group hub's child nodes or to get a list of group hubs in the community or within a category. You can also use calls on the v1 GenericNode object. Make queries to the v2 subscriptions collection for group hub subscription information. You can also use calls on the v1 Subscription object. Make queries to the v2 boards collection for information about a child board in a group hub. You can also use calls on the v1 Board object. Make queries to the membership_requests collection create a request to join and to accept or deny a request to join LiQL examples These example queries will get you started with some common group hub tasks. Get the count of topics on a group hub SELECT topics.count(*) FROM grouphubs WHERE id = 'knittingGroupHub' Get the last 5 messages posted to a group hub SELECT subject,body, author,href,view_href FROM messages WHERE grouphub.id = 'knittingGroupHub' ORDER BY post_time DESC LIMIT 5 Get the details about a group hub's child nodes SELECT id,title,href,view_href FROM nodes WHERE parent.id = 'grouphub:knittingGroupHub' ORDER BY message_activity.core_property_change_time Get a list of group hubs in a category SELECT id,title,view_href,href FROM nodes WHERE parent.id = 'category:groupHubs' More to come Look for the ability to set the group hub avatar via the API in the next release. Membership APIs Membership nodes are nodes that have members, membership roles, and optional access restrictions. At this time, a group hub is the only node type that supports membership. We've added new Community API v2 collections to support membership actions. Important! We have deprecated the memberships collection introduced during Group Hubs EA. The memberships collection supported retrieving join date, node, and user details associated with a specific membership. The memberships collection is deprecated as of Community release 20.1. Retrieve membership details using the membership_nodes and members collections as described below. Note: We discovered issues with the members and membership_nodes collections soon after the release of 20.1. We will be replacing these collections with new fields and constraints on the users and nodes collections to retrieve members of a node and the nodes to which the user is a member. Collection Object Actions Supported tasks membership_requests membership_request GET POST PUT Retrieve requests to join a membership node. Must be constrained by node ID. Send a request to join Approve or deny a request to join invites invite POST Send invitations to join a membership node Examples Retrieve requests to join a membership node SELECT * FROM membership_requests WHERE node.id = 'grouphub:developerNetwork' Retrieve requests to join a node SELECT * FROM membership_requests WHERE node.id = 'grouphub:developerNetwork' Send a request to join a membership node URL: /api/2.0/nodes/<node.id>/membership_requests Method: POST Body: { "data" : { "type" : "membership_request" } } cURL example curl -X POST \ https://[COMMUNITY DOMAIN]/api/2.0/nodes/<node_type>:<node_id>/membership_requests -h 'Content-Type: application/json' \ -h 'li-api-session-key: [SESSION KEY]' \ -d '{ "data" : { "type" : "membership_request" } }' Approve or deny a request to join URL: /api/2.0/nodes/<node_type>:<node_id>/membership_requests Method: PUT Body: { "data" : { "type" : "membership_request", "approve_request" : "<true or false>", "user_id" : <ID of the user who requested to join> } } cURL example to approve curl -X PUT \ https://[COMMUNITY DOMAIN]/api/2.0/nodes/<node.id>/membership_requests -h 'Content-Type: application/json' \ -h 'li-api-session-key: [SESSION KEY]' \ -d '{ "data":{ "type":"membership_request", "approve_request":"true", "user_id":2 } }' cURL example to deny curl -X PUT \ https://[COMMUNITY DOMAIN]/api/2.0/nodes/<node.id>/membership_requests -h 'Content-Type: application/json' \ -h 'li-api-session-key: [SESSION KEY]' \ -d '{ "data":{ "type":"membership_request", "approve_request":"false", "user_id":2 } }' Send invitations to join a membership node URL: /api/2.0/nodes/<node_type>:<node_id>/invites Method: POST Body: { "data":{ "type":"invite", "invitees":[ { "id":<id of first person to invite> }, { "id":<id of next person to invite> }, { .. } ], "role":{ "name":"<membership role title. Member is default>" }, "body":"Please Join My GH" } } cURL example curl -X POST \ https://[COMMUNITY DOMAIN] /api/2.0/nodes/<node.id>/invites -h 'Content-Type: application/json' \ -H 'li-api-session-key: [SESSION KEY]' \ -d ‘{ "data":{ "type":"invite", "invitees":[ { "id":5 }, { "id":6 } ], "role":{ "name":"Owner" }, "body":"Please Join My GH" } }' More to come Stayed tuned for API support for the following tasks in the next release: Accepting an invitation to a membership node Removing and assigning roles from/to members in a membership node Content Archive API We've added API support for Content Archive. The Content Archive API supports: Archiving a message Updating an archived message (adding or updating a suggested URL) Removing a message from the archive Retrieving archived content Archive a message URL: /api/2.0/archive curl -X POST \ https://[COMMUNITY DOMAIN]/api/2.0/archives/archive \ -H 'Content-Type: application/json' \ -H 'li-api-session-key: [SESSION KEY]' \ -d '[{ "messageId" : "251", "suggestedUrl" : "<full URL to suggested content>" }]' Edit an archived message URL: /api/2.0/archives/suggestedUrl Method: PUT curl -X PUT \ https://[COMMUNITY DOMAIN]/api/2.0/archives/suggestedUrl \ -H 'Content-Type: application/json' \ -H 'li-api-session-key: [SESSION KEY]' \ -d '[{ "messageId" : "251", "suggestedUrl" : "<full URL of suggested content>" }]' Remove a message from the archive URL: /api/2.0/archives/unarchive Method: POST curl -X POST \ https://[COMMUNITY DOMAIN]/api/2.0/archives/unarchive \ -H 'Content-Type: application/json' \ -H 'li-api-session-key: [SESSION KEY]' \ -d '[{ "messageId" : "251" }]' Retrieve archived content URL: /api/2.0/search?q=<LiQL query> Method: GET curl -X GET \ 'https://[COMMUNITY DOMAIN]/api/2.0/search?q=SELECT%20id%2C%20author%2C%20subject%20FROM%20messages%20WHERE%20visibility_scope%20%3D%20%27public%27%20AND%20author.login%20%3D%20%27User2%27' \ -H 'li-api-session-key: [SESSION KEY]' When retrieving messages, you can filter by visibility_scope in the WHERE clause of a query to the messages collection. To include archived content along with public content, use a visibility_scope of public_and_archived. To retrieve only archived content, use a visibility_scope of archived. Example LiQL queries select id, author, subject from messages where visibility_scope = 'public_and_archived' AND author.login = 'User2' select id, author, subject from messages where visibility_scope = 'archived' AND author.login = 'User2' You Found It. We Fixed It. When creating a new case via the Case Portal, some members reported receiving an error message and being instructed to correct the highlighted fields and resubmit the request. However, no fields in the form were highlighted. Additionally, sometimes the case was created and other times it was not. Both of these issues have been fixed. We have fixed the issue where the Community Batch API with Post JSON was not returning any users for some communities. Previously, there were some discrepancies between the results for the /users/id/<user id>/posts and /users/id/<user id>/posts/count REST API v1 calls. Now, these calls produce consistent results.3.2KViewsSign in to react to this post16Comments15.9 Release Notes
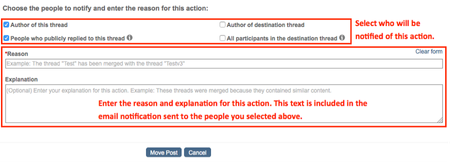
The 15.9 Release introduces the new Lithium Responsive platform. Lithium Responsive optimizes your community for a wide range of devices from mobile phones to tablets to desktop monitors. Using Lithium Responsive, you can provide a consistent and modern brand and user experience everywhere, ensuring a feature-rich community on all devices. Customer demand has been high for this feature, and we cannot accommodate all customers at this time. The 15.9 release also includes several other productivity and search optimization improvements, including the ability for moderators to add a reason explaining why they are editing, moving, or deleting messages and send an email notifying users of the action taken. To help with SEO, we’ve added the ability to customize title tags for community pages and have enhanced our metadata descriptions so when threads that have accepted solutions are returned in search results, it is clearly indicated that the issue is “Solved”. Other improvements include a new setting to prevent people from giving kudos to implemented Ideas and support for several more criteria you can use to create community badges. Finally, we’ve cleaned-up and improved several of the Community Admin settings so that it’s much clearer what each state of the setting does. New features and enhancements Lithium Responsive Reason notification option added to message moderation workflow Improved metadata descriptions to indicate when threads have been marked with accepted solutions Title tag optimization for SEO Prevent users from giving kudos to completed ideas and contests Support for new criteria for badge rules Text improvements to several Community Admin settings API changes Lithium Responsive This year, Lithium has been working hard to migrate the Community product to a responsive web design platform. The 15.9 release marks the first of several launches on this new platform and the start of an evolving user experience journey. Customers engage with your Lithium Community throughout the day whether they are on the go or relaxing at home. They can start a conversation on their laptop and continue it on their mobile device while waiting in line for coffee. Our goal is to adapt your customers’ Community experience seamlessly across devices so that they can connect when they want, wherever they are. Lithium Responsive, our responsive user experience solution, optimizes your community for a wide range of devices from mobile phones to tablets to desktop monitors. Using Lithium Responsive, you can provide a consistent brand and user experience everywhere, ensuring a feature-rich community on all devices. There are many exciting technologies coming together for this product, and we want to ensure that you have the best possible experience. For this reason, adopting Lithium Responsive must be done in cooperation with Lithium Professional Services. Note: Customer demand has been high and we cannot accommodate all customers at this time. If you are interested in moving to a responsive solution, contact your Account Manager for more information. Reason notification option added to message moderation workflow Site content moderators sometimes need to take action on user content by moving, editing, and deleting user messages. Reasons for these actions can vary, from better site content organization to corrective action on inappropriate content. Up to now, communication to users about the reason for the action taken on their messages could be a bit hit and miss, since it relied on moderators completing a few extra steps to ensure proper communication. To simplify this process and improve communication of these moderation actions, we have added a “Reason” section to the appropriate pages when moderators (or any user with the new Send reason notifications permission) attempt to move, edit, or delete messages. Now, when a user with the Send reason notifications permission edits, moves, or deletes a message, a new reason notification area appears: The moderator can opt to notify different groups of people about the change being made and enter custom text that provides as much detail as they want. The Reason and Explanation text is then added to the email notification sent to the chosen recipients. The availability of the reason area is controlled by the Send reason notifications user permission. We recommend granting this permission, which is denied by default, to your community Admins and Moderators. Note: The reason notification workflow/notifications feature is not enabled by default. Contact Lithium Support to have this feature enabled for your community. To grant the reason box moderation permission: Go to Community Admin > Users > Permissions. Scroll down to the Moderation section. Grant the Send reason notifications permission. Click Save. To use the new reason notification workflow: Sign in to the community as a member with the Send reason notifications permission. Go to the message or reply you want to edit, move, or delete. Open the Options menu and choose the appropriate action. In the reason section, choose the people who should be notified about this change. Note: Recipient options include Author of thread, Recent participants in thread, Author of destination thread (Move only), and All participants in the destination thread (Move only). Enter the Reason and Explanation. The text you enter here is used in the email notification sent to the indicated recipients. Each recipient receives an email that indicates the message impacted and the action taken. If you want, you can edit the source content of the email template in Studio, just like any other email template. The “from” address is the same as all other system emails. To view and edit the source content of the new Moderation reason notification email template: Go to Studio > Text Editor > Email Text. Open the Select Email Template menu and select the Moderation reason notification option. Click View. Review and edit, if necessary, the email template text to your liking. Note: Do not edit or remove the Reason and Explanation lines. These lines are automatically populated with the Reason and Explanation text you entered when you edited, moved, or deleted the message. Click Save. Improved metadata descriptions to indicate when threads have been marked with accepted solutions We have enhanced the descriptions in the metadata for our topics so that when people perform searches (for example, on Google), the results returned by the search engine indicate when the question/thread is “Solved”. With this optimization, threads with accepted solutions will be clearly indicated, hopefully resulting in people being more inclined to click through to view the thread on your community. Here’s what’s changed: Before this enhancement, the metadata below the <title> tag looked like this: Now, when a thread is marked as solution, the metadata includes much more information, including user-facing search results text to indicate that the thread is solved: There is nothing you need to do to get the benefit of this improvement. It’s all done for you behind the scenes. Title tag optimization for SEO Admins can now make it easier for search engines to find and categorize community pages by defining unique PAGE TITLE tags in the header of each page/URL. To take full advantage of this tag (based on how search engines, like Google, process and display search results), title tags are limited to 60 characters. We highly recommend you make the tags for each node unique and include your brand name in the title. Note: If you do not enter a value in this field, Lithium creates one using the node name and brand name (for example, “Node title – Brand name”). To enter a page’s Title tag text that appears in web search results: Go to Community Admin > System > SEO. In the Text for the Title tag in Page header field, enter a unique text string (up to 60 characters). Click Save. Support for new criteria for badge rules We’ve added several new badging criteria options that you can use when creating community badges. Many of these new badge options pertain to member-related activities. The new badge criteria include: Changed profile avatar: Award a badge when a member changes their profile avatar from the default image with an uploaded, external image. Number of signins: Award badges based on the number of times members sign in to the community over a specific time period. Message views: Award badges based on the number of messages members view over a specific period of time. (Advanced editor only) Registration date: Award badges based on when people registered with your community. (Advanced editor only) Sign-in date: Award badges based on member sign-in activity during a specific date range. (Advanced editor only) Time since registration: Award “anniversary” badges based on when members registered for your community. Values can be in days, months, or years. Learn more about creating new badges and view the full list of supported badge criteria. Prevent users from giving kudos on completed Ideas We have added a new setting for Idea Exchanges so you can prevent people from giving kudos to Ideas that have a status of completed. Enabling this setting locks down the kudos granted to an idea when the idea is marked with a “Completed” status. To prevent users from giving kudos to completed ideas: Go to Community Admin > Discussion Styles > Ideas. Select Prevent users from giving kudos on completed Ideas. Click Save. When enabled, members will not be able to kudo completed Ideas: Text improvements for several Community Admin settings In our ongoing effort to make our community management tools easier to use, we recently completed a review of our community admin settings that were a bit confusing. Specifically, there were several settings where you enabled or disabled the setting by clicking a checkbox. For example, the Posts & Topics checkbox option “Use the Rich Text Editor by default” was confusing since it wasn’t clear what the non-checked setting implied. To make these settings more clear, we have converted over a dozen of these checkboxes to radio button choices. In the example above, the setting now appears as: Note: None of these changes will impact existing settings on your community; all of your current settings are retained. The following table lists before and after text for the setting labels we improved. Admin Page Previous Checkbox Text New Radio Button Text Posts & Topics > Settings Use the Rich Text Editor tab by default Default editor to use for posts · Rich Text Editor · HTML Editor Posts & Topics > Settings Default reply subject line is "Re: <previous subject>" Default subject line to use in replies · Re: <previous subject> · Empty Posts & Topics > Settings View topics immediately after posting After posting a topic, take user to the · Topic page · Board that topic is contained in Posts & Topics > Topics Display Sort topics by time of most recent post Sort topics by · Time of most recent post · Original posting date TKB > Settings Let designated contributors publish articles Users who can edit TKB articles · Author and any contributors promoted to Assistant Publisher · Author only TKB > Settings Grant kudos on TKB articles to the article's original owner Grant kudos on TKB articles to · The article's original author · No one Blogs Show full name of blog authors For blog authors, show name as · Full name and user name · User name only Mobile Use Community Wide Search Set default search scope to · Entire community · Just the current discussion style (Forum, Blog, TKB, etc.) Mobile Use mobile view for tablets When viewing the community on a tablet, use · Mobile view · Desktop view Mobile Show community announcement on all pages Show announcements on mobile devices on · Node, Category, and Community pages · Community home page only Mobile Display images in page Display images in posts · Inline in the message body · As separate from the message body Private Messages Show both read and unread private messages In the community page Private Message component, show · Read and unread messages · Unread messages only Private Messages Use Token Input for Private Messages Enter user names · From a pop-up list (Token Input) · As a comma-separated list of user names System > Date & Time Use Relative Dates (three hours ago) Display dates as · Relative dates (e.g. three hours ago) · Absolute dates (e.g. Nov-15-1966) System > RSS Use the teaser for the RSS feed content Content to use for RSS feeds · Teaser or body · Always body System > File Attachments Make all attachments public Set attachment access to · Public · Private User > Profile Defaults Display names with last name first Display names as · Last Name, First Name · First Name, Last Name User > Profile Defaults Show both online and offline friends in My Friends component In the My Friends component, show · All friends (online and offline) · Online friends only API Changes The following API changes have been added for 15.9. != constraint now supported on Board and Category v2 collections We now support queries that that filter out a specific board or category. For example: SELECT * FROM boards WHERE id != ‘board1’ SELECT * FROM categories WHERE id != ‘category1’ Review Invitation API to generate tokenized URLs In 15.4, we added a feature that enables you to send invitations to users to write a product review. This feature supported a manual process for uploading email addresses and product IDs in a CSV file to Community Admin, and then Community Admin would generate a list of tokenized URLs to send to your users that included the invitation. We added an API that generates tokenized URLs in addition to the Community Admin workflow. This feature is supported from 15.5 and later. The APIs require OAuth 2.0 for authentication. For full details, see Invite users to write a product review. New Components New Klout Connect Component for Mobile v1 We’ve added a new component you can place onto Mobile v1 quilts that enables community members to connect their community account to their Klout account. When they connect their profiles, the actions they take on your community influence their overall Klout score and topic expertise. You can find the component in the Klout section of the components list in Studio > Page. You can use the component on any Mobile quilt. Mobile quilts begin with “Mobile,” such as Mobile Community Page or Mobile Category Page. You Found It. We Fixed It. We identified that notifications and subscriptions were sometimes lost due to network and other unknown issues. We’ve rectified this behavior by adding a layer of redundancy to our framework, enabling us to store and resend notifications/subscriptions that might not have been sent. We have fixed the Number of days to wait before sending reminder email setting under Admin > Features > Accepted Solutions so that it now accepts integers between 1 and 30. Previously, you received an error if you entered a number less than 7. We have fixed the issue where URLs pasted into private messages were being converted to plain text. Now, the URL is pasted correctly and retains the link. We have fixed the issue where links added to knowledge base articles were not clickable. Previously, if you copied or bookmarked the URL for a non-first page of a thread (for example, the third page of posts in a thread) and then tried to go to that page, but the page was no longer there (posts were removed so that the third page was no longer needed), you would see a blank page. Now, instead, you are taken to the last active page in the thread. You no longer get an error when you try to send a test email to yourself in Studio for the Answer accepted as solution or Kudos notification email templates. We have fixed the issue where the maximum character length for the badge description field was not being respected based on the value entered in the input.cfg file. Now, if you enter a value more than the 150-character default, this value is respected when entering a description while creating a badge. We have fixed the issue where your metrics_summary_report notification was not delivered, if your default language was set to Finnish. Previously, if you were using the Mondrian skin and had a numbered list that exceeded 9 steps, the double-digit numbers would get cut off. We have fixed this display issue and now all numbered steps appear correctly. We have fixed the issue where you could not filter your community search for Private Messages, if you had top-level categories enabled on your community site. Previously, in these cases, the Private Messages option did not display in the search drop-down menu; now it does. Anonymous users can no longer submit multiple reviews from an account with the same email address.2.7KViewsSign in to react to this post21CommentsKhoros Communities 20.8 Release Notes
Community 20.8 delivers self-service for many Community page URL redirects, a sneak peek at improvements to Community in-app user guidance and help, as well as enhancements to several existing features and APIs. New Features API Updates Bug Fixes New Features and enhancement Coming Soon: Improved User Guidance and Help in Community URL redirect rules for Community pages Addition of new columns to Bulk Download of member data in Community Analytics Cookie Banner enhancements Coming Soon: Improved User Guidance and Help for Community In the coming months, we will be rolling out a new User Guidance/Help solution for Community and Community Analytics. First up will be in-app guides. These guides will provide you with a helpful information, including: New feature announcements Product alerts and notifications Tips to help you get the most out of community features Don’t be surprised if you start seeing guides like this in the coming weeks: And don’t worry, we won’t be spamming you with lots of pop-ups. These guides are intended to help you get the most out of the product and get out of your way fast. Next, we’ll be rolling out our new Resource Center, which you can open by clicking the question mark icon at the top-right corner of the application window. Use the Resource Center to get product help, access Release Notes, and learn about available Product Coaching sessions and community best practices. Note: Later this year, we plan to remove the existing Help drawer that appears at the bottom of the Admin and Studio apps. This feature-level help content will all be available within the Help section of the new Resource Center. Guides and Resource Center will be available in: Community Admin Studio App Creator Toolbox Moderation Community Analytics URL redirect rules for Community pages Over time, content on your community changes, moves, is deleted/archived, or replaced. When this happens, you want to make sure that Internet searches don’t show results that go to obsolete/missing pages. Or, sometimes, you might want to point people to newer or more relevant content. To help optimize these search results and make sure that people get to the right content, you can create redirects rules. Redirects enable you to keep page and link authority of your website when a website’s URL is redirected to another URL (for any reason). Basically, redirects help you keep the SEO of your website healthy and keep visitors engaged on your site. Properly defined redirects help keep your search rankings. The most common types of redirects are 301 (permanent) redirect and 302 (temporary) redirect. Previously, you needed to open a Support ticket to get these search redirect rules created. As of the 20.8 Release, you can create these search redirect rules yourself from Community Admin. Note: To create redirect rules other than 301 or 302 redirects, you must still open a Support ticket. The ability to create, edit, or delete redirect rules is granted through the Manager redirects permission, located under Admin > Users > Defaults > SEO Redirects. This permission is denied by default. We recommend enabling this permission for Admins or other trusted community members. Members with this permission have access to the Redirect Rules tab under Admin > System > SEO. Learn more about setting up members to create redirect rules and how to manage these rules from Community Admin . Addition of new columns to Bulk Download of member data in Community Analytics Bulk Download Members Data provides a snapshot of member activity and community influence. With the 20.8 release, this report will include Registration Start Date, Registration Completion Date, and Registration Status columns. Registration Start Date is the timestamp (UTC) when the member initiates the registration process. The Registration Completion Date is the timestamp (UTC) when the Registration Status changes from “Partially Registered” to “Registered". If the registration was completed more than two years ago, the Registration Date will be empty in the Bulk Download Members Data report. With the addition of these columns, you can now filter the list of members who completed their registration within the time frame selected for the report. Learn more on download community member metrics. Cookie Banner enhancements Currently, when users visit the community the cookie banner appears and prompts them for consent to use site cookies. The Click Here link opens the webpage that describes your cookie policy, but it does not dismiss the banner. As of today, clicking OK or continuing to use the site is considered as user consent to add or set all community cookies. With the 20.8 release, we have changed this behavior. Users must now click OK in the cookie banner and explicitly confirm their consent to activate the community cookies. Continuing to use the site will not be considered as a user consent anymore. If users do not provide their explicit consent, only the Type 1 cookies(“Strictly Necessary”) are set, and all other cookies are held back. With this release, we also re-classified the LithiumVisitor and VISITOR_BEACON cookies into Type 1. Learn more about cookies found in Khoros communities. API Updates api.mark_read view count update The Community API v2 api.mark_read query parameter now increments the view count for messages for anonymous as well as signed-in users. See Mark a message as 'read' for more information about the api.mark_read query parameter. Constrain message queries by messages posted or edited in the past n days We have added new fields, constraints, and sorts to enable you to constrain queries to the messages, reviews, and review_comments collections by posts that have been posted or edited in the past n days. In this context, the term posts refers to topics, replies, and comments for all conversation styles (forum, idea, TKB, QandA, group, blog, contest) including reviews and review comments. See Get messages posted or edited in a specified range of time for more information and examples. Developer Documentation improvements We've given our Community API v2 endpoint and LiQL documentation a refresh in order to improve usability and the search experience. See our announcement in the Community Blog. Here's a quick look. You'll now find the endpoint documentation in the API Reference section, organized by HTTP method type. You'll find LiQL reference information in the Guides section with our LiQL guides and examples. API v2 and LiQL reference now appear in Search results. Our legacy API v2 experience will remain in place for two weeks to ease the transition. We hope that you find these changes helpful. You Found It. We Fixed it We have fixed the issue where images that were uploaded when sending a private message from a mobile device were placed in the sender’s public image album instead of their hidden album. We have fixed the issue where users were not appearing in the @mentions pop-up menu, despite typing in their entire user name. Previously, when you sorted the list of Group Hubs by different criteria, the number of group hubs was returned each time. This display issue has been fixed. Previously, the Net Accepted Solutions metric key worked only in Studio and not the SDK. This issue has been fixed, and the key is now available via the SDK. We have fixed the issue where the Real-time Virus Scanner took a very long time to complete attachment scans or in some cases, never completed the scan.2.6KViewsSign in to react to this post26CommentsKhoros Communities 20.3 Release Notes
Hello from Khoros! We hope that you, your co-workers, and your loved ones are safe and well. We're still here, so continue to reach out to us on Atlas and other channels. As always, your success is important to us. Community 20.3 brings General Availability (GA) for Community Syndication Message List and Content Archive, as well as improvements to search, analytics, the Salesforce Connector, and the Community API. Read on to learn more. New Features API Updates Bug Fixes New Features Community Syndication - Message List GA Content Archive GA Search enhancements Product Associations Analytics Khoros Salesforce Connector 4.2 In-line replies and threading EA Updates to the Custom Tags UI in Community Admin Migration of videos from Ooyala to Brightcove Community Syndication - Message List GA Syndication Message List component. We're happy to announce that the Message List component is now in General Availability (GA). See About Message List Syndication for more information and instructions for implementation and launch. See this blog post to learn about how we added Message List syndication to developer.khoros.com. To recap, Message List enables you to create a read-only list of publicly accessible posts from your Community and display it on an external website. For example, you could create a list of messages from forums within a category that have a particular label applied. You could highlight blog articles that reference a specific product and put that on a product page. Mix and match from the following to define your unique message list: Location in the community structure Discussion style type, optionally filtered by attributes such as accepted solutions, featured articles, and idea status Label Product name Username or Rank During the EA period, we received some very helpful EA customer feedback that led to some improvements from our initial version of this feature. (Thank you, @BekaD12!) Read on to learn more. Feature requirements Message List is enabled by default when you upgrade to Community 20.3. You'll find the configuration options in Community Admin > Content > Community Syndication. As with other Community Syndication and ActiveCast components, you must enable Content Security Policy and whitelist all domains where you embed ActiveCast components, or the ActiveCast components will not render. See Enable Content Security Policy (CPS) for ActiveCast for instructions. Dedicated skin for the Message List component We created a new parent skin called Community Syndication. You'll find this skin in Studio > Community Style > Properties with our other parent skins. While Community Syndication is based on Responsive Skin, it is much leaner than Responsive (we’ve reduced the overall CSS file size by ~95%, from 2.3 MB to 118KB) and using it with the Message List component dramatically improves performance and load times. You can use our default Community Syndication skin or you can create your own customized version using the Community Syndication skin as a base. We are planning to make improvements so that we can use this skin with the Community Syndication Q&A component and any future syndication components (not legacy ActiveCast). Warning: Do not use the Community Syndication skin or a skin with Community Syndication as its parent as the skin for your entire community. Additional filtering support for discussion styles When you filter by the Forum, Q&A, Idea, or TKB discussion style, you can choose a Style Attribute to further filter the list of messages. Style Attributes are allowed when filtering by a single discussion style. For example, you can only select messages from forums or only from knowledge bases. (You can still use the Labels, Product, Tags, and Authors filters though.) These are the Style Attribute options for each discussion style: Forum - Accepted Solutions Only Q&A - Accepted Solutions Only Ideas One of the core idea statuses. Custom idea statuses are not currently supported as a filter. Knowledge Base - Featured Articles Only Content Archive GA In the 19.10 Release Notes, we announced Early Access for the Content Archive feature. This feature is now available for GA. You can enable the Content Archive feature from Admin > Mod Tools > Content Archive. With Content Archive: Community Managers can archive a topic/article directly from the Options menu for a Forum topic, TKB, or Blog article. You can view all your archived contributions. You can Unarchive an article from the Content Archive. You can delete archived contents. The count of user stats such as # kudos, # replies etc., will remain the same post-archival of a content. You can provide a link to an updated/related content while archiving. Though this is optional, it is best practice to provide a related link to relevant content while archiving. For instance, if a google search result suggests content that was archived in your community and the user clicks on that link, he will be automatically redirected to the related content in your community instead. As the redirection occurs for several users, the google crawlers understand that the old link is replaced, and boost up the new link's ranking instead of the old link. Note: The suggested URL must be a URL within your community. Learn more about Content Archive. Search Enhancements With this release, we have improved the search functionality with exact phrase search and by removing “stop words” while populating the recommendation widget. Each of these are explained below. Exact phrase search You can now use double quotes around search terms to get search results that exactly match the phrase within the quotes. The system searches and displays results found in the message body, subject, labels, and attachments. To activate this feature: Go to Admin > System > Search. Disable the Include punctuation while searching setting. Click Save. Below example shows how the exact phrase search works: Search for brick house (no quotes): Say you click on Homes from the results listed. You can see that the words brick and house are searched for, but not as a single phrase or in that order. Let’s see how exact phrase search fetches results for “brick house”: You can see that the content Stories for Kids is listed because, it contains the phrase brick house: Note: Exact phrase searches do not: support special characters (for example, "Apple&Orange" searches for "apple orange") display in autosuggest results return tags in the results support nested quotes (for example, “Product number “12345””) support multiple phrases with quotes (for example, “brick house” “sheep skin”) Removal of common words from Recommendation Widget results We’ve improved overall search performance by excluding commonly used words (also called “stop words”) while populating the recommendation widget. Common stop words include a, an, the, in, on. For example, let’s say someone searches for wolf and then clicks the result Wolf in sheep’s skin: The Recommendation Widget on the right pane suggests contents that match the words from the title, in this case Wolf, sheep’s and skin, but excludes the word in. Hence, search is only on the primary keywords (excluding stop words) and relevant results are fetched. Product Associations Analytics With this release, we introduce Product Associations Analytics to measure the usage of products in your community. Product Associations is an important Community feature as it links a brand’s e-commerce website to the Community content and vice-versa. You can improve its adoption by analyzing related metrics such as: The number of times a specific product is tagged to any community post The number of times a specific product is mentioned (using # followed by product name)in any community post The number of times a product is viewed on the brand domain from the product page or from a product mention The number of product page views when the associated product in the community page is clicked and viewed The number of accepted solutions in any type of community post that has a specific product association in the first post or any of the replies A new tab called Products is listed under the CONTENT tab as shown below. Learn more on Product-Association Analytics. Khoros Salesforce Connector 4.2 We have addressed the open issues with Salesforce Connector 4.2. All documents and package details for Salesforce Connector 4.2 are updated. In-line Replies and Threading EA We had announced the EA release for In-line replies and threading in the 20.1 release. This feature is still available for EA. To participate, you must open a Support ticket and request access. Updates to the Custom Tags UI in Community Admin We made some minor changes to the Edit List Tag and Edit Attribute Tag modals in Community Admin. These modals appear when you click the Edit Tag button in Community Admin > Mod Tools > Custom Tags > Edit Tags. We have updated tooltips and field names in the modal and we added the ability to view example LiQL calls. The updates do not change the functionality of custom tags. Instead, we made the updates to help developers and Community Administrators understand which custom tag data to use when retrieving custom tags and filtering messages by custom tags using the Community API. These updates coincide with improvements to the Custom Tags API described in the API Updates section of these release notes. Migration of videos from Ooyala to Brightcove This announcement is for communities using Ooyala Integration (Video). Community videos uploaded after upgrading to 20.3 will be supported by BrightCove. All videos uploaded prior to 20.3 will also be migrated to BrightCove. This backend integration change is necessitated by Brightcove’s acquisition of Ooyala. Note that there will not be any change required by community admins for this migration. Also, there will not be any change in the video uploading experience for the community members. Support for Ooyala videos will be discontinued from June1, 2020 and if your community is not on 20.3 or above, you will not be able to use videos. For any further clarifications, reach out to Support. API Updates Group Hub API changes We have added support for setting and editing a group hub avatar via the API. Note that this changes your POST and PUT request format to the /grouphubs endpoint. Note the change from Content-Type from application/json to application/x-www-form-urlencoded. Note: Customers who have created customizations using POST and PUT requests to the /grouphubs endpoint are advised to update their code to use the new Content-Type in the header and the new request body format. Create a group hub with an avatar To set or edit a group hub avatar,include the following Headers and Body Parameters in a POST (to create) or a PUT (to edit) request to the following endpoints, respectively: /grouphubs /grouphubs/<group hub id> Headers li-api-session-key [SESSION KEY] If using Session Key authentication Authorization Bearer [TOKEN] If using OAuth authentication client-id [CLIENT ID] If using OAuth authentication Content-Type application/x-www-form-urlencoded Body Parameters avatar The full path to the avatar image api.request A grouphub JSON object definition Create a new group hub with an avatar Include the avatar parameter in the POST request body. Here is an example grouphub object for a new group hub. Place it in the api.request body parameter. { "grouphub":{ "id":"<internal grouphub ID>, "title":"<display title>", "membership_type":"<open, closed, or closed_hidden>", "conversation_styles":[ "<string array of discussion styles included in the group hub>" ], "parent_category":{ "id":"<optional internal ID of the parent category>" }, "description":"<optional description of the group hub>" } } cURL example (Session Key) curl -L -X POST 'https://[COMMUNITY DOMAIN]/api/2.0/grouphubs/' \ -H 'li-api-session-key: [SESSION KEY]' \ ] -H 'Content-Type: application/x-www-form-urlencoded' \ -F 'avatar=@/PATH/TO/AVATAR/avatar.jpg' \ -F 'api.request={ "grouphub": { "id": "shutterbugs", "title": "Sutterbugs", "membership_type": "closed_hidden", "conversation_styles": [ "forum", "blog", "tkb", "idea", "qanda", "contest" ], "parent_category": { "id": "groupHubs"} } }' cURL example (OAuth) curl -L -X POST 'https://[COMMUNITY DOMAIN]/api/2.0/grouphubs/' \ -H 'Authorization: Bearer [TOKEN]' \ -H 'client-id: [CLIENT ID]' \ -H 'Content-Type: application/x-www-form-urlencoded' \ -F 'avatar=@/PATH/TO/AVATAR/avatar.jpg' \ -F 'api.request={ "grouphub": { "id": "shutterbugs", "title": "Sutterbugs", "membership_type": "closed_hidden", "conversation_styles": [ "forum", "blog", "tkb", "idea", "qanda", "contest" ], "parent_category": { "id": "groupHubs" } } }' Updated group hub developer guides: Group Hubs API support Create a group hub Edit group hub properties and child boards Edit group hub details including the avatar Include the avatar parameter in the PUT request body. Here is an example grouphub object for an existing group hub. Place it in the api.request body parameter. { "grouphub":{ "title":"<display title>", "membership_type":"<open, closed, or closed_hidden>", "conversation_styles":[ "<string array of discussion styles included in the group hub>" ], "parent_category":{ "id":"<optional: internal ID of the parent category>" }, "description":"<optional description of the group hub>" } } Add or edit only the avatar on an existing group hub Include the avatar parameter in the PUT request body. Here is an example grouphub object for an existing group hub. Place it in the api.request body parameter. { "type": "grouphub" } Membership API updates As a result of customer feedback, we have finalized the Community API v2 Membership APIs with some changes. (Thank you for your patience.) Membership API Developer Guides: Membership API support Send and accept invitations to a membership node Send, retrieve, approve, and deny a request to join a node Membership API LiQL support We have removed the members and membership_nodes collections. These collections are no longer supported. Membership is now handled using the nodes, users, and roles collections, and the invites and membership_requests subcollections on nodes to manage Invitations to and requests to join membership nodes. Note: At this time, group hubs are the only nodes that support membership. Use these endpoints on the nodes collection for the following tasks: Endpoint Task Added POST /nodes/<node.type>:<node.id>/membership_requests Send a request to join a membership node 20.1 PUT /nodes/<node.type>:<node.id>/membership_requests Approve or deny a request to join a membership node 20.1 POST /nodes/<node.type>:<node.id>/invites Send invitations to a membership node 20.1 PUT /nodes/<node.type>:<node.id>/invites Accept an invitation to a membership node 20.3 Membership API LiQL support To retrieve data around memberships, membership nodes, and membership roles, you'll use LiQL queries to the users, roles, nodes and membership_requests collections. To access the data, use a GET request to the /search endpoint or use one of the FreeMarker methods that enable you to make calls to the Community API. With LiQL you can get: A list of members in a membership node (i.e., a group hub) User details (such as join_date) for the members of a node User details for users with a specified membership role assigned (such as Member, Owner, or a custom membership role) A list of membership roles available on a node Data about membership roles applied to a user on a node A list of membership nodes to which a user belongs A list of pending requests to join a membership node Note: The join_date field is not returned from a query to the users collection unless node.id is included in the WHERE clause. If the user is not a member of the node or if the node is not a membership node, the query will return null. Note: To retrieve membership role data from a LiQL query to the roles collection, you must include node.id in the WHERE clause. Note: A query to the nodes collection is made based on the permissions of the user making the request unless the query is constrained by user.id in the WHERE clause. When constrained by user.id, the query is made based on the permissions assigned to that user. Note: Remember that the results of a LiQL query are dependent on the permissions of the user making the request. In other words, if a user is not allowed to see roles, roles details are not returned. Users collection queries Retrieve a list of members of a specified membership node SELECT id,login FROM users WHERE node.id = '<node.type>:<node.id>' Retrieve user details from a membership node SELECT login, id, join_date FROM users WHERE node.id = '<node.type>:<node.id>' Retrieve user details for users with a specific role SELECT * FROM users WHERE roles.id ='<role prefix:node id:role title>' Example group hub role ID: g:developerNetwork:Member Roles collection queries Retrieve a list of membership roles available on a membership node Note: If the node in the WHERE clause is not a membership node (i.e., a group hub), then the query will return the core roles on the node. SELECT * FROM roles WHERE node.id = '<node.type>:<node.id>' Retrieve data about a membership role applied to a user SELECT * FROM roles WHERE users.id = '<user.id>' and node.id = '<node.type>:<node.id>' Nodes collection queries Retrieve the list of membership nodes to which a user belongs SELECT join_date, title FROM nodes WHERE user.id = '32' Retrieve node details for nodes of a specified type (e.g., all group hubs) for a specific user Note: If user.id is not specified in the WHERE clause, then the query is made with the permissions applied to the user making the request. SELECT title,join_date FROM nodes WHERE user.id='17' AND node_type='grouphub' Membership_Requests collection queries Retrieve pending requests to join a membership node SELECT * FROM membership_requests WHERE node.id = '<node.type>:<node.id>' Improved custom tag API support We have improved our API v2 custom tag API support so that you can now retrieve and set both attribute and list type custom tags. Read on to learn about the new fields and constraints to the Message and Custom_Tag objects. The improvements enable you to: Get messages filtered by custom tags and custom tag values Get custom tags filtered by message ID Get messages filtered by custom tags and custom tag values Get messages filtered by a custom tag with a LiQL query to the messages collection. New fields on the messages collection custom_tag_scope - A custom tag key and value set on the message. This field appears in the response only when it is explicitly included in the SELECT statement and when the custom_tags.id constraint is included in the WHERE clause. New constraints on the messages collection custom_tags.id - The key for the custom tag you want to filter by. When this constraint is used, custom_tag_scope is included in the response. custom_tags.value - Used only when filtering by a List custom tag. The value key of the List custom tag you want to filter by (e.g., messages with the Color custom tag set to Red). Can be used only when custom_tags.id is also included in the WHERE clause, and is used only when filtering the response by a list type custom tag. Use the equals operator to filter to a single value (custom_tags.value='red') or IN() to filter to multiple values (custom_tags.value IN ('red', 'blue')). Use custom_tag_scope in the SELECT statement of a LiQL query to the Messages collection specifying the custom tag key as the value of custom_tags.id in the WHERE clause. To filter further to messages with a specific value of the tag, also include custom_tags.value in the WHERE clause. Examples SELECT id, custom_tag_scope FROM messages WHERE custom_tags.id = 'color' SELECT id, custom_tag_scope FROM messages WHERE custom_tags.id = 'color' AND custom_tags.value = 'red' SELECT id, custom_tag_scope FROM messages WHERE custom_tags.id = 'color' AND custom_tags.value IN ('red', 'blue') The response includes a custom_tag_scope field (a custom_tag_message_scope object) that includes the value and the display text of the custom tag assigned to the message. custom_tag_scope for a list custom tag "custom_tag_scope" : { "type" : "custom_tag_message_scope", "value" : "green", "text" : "Green" } custom_tag_scope for an attribute custom tag "custom_tag_scope" : { "type" : "custom_tag_message_scope", "value" : "true", "text" : "true" } Get custom tags filtered by message ID Get custom tags for a specific message with a LiQL query to the custom_tags collection. New field on the custom_tags collection message_scope - The custom tag value and display text for a custom tag applied to the specified message. You must explicitly include message_scope in the SELECT statement and the messages.id constraint in the WHERE clause of a LiQL query to include message_scope in the response. possible_values - The possible values for a List custom tag. Not used with Attribute custom tags. This field is not returned by default. You must specifically include it in the SELECT statement. Example SELECT id, text, message_scope FROM custom_tags WHERE messages.id = '1267' message_scope for a list custom tag "message_scope" : { "type" : "custom_tag_message_scope", "value" : "white", "text" : "White" } message_scope for an attribute custom tag "message_scope" : { "type" : "custom_tag_message_scope", "value" : "true", "text" : "true" } New Custom Tag Developer Guides See these new guides in the Developer Doc Portal: Custom Tag API support Return whether any posts have specific custom tag Get messages with a given custom tag applied Get custom tags on a given message Set or update a custom tag on a message You Found It. We Fixed It. We have fixed the issue where customers could not delete an attachment when editing a message. We have fixed the issue where images in Boards, Blogs, and TKBs were being mistakenly converted to data-lia-image tag when certain custom plug-ins were used in the message editor. This transformation no longer occurs and the images render properly. We have fixed the issue where users could download but not preview images in forums, blogs, and TKBs. Previously, unexpected errors were being thrown on the Community Analytics Members > Value Analytics page. This issue has been fixed. We have fixed the issue where search produced intermittent, unexpected errors when search pagination was enabled. Previously, the common.widget.slide-out-nav-menu sporadically showed different nodes for authenticated members. Now, the slide-out menu consistently displays the nodes you have permission to access. Previously, when posting multiple replies to forum posts at the same time, file attachments were added to the wrong post if the replies were autosaved. This issue has been fixed. Previously, when a user sorted topics by the newest to oldest (newest posts are listed first) and attempted to access page 1 of a group topic either by clicking page 1 or by viewing the group itself and clicking on the topic title, they were redirected to the last page in the topic list. As a result, the most recent X number of posts could be inaccessible depending on how the UI is configured. This behavior has been fixed and users can now access page 1 of the sorted topic list and see the most recent posts in the thread. We have fixed the issue on AWS-hosted communities where any request taking longer than 60 seconds displayed a Cloudfront timeout error. Previously, creating an anchor to a specific part of the page using the Link/Unlink button in the message editor added an additional "http://" to the URL rendering the link useless. This issue has been fixed and now anchor tags are coded properly and work as expected. When exporting large Community Analytics reports against AWS-hosted communities, sometimes 504 gateway errors were thrown and the report process was cancelled. This issue had been fixed and reports now export fine. Previously, if a message has been edited, further edits done to that same message using API V2 would not be successful in specific scenarios. This issue has been fixed. In API V2, the query SELECT * FROM users WHERE online_status = 'online' was producing duplicate results. This issue has been fixed and now each online user is returned only once. We have fixed the issue where users were not able to schedule Page View reports from Community Analytics. Additionally, we have fixed other problems related to the creation, management, and delivery of scheduled reports. We have fixed various issues relating to user data not getting properly synced with their corresponding Salesforce records. Previously, there was a link to the Group Hub names under the membership tab. Now, they are not clickable. Previously, you could view the membership tab when you drill down to group hubs. Now, we have replaced it with the member tab.3.9KViewsSign in to react to this post38CommentsKhoros Communities 20.5 Release Notes
Community 20.5 might look like a light release, but we have one big update that affects the single most used feature for nearly every customer - the GA of Inline Replies and Threading for Forums! In addition, our teams are working on exciting features currently in development and beta. There are also some nice additions to the Developer Experience. We've added support for batched and JSON-based requests to Community API v2, and we've added details about Studio endpoint customizations in Toolbox. New Features and Update Bug Fixes New Features and Updates Inline Replies & Threading (GA) JSON-based Search Queries in API v2 Batch Requests to Community API v2 Studio Endpoint REST calls in Toolbox Functions and lists now supported in the same search query Inline Replies and Threading (GA) In the 20.1Release Notes, we announced Early Access for our Inline Replies and Threading feature. This feature is now in General Availability (GA). With Inline Replies and Threading you can reply to the main message or reply to a reply. This helps to better organize discussions and keep the context of the discussion meaningful. To use this feature you must be on Forums v5. By default, a post or a reply has three levels of threaded(indented) replies. Any reply after the third reply would be at the same level of indentation as the third reply. This is configurable up to eight levels. Contact Support to configure the levels of indentation. Learn more about the Inline Replies and Threading feature. Learn more about Inline Replies and Threading with examples Learn about quilt changes for forums that are customized according to community needs. JSON-based search queries in API v2 The Community API v2 /search endpoint can now take a raw JSON body in a POST request. A POST request enables you to make multiple search queries in a single request. POST also supports making subqueries in the same request. (Subquery support enables you to make a second query within the same request in cases where a field of an object returns a LiQL query in the response instead of the subobjects -- for example topics on the board resource.) Note: JSON-based queries are supported over HTTP only. If you are writing a Freemarker customization, you should continue to use LiQL strings. JSON-based queries use the same principles as LiQL-based queries. We describe these principles in Using LiQL. See our collection documentation for the fields, constraints, and sorts supported for each Community API v2 resource type. We'll look at a couple of quick examples here in the release notes. Find the full documentation for making JSON-based queries in the Developer Documentation Portal. JSON-based query example The following example JSON is equivalent to these two LiQL queries: SELECT id, view_href, subject, board FROM messages WHERE board.id = 'developerDiscussion' ORDER BY 'is_solution' DESC LIMIT 5 SELECT id, title FROM boards WHERE id = 'developerDiscussion' Create a separate subobject for each collection to query that includes the fields, constraints, sorts, and other entities as needed. Example JSON body [ { "messages": { "fields": [ "id", "view_href", "subject", "board"], "constraints": [ { "board.id": "developerDiscussion" } ], "sorts": ["is_solution"], "limit": 5 } }, { "boards": { "fields": [ "id", "title"], "constraints": [ { "id": "'developerDiscussion'" } ] } } ] HTTPS Example POST /api/2.0/search HTTP/1.1 Host: [COMMUNITY DOMAIN] li-api-session-key: [SESSION KEY] Content-Type: application/json [ { "messages": { "fields": [ "id", "view_href", "subject", "board"], "constraints": [ { "board.id": "developerDiscussion" } ], "sorts": ["is_solution"], "limit": 5 } }, { "boards": { "fields": [ "id", "title"], "constraints": [ { "id": "developerDiscussion" } ] } } ] JSON-based subquery example This example JSON body requests the id, subject, and author.login fields for the last five topic messages posted to the photography board. First, the query definition requests the topics in the board, and then defines the subquery. This saves you from having to make a separate call. [ { "boards": { "fields": [ "topics" ], "constraints": [ { "id": "photography" } ], "subQueries": { "topics": { "fields": [ "id", "subject", "author.login" ], "limit": 5 } } } } ] Batch requests to Community API v2 A POST to the /batch endpoint enables you to make multiple calls to Community API v2 in a single request. You can make Create, Read, Update, Delete, and Query calls within the same batch request. Calls are passed to the /batch endpoint in a raw JSON body. Each call is a separate object in an object array. Each call is executed in the sequence in which it is submitted with the top call running first and the bottom call running last Each call is executed independently (not in a transaction). In other words, if one call fails, successful calls made before are not rolled back. A failed call, by default, does not prevent calls after it from running; however, you can change this behavior by passing the api.batch.break_on_error query parameter set to true. The number of calls allowed in a batch request is 50. Note: The /batch endpoint is supported over HTTPS only. It is not supported in FreeMarker methods that make requests to the Community API (E.g., rest, restBuilder, liql) . Note: Endpoints supporting the following resources are not allowed in requests made with the /batch endpoint: Auth, Product_Catalog, Schema, and Archive. We'll look at a quick example below. Find full documentation in the Developer Documentation Portal. Batch request example A batch request looks something like this: POST /api/2.0/batch HTTP/1.1 Host: [COMMUNITY DOMAIN] Content-Type: application/json Cache-Control: no-cache [ { "create": { "type": "board", "entity": { "id": "batchRequestForum", "conversation_style": "forum", "title": "Batch Request Forum", "description": "I created this forum using the /batch endpoint", "allowed_labels": "predefined-only", "parent_category": { "id": "batchRequestTestCategory" } } } }, { "create": { "type": "message", "entity": { "board": { "type": "board", "id": "batchRequestForum" }, "subject": "First message", "body": "I created this message using the /batch endpoint" } } }, { "read": { "type": "board", "id": "batchRequestForum", "fields": [ "id", "title", "description", "conversation_style", "parent_category", "topics" ] } }, { "update": { "type": "board", "id": "batchRequestForum", "entity": { "description": "This is my updated forum description. I updated it using the /batch endpoint" } } }, { "read": { "type": "board", "id": "batchRequestForum", "fields": [ "id", "title", "description", "conversation_style", "parent_category", "topics" ] } } ] Studio Endpoint REST calls in Toolbox The REST Usage tab in Toolbox now includes Studio endpoints. Hover over the name of the endpoint to view the number of requests to the Community REST API. Note: You cannot click into an endpoint section of the pie graph to drill down to see the individual calls. Functions and lists now supported in the same search query You can now request both a function (like topics.count(*)) and a list (like topics) in the same query to the /search endpoint. Previously, a query like SELECT topics, topics.count(*) FROM boards WHERE id = 'MyBoard' would only return the count. You Found It. We Fixed It. We have fixed the issue where attachments could not be previewed before or after publishing a post/article using the Preview function. This display issue has been fixed. Previously, some customers received errors when attempting to view the Members > Value Analytics metrics in Community Analytics. This issue has been fixed, and the metrics display properly. We have fixed the issue where community members on PCs were not seeing the visual indicator for unread messages. This issue has been fixed, and unread messages now display in bold text on PCs. We have fixed the issue where Salesforce records were not getting updated when someone deletes themselves from the community. Now, this profile update is synced properly. Previously, if you tried to copy/paste images from the clipboard to the message editor (a feature that was introduced in the 19.6 release), the image was not pasted into the editor. This issue has been fixed. When members clicked the Send this user a private message button on the user profile page on a community using Private Messages v3, they were taken to the private message page without an open dialogue box to start crafting the message. This navigation issue has been fixed. We have fixed the issue where users with unverified email addresses were not presented with the message to verify their email address after attempting to post a question from the Ask a Question component. Previously, these users saw a blank page without any instructions on how to proceed. Previously, when you created an anchor to a specific part of the page using the Link/Unlink button in the message editor, an extra "http://" was added to the URL rendering the link ineffective. This issue has been fixed. We have fixed the issue where if a message has been previously edited, additional edits made to that same message via API v2 were not applied, despite serving a 200 response. Now, all edits via API v2 are processed correctly. We have fixed issues with the Mobile editor v1/v2, where the cursor would jump to other portions of the page while editing a post. Now, the cursor remains in the appropriate place while editing. This issue is fixed only for android devices. We have fixed the issue where the date/time sorting of featured topics via the API was not sorting properly. Previously, when a Case was escalated from the Case Portal to Salesforce and then the Case was closed in Salesforce, the case status was not updated to Closed in the original Case Portal message. This is now fixed. Previously, if a user tried to reply to a comment beyond the second page on a message that had over two pages of replies, the inline message editor threw an error. This issue has been fixed. The location field is now properly synced between a member’s community account and the corresponding Salesforce record. Previously, if you attempted to unarchive an article from the Content Archive that included a semicolon (;) in the title, an error was thrown and the unarchive failed. This issue has been fixed. You are now able to schedule reports for Page Views in Community Analytics. Additionally, we have fixed other issues with regard to creating and managing scheduled reports and those reports being delivered successfully. Previously, “spoiler” text (message text that is not displayed until the reader clicks the spoiler link) was included in Community subscription emails. This content is no longer included in any Community emails. This fix delivers on this idea submitted to the Khoros Communities idea exchange. Augmented our blacklist of FreeMarker unsafe methods to prevent instantiation of arbitrary Java objects. We upgraded to a stronger password-based hashing algorithm.2.4KViewsSign in to react to this post21CommentsLithium Community 19.1 Release Notes
New Features Content Mentions GA Prefix search for auto-suggest Message Editor v2 (Early Access) Better visual display for code samples In-line image editing Streamlined editing pane Toolbar button optimization and consistency Improved Emoji support GDPR “soft-delete” support Change a user's login using an HTTP endpoint (SSO only) API changes Content mentions GA In the 18.12 Release, we announced the Early Access release of Content Mentions. We are happy to announce that Content Mentions is now GA and no longer requires a Support ticket to enable. Note: Content mentions is supported only on Responsive communities. To get started with Content Mentions: Set the Mentions feature to version 2 in Studio > Features. (You no longer need a Support ticket to enable User or Content mentions.) Grant users the Mention content in posts permission in Community Admin. Turn on Content Mentions under Admin > Features > @Mentions. As part of the GA release, Content Mentions now supports email notifications when a user's message is mentioned in a post and content keyword search. We’ve added a new @Mention Content Notification email template in Studio. To view and edit the @Mention Content Notification template: Sign in to Community and go to Studio. Go to Text Editor > Email Text. Select @Mention Content Notification from the email template drop-down list. Click View. Make changes to the email text as needed and click Save. Content Mentions default notifications are configured in Community Admin. Members can configure their notification preferences, too: For admins: Users > Notification Defaults > Notifications > Posts my content is @mentioned in. For members: My Settings > Subscriptions & Notifications > Notification Settings > Posts my content is @mentioned in. Finally, the GA release of Content Mentions also takes advantage of the prefix search functionality, so as you begin typing your content mention, you see matching results as you type: Learn more about Content Mentions. Prefix search for auto-suggest We have improved the auto-suggest capabilities for community search so that you start seeing matching results as you type, instead of waiting for the whole word to be typed. For example, when searching for topics/answers on “gdpr”, you used to need to type in the complete word in the Search field to see auto-suggest results: Now, Search auto-suggest serves up answers as you type as soon as it finds matching results: Message Editor v2 (Early Access) We’ve made several improvements to our message editor (which currently uses TinyMCE version 4.7.13). Improvements include: Better visual display for code samples In-line image editing Streamlined editing pane Toolbar button optimization and consistency Improved Emoji support Requirements: These message editor enhancements require Responsive, Media v4 or higher, and Editor v2. Learn more about Feature Versions. Message Editor v2 is currently available as Early Access. Open a Support ticket to request access. (Before having Editor v2 enabled, we recommend reviewing your current implementation to assess the impact of any customizations you’ve made.) Enable Editor v2 (Early Access) Before upgrading to Editor v2, we recommend reviewing the all the new features and user interface changes that are included in Editor v2. You cannot pick and choose specific features; if you update to v2, you get all of these features and improvements. Similarly, we recommend reviewing your current implementation to assess the impact of any customizations you’ve made. Note: Message Editor v2 is currently available as Early Access. Open a Support ticket to request access. To enable the new version of the message editor: Sign in to Community. Go to Studio > Features. Set the Editor version number to 2. Click Save. Better visual display for code samples For Editor v2, the updated editor provides color coding for code samples in your posts to improve overall readability. To enter code samples when composing a message: Click the Insert Code icon. Choose the coding language from the list. Start typing (or copy/paste) your code sample. Here’s an example of a more robust code sample: Note: If you have applied custom CSS on the li-code tag, that styling will override these display improvements. To leverage the out-of-the-box styling, simply remove your custom CSS. In-line image editing In the previous version of the message editor, you could only perform the light, image editing tasks on images when you uploaded them to the community. In Editor v2, when a user clicks on an image while editing a post, the image is highlighted and provides these editing options: Alignment (left, center, right) Sizes (small, medium, large) Edit (opens modal window where you can add caption, resize and reposition) Streamlined editing pane To improve the overall usability of the message editor, we have replaced the multiple tabs (Rich Text, HTML, and Preview) with a single, editing pane in Editor v2. Note: The improved editing pane displays the content very close to how it will look like when published, mostly negating the need for the Preview tab. However, we plan to provide a new “preview mode” option in a future release. The improved editing pane will continue to pick up any custom styling in your SCSS that applies to message styling. To view and edit the HTML source for the page (which is sometimes needed to clean up HTML formatting when copy/pasting content from other sources), you can click the Source Code icon in the toolbar: A window opens where you can view/edit the HTML source code directly. Removed Admin settings Since the tabbed view of the message editor has been removed, the two admin settings associated with the configuration settings of these tabs have been removed. When you use enable Editor v2, the Discussion Styles > Posts & Topics > Settings tab no longer includes these setting options: Default editor to use for posts Display Rich Text, HTML, and Preview tabs Toolbar button optimization and consistency For Editor v2, we have done a full audit of the editing toolbars and have optimized them for specific discussion styles and size formats. Additionally, we have standardized the drop-down menu options across all the toolbars. Editor v2 provides these toolbars: Full toolbar (for Blogs and TKB) Simple toolbar (for all other content types) Responsive mobile Full toolbar (for Blogs and TKB) Blog and TKB content require the most robust editing controls. As such, the editing toolbar includes the most options: Top row buttons Format Align left Align Center Align Right Justify Bullet list Numbered list Decrease indent Increase indent Spoiler tag Source code Table of Contents Find Content (TKB only) Bottom row buttons Bold Italic Underline Strikethrough Text color Font sizes Font family Clear formatting Insert code Insert link Insert emoji Insert image Insert video Table Simple toolbar (for all other content types) All other content types (Questions, Ideas, Contests, comments, replies) don’t usually require advanced editing options. As such, a simpler toolbar is used: Buttons Bold Italic Bullet list Numbered list Clear formatting Insert link Insert emoji Insert image Insert video Expand toolbar Note: Clicking the ellipsis (...) button opens the Full toolbar, described above. Responsive mobile On mobile devices, where screen real estate is at a premium, the toolbar includes only the most common actions: Buttons Undo Bold Italic Bullet list Styles Insert link Insert image Insert video Consistent button drop-down menus Across all the toolbars (Full, Simple, Responsive), we have made standardized the options in these drop-down menus: Format Bullet list Numbered list Text color Font sizes Font family Table Improved Emoji support For Editor v2, we’ve improved our emoji support to provide community admins with a lot more flexibility over which emojis to make available in the message editor as well as the ability to create a custom set of emojis. For example, you might want to create emojis specific to your brand or products. To configure emoji support for your community: Sign in to community as an Admin. Go to Admin > Display > Emojis. By default, emojis are enabled on your community. Click Turn off emojis everywhere to turn off Emoji support. Click Turn off emojis within preformatted text to disable text from being converted to emojis in preformatted (code) text. Select or clear specific emoji categories, depending on which ones you want to include in the message editor’s Emoji drop-down menu. For each Emoji category, you can include or filter out specific emojis. Click the View All link next to each category and click specific emojis to turn them on or off. Click Save. Note: At this time, Custom emojis (ones you create specifically for your community site) are either all available or none are available. You cannot selectively hide emojis in your Custom emoji category. To remove an emoji from the Custom group, you must delete the emoji from Studio. Create a set of custom emojis Some brands have a custom set of emojis that they want to make available in the message editor. You create and manage this set of custom emojis in the Studio asset library. You can have only one set of “custom” emojis, and they all are stored in the “Custom” emoji category. To create custom emojis: Sign in to community and go to Studio. Go to Community Style > Asset Library > Emojis. At the bottom of the custom emoji list, enter the Emoji Name for your new emoji. In the Upload an Image field, click Choose File and select the image to use for this emoji. Note: Custom emoji icons cannot be larger than 128x128 pixels and must be smaller than 64KB. Emoji icons can be in .bmp, .jpg, jpeg, .gif, .png, and .svg format. Click Add Emoji. To delete an emoji from the Custom emoji list, click the Delete (trashcan) icon in the row of that emoji. Note: At this time, you cannot edit the name or image for an existing custom emoji; you must delete the emoji and recreate it. Using emojis in the message editor To add an emoji to your post: While writing your article/post, click the Emoji icon in the message editor toolbar: The Emoji chooser opens: Scroll through the list to find the emoji you want to add. Or, click one of the emoji categories along the top of the chooser. (The asterisk category (*) is your brand’s custom emoji set; this category appears only if you have created and enabled a set of custom emojis.) Tip: If you know the name of the emoji you want to use, you can type its name to search for it quicker: (Optional) You can select the skin tone to use for emojis that support different skin tone colors. Click the emoji image. The emoji is added to the body of your message. Tip: Additionally, you can type the emoji name (starting with a colon) to directly in the message editor pane. Doing so initiates an emoji search and preview of emojis matching that name: If an emoji is later removed from the Custom emoji list, hidden, or if emojis are turned off completely for the community, the emojis alternative text (for example, “:smiley:”) is used in place of the emoji image. Mac vs. Windows emoji display: The emoji screenshots used in these instructions are for Mac. On Windows machines, the emojis will look a little different. For example: GDPR “soft-delete” support As part of our support for GDPR, we have provided for a soft-delete period for all user deletes. During this period of time, it is possible to undo an account deletion and restore the deleted user account. To request an account restore, open a Support ticket. This soft-delete window provides a built-in safety feature to handle any accidental or malicious deletes. After the soft-delete window (default is set to 10 days) has passed, all user account deletes are permanent and irrecoverable. During the soft-delete period, the user name is reserved and cannot be used when creating a new account. After the soft-delete period elapses, the deleted username will be available again for new users. Note: This 10-day period is subsumed in 30-day SLA for user deletes. Note: When querying for the number of deleted accounts via the API, the response does not include any accounts in a soft-delete state, only accounts that have been hard deleted. The soft-delete period set to 10 days by default, but is configurable. The recommended maximum value is 10 days so as to not risk the GDPR-mandated 30-day SLA for account deletions. To request a change to the default value of 10 days, open a Support ticket. No action is required on your part to activate this feature and use the default configuration. Change a user's login using an HTTP endpoint (SSO only) A subset of customers using Single-Sign-on (SSO) and who are also the Identity Provider (IDP) require a way to change a user's login via an HTTP endpoint. This enables these customers to sync login name changes on their side with logins in Community. To provide this support, we have added a new configuration setting, disabled by default and enabled by Support. When the setting is enabled an SSO-enabled user's login can only be changed via the Community REST API. (It cannot be changed through UI by the user or by an administrator.) To enable this new configuration, open a Support ticket and request enablement for API-Only Allowed Login. To update a login, make a PUT call to the users collection (Community API v2) or call the user/login/set endpoint (Community API v1). API Changes 19.1 brings updates to Community API v2 Message, Conversation, Subscription, and User objects Community API v1 group roles endpoint FreeMarker Community API v2 Message object updates Conversation object updates Subscription object updates User object updates Initiate the Reset Password flow Message object updates New fields We've added new fields to the Message object. board_relative_id - the board-relative message ID. This could be used in custom components that incorporate inline anchors to jump to a specific message, for example, or to create a custom CSS class that differs by the message ID within context_id - Metadata on a message to identify the message with an external identifier of your choosing. You may create or edit a message with context_id and then query for messages by context_id using context_id in the WHERE clause of a LiQL query. You may add a single context_id per message. context_url - Metadata on a message representing a URL to associate with the message. This is an external identifier of your choosing. You may create or edit a message with context_url and then query for messages by context_url using context_url as a constraint in the WHERE clause of a LiQL query. You may add a single context_url per message. is_escalated - whether the message has been escalated moderation_style - The moderation style based on the Community Admin setting for the given board. Supported values: off, pre, post Order queries to the messages collection by the more recent of two timestamps You can now order queries to the message collection in the ORDER BY clause by the more recent of these timestamps: the post date of the latest reply in a given thread (equivalent to the conversation.last_post_time field) the last publish date (last non-draft message revision) of the thread topic Note: conversation.last_posting_activity_time is a new field on the Conversation subobject. The value of conversation.last_posting_activity_time will often be the same as the last_post_time of a conversation, but if the last publish date of the topic message is more recent, then sorting by conversation.last_posting_activity_time will show that date instead. Example SELECT subject, id FROM messages WHERE conversation.last_posting_activity_time > 2013-10-07T10:04:30-08:00 AND conversation.last_posting_activity_time < 2013-11-07T10:04:30-08:00 AND depth=0 ORDER BY conversation.last_posting_activity_time DESC Conversation object updates We have added the last_posting_activity_time field to the Conversation object. This field will be the more recent of either the conversation.last_post_time or the last publish date (last non-draft message revision) of the thread topic. This field must be called explicitly in the SELECT statement in order to be returned. See the previous section for more details about how to use this new field. Subscription object updates You can now subscribe a user to labels and products with Community API v2. See Creating user subscriptions with Community API v2 for examples. User object updates New LIKE clause constraint for the login field New LIKE constraint on login field We've added a new LIKE operator in the WHERE clause on the login field of the API v2 users collection. The LIKE operator works similarly to SQL LIKE clauses: you may add either 1 or 2 wildcard characters (the % sign) and you must have at least 3 non-wildcard characters in your LIKE string. Examples: doug%, %suz%, 'john%. SELECT id, login FROM users WHERE login LIKE 'doug%' SELECT id, login FROM users WHERE login LIKE '%suz%' SELECT id, login FROM users WHERE login LIKE '%john' The first example (LIKE 'doug%') would return user logins such as doug, dougP, douglasAdams, doughnutsAreDelicious, and so on. You may use the LIKE operator only with the login field of the users collection. You can use LIKE alone or with other constraints in the WHERE clause. You may use Unicode characters in a LIKE clause. You may include a % sign as a non-wildcard by escaping it. Escape a % by including two percent signs next to each other (%%) in your search string. Note: If you use LIKE in a query that also uses the following.id or followers.id constraints in the WHERE clause, then your wildcard characters must be before and after the rest of the LIKE string. These queries are valid when using followers.id or following.id: SELECT id, login FROM users WHERE following.id = '2' AND login LIKE 'doug%' SELECT id, login FROM users WHERE followers.id = '4' AND login LIKE '%suz%' SELECT id, login FROM users WHERE following.id = '5' AND login LIKE 'john%' These queries are not valid: (% is used in the middle of the LIKE string) SELECT id, login FROM users WHERE following.id = '2' AND login LIKE 'do%g%' (LIKE string includes only two non-wildcard characters. Three minimum are required.) SELECT id, login FROM users WHERE followers.id = '4' AND login LIKE '%su%' Initiate the Reset Password flow We've added a new Community API v2 endpoint /auth/resetPassword. This new endpoint is intended for use in native Android and iOS mobile Community integrations when an anonymous user wants to reset their password. (Community web app developers can simply redirect a user to the Forgot Password Page to start the reset password flow.) A POST call to the endpoint initiates the rest password flow for the email sent in the request body. You make this call as an anonymous user passing your app's client ID in the header for security verification. The endpoint verifies whether the user exists and is registered with the current email provided in the request body. Note: To use this endpoint, you must file a ticket with Lithium Support and request Reset Password API Enablement. Header Parameter Content-Type: (Required) application/json client-id: (Required) Obtain your client-id in Community Admin > System > API Apps. If you have not yet registered your Community web app in Community Admin, click Create Web App, provide a display name and authorization redirect URL, and click it verifies whether the user exists and is registered with the current email provided in the request body. Your client-id appears in the Client ID column. Request Body email: (Required) The email address associated with the user wanting to initiate a password reset cURL Example curl -X POST \ https😕/[COMMUNITY DOMAIN]/api/2.0/boards \ -H 'content-type: application/json' \ -H 'client-id: [CLIENT ID]' \ -d ' { "email" : "[email protected]" } ' Response codes A POST call returns one of the following codes: 200 - (Success) Returned if the required configuration setting (enabled by Support) is enabled and the payload includes an email item (regardless for the email validity) 400 - (Client Error) Returned if the payload is not present 403 - (Client Error) Returned if no client-id or an improper client-id is sent in the header 503 - (Service Unavailable) Returned if the required configuration setting is disabled Community API v1 We have added an optional String query parameter to the /groups/id/[id] /group_roles Community API v1 endpoint. By default, this call returns a list of roles defined for the specified group. When the new roles.include_ancestors query parameter is true, the call also returns group roles inherited from ancestor nodes. Example resource URL /restapi/vc/groups/id/group_id/group_roles?roles.include_ancestors=true FreeMarker updates We're pretty excited about these updates. We've got a new convenience method to make a LiQL call with a single argument, and you can now make POST, PUT, and DELETE calls to Community API v2 with the rest and restadmin context objects. Make POST, PUT, and DELETE HTTP actions to Community API v2 via FreeMarker We have updated the rest and restadmin FreeMarker context objects to enable you to make POST, PUT, and DELETE calls to Community API v2 in addition to GET calls. POST, PUT, and DELETE actions made with FreeMarker take a new set of parameters, described later in this section. You may continue to make GET calls with the following syntax (rest("rest_version","/search?q=" + "liql_query"?url)) or you can use the new liql and liqladmin context objects instead. Example POST (create) <#-- Build the requestBody parameter and assign it to a variable--> <#assign messagePostBody = { "type": "message", "subject": "How do I post a REST API message?" } /> <#-- Make your REST call with the rest or restadmin object --> <#assign resp = rest("2.0", "/messages", "POST", messagePostBody) /> ... Example PUT (edit) <#-- Build the requestBody parameter and assign it to a variable--> <#assign messagePostBody = { "type": "message", "id": "34", "subject": "How do I post a REST API message?" } /> <#-- Make your REST call with the rest or restadmin object --> <#assign resp = rest("2.0", "/messages/34", "PUT", messagePostBody) /> ... Example DELETE <#-- Make your REST call with the rest or restadmin object --> <#assign resp = rest("2.0", "/messages/34", "DELETE") /> ... The rest and restadmin methods now take the following parameters when making POST/PUT/DELETE calls to Community API v2 with FreeMarker: rest("version", "path", "method", "requestBody") restadmin("version", "path", "method", "requestBody") Parameter Description Example version (Required only when calling the Community API v2) The API version Get the message with the ID of 34 with a call to API v2. Note that because there is no method parameter passed, the method defaults to GET. <#assign resp = rest("2.0", "/messages/34") /> path (Required) The REST call path Get the message with the ID of 3 with a call to API v2. Note that because there is no method parameter passed, the method defaults to GET. <#assign resp = rest("2.0", "/messages/34") /> method (Optional) The HTTP method for the REST call. Defaults to GET if not set. Delete the message with the ID of 34 with a call to API v2 <#assign resp = rest("2.0", "/messages/34", "DELETE") /> requestBody (Optional) The REST V2 request body, as a FreeMarker hash Edit the subject of message ID 3 with a call to API v2. <#assign resp = rest("2.0", "/messages/34", "PUT", { "type": "message", "id": "34", "subject": "updated subject" }) /> Example use in endpoint posting a message <#assign subject = http.request.parameters.name.get("subject", "") /> <#if subject?length gt 0> <#assign messagePostBody = { "type": "message", "subject": subject, "board": { "type": "board", "id": "Otis" } } /> <#assign resp = rest("2.0", "/messages", "POST", messagePostBody) /> ${apiv2.toJson(resp)} <#else> { "status": "error", "message": "no subject parameter passed." } </#if> New liql and liqladmin context objects We've added new liql and liqladmin context objects. They are convenience methods and alternatives to using the rest and restadmin context objects to make a LiQL call. liql and liqladmin enable you make a LiQL call with a single argument. Note: Like restadmin, the liqladmin context object makes the call to the Community REST API with administrator permissions on behalf of the current user. Be careful when using liqladmin that you are not inadvertently returning or revealing data to a user who should not be seeing it. This call to the rest context object: rest("2.0","/search?q=" + "SELECT id, subject, body FROM messages ORDER BY post_time DESC LIMIT 5"?url) Can now be made like this with liql or liqladmin: liql("SELECT id, subject, body FROM messages ORDER BY post_time DESC LIMIT 5") You do not URL-encode the LiQL query when calling liql and liqladmin. Both ways of making GET calls to the Community API with FreeMarker are supported. You do not need to update existing code liql call format liql("liql_query") Example <#-- Make your LiQL query call --> <#assign resp = liql("SELECT id, subject, body FROM messages") /> … <#-- Do something with the response --> The liql and liqladmin context objects take the following parameters: liql("version", "query", "characterSet") liqladmin("version", "query", "characterSet") Parameter Description Example version (Optional) Specifies the Community API version. Defaults to "2.0". At this time, 2.0 is the only version. <#assign resp = liql("2.0", "SELECT id, subject FROM messages") /> query (Required). Specifies the LiQL query <#assign resp = liql("SELECT id, subject FROM messages") /> characterSet (Optional) Specifies the character set to use when encoding the LiQL query. Defaults to "UTF-8". We recommend using the default. <#assign resp = liql("SELECT id, subject FROM messages", "ISO-8859-1") /> http.response support in endpoints We now support the following http.response methods in Lithium endpoints. Previously, these call were only allowed in the page initialization script: addHeader("header_name","header_value") - add an HTTP response header setRedirectUrl("redirect_url") - set a redirect URL. Will use status code 301 until another redirect status code is set with http.response.setStatus. setContentType("content_type") - set a different content type for the request setStatus("status_code") - This is a new method that lets you set the HTTP status code Note: setStatus("status_code") is supported in endpoints only. Continue to use setRedirectStatus(status_code) in the page initialization file (common.init). You Found It. We Fixed It. For communities on AWS, we have fixed the issue where changes to user permissions were taking up to 24 hours to take effect. Now, these permission changes take place almost immediately, as expected. We have fixed the issue where the cookie-usage banner was not getting triggered in some cases when the LithiumVisitor cookie was not present. Previously, when a non-admin user flagged a video in a post for review, the video was not viewable by any non-admin user until an admin unflagged it. This has been fixed, and not videos remain viewable by non-admins until and admin/moderator confirms the flagged report. We have fixed the issue where the username values in the LSI Value Analytics report export were encrypted and didn’t show the actual username. Now, the username appears properly in the Username column. We have fixed this issue where the RSS Feed component was not displaying any recent topics. Previously, when adding a Daily Motion video link when replying to a post with a YouTube video, the Daily Motion video displayed as a link instead of as rich content, despite the Rich Content in posts setting being enabled. This issue had been fixed, and now Daily Motion videos display as rich content. We have fixed the issue where the log entry for Content Marked as Not Spam logged the IP address of the user who marked the message instead of the message itself. We have fixed the issue here node-level Message Placeholder settings were not being respected when moving messages. We have fixed the display issue where the Completed Ideas component was displaying over the header. We have fixed the issue where the "answerCount" metadata was missing in our QA Page markup.3.4KViewsSign in to react to this post34Comments17.8 Release Notes
Community release 17.8 provides: New Features API Changes Bug Fixes New Features Updates to Lithium Case Portal We have made several updates to Lithium Case Portal: Users who have permission to View or Create a case can now edit cases in the community, as well as edit custom and non-custom case fields. Previously, cases were read-only and could not be edited. Contact Lithium Services to perform this kind of customization. We have expanded the column-wise sorting functionality of results in the Case Portal. Previously, you could only sort results according to options configured for static columns such as “Created Date” and “Last Modified Date”. You can now configure sorting for all columns. In other words, you can now sort or list the results in the Case Portal based on options that you configure for any column. Contact Lithium Services to perform this kind of customization. You can now apply additional filters to Case Portal results. Previously, the Case Portal could filter results only based on their origin. You now have more control over filter configuration so that you can customize the results displayed in the Case Portal to your needs. API Changes Community V2 - Additional reason codes added to /allowed endpoint responses The /allowed endpoint is used to verify whether the current user has the correct permissions to make a Community API v2 call. The response includes a reason_code field, as described in Verifying permissions. We have added the following reason codes: 100 – Ok or Unknown 106 – Entity not found 107 – Entity does not support action 108 – Constraint check failed You Found It. We Fixed It. Using the id field as a constraint on the outbox_notes resource (SELECT subject FROM outbox_notes WHERE id = '35') now works correctly in a LiQL query in order to filter private messages in a user's outbox by user ID. Queries to the messages collection filtered by conversation.last_post_time (SELECT id, board, conversation.last_post_time, post_time FROM messages WHERE conversation.last_post_time < 2015-07-01T22:29:11-07:00 AND depth = 0 ORDER BY conversation.last_post_time DESC limit 10) now correctly returns topic messages where the last post in the topic thread is within the range specified in the WHERE clause. We fixed an issue where community users were receiving duplicate notification emails. Links in Groups components that take the user to the Pending Requests tab in the Group Members Page now take you to the correct location. The Pending Requests tab in the Group Members Page now shows the invite date/time. Sitemaps for nested TKBs now display properly. CSS formatting of <p> tags in private messages has been fixed to remove the unnecessary whitespace. We fixed an issue seen in 17.6 where images uploaded with a message post and resized using the rich text editor caused an error if the images did not have HTML width and height attributes set. No action is required by customers. Existing images will render even if the height or width have incorrect values. If there is incorrect height or width specified for an image when posting new messages or editing existing messages, the message will not be posted and an error message will be displayed in the form. The query returned for the messages.query field in LiQL queries like SELECT * FROM tags WHERE messages.id = '233' now returns the correct LiQL statement. Previously the query would return a value like SELECT * FROM messages WHERE tag.id = '57', which is not valid because we do no support tag.id in the WHERE clause. Now the value returns a statement with a valid query syntax using tags.text. For example: SELECT * FROM messages WHERE tags.text = 'test'611ViewsSign in to react to this post0CommentsKhoros Communities 21.7 Release
Features Integrate Zoom with Community Events API Updates RSVP API You found it. We fixed it! Features Integrate Zoom with Community Events Today, more and more meetings are moving to virtual spaces. Khoros Community Events now supports full integration with Zoom Meetings and Webinars. Integrating Events with Zoom enables community members to join the Zoom meetings and webinars directly from the community. With this integration you can: Create events to host Zoom meetings and webinars! All you have to do is paste in the Zoom URL. Now you can ask questions, discuss, and share follow ups to increase overall engagement in the threaded discussion. Host Zoom Meetings from a community event while providing full access to the Zoom options and features Host Zoom Webinars from a community event while providing full access to the Zoom options and features More info Learn more about the prerequisites required to host Zoom meetings and webinars from your community. Learn more about hosting a Zoom meeting and Zoom webinar on your community. Learn about mobile view for events with Zoom meetings and webinars. API Updates RSVP API We have updated the Events RSVP API to enable a member to add or remove the RSVP response on behalf of another member. Members with the “Create Events” permission now gain this ability. Learn more about move events API You Found It. We Fixed It. Earlier, the Internet Calendar Scheduling(ICS) files for community events uploaded incorrect schedule information in the Outlook calendar. This issue is now fixed, and all community events are now added to external calendar programs with correct information. We have fixed the issue where your editing position jumped to the beginning of a post while formatting any text at the bottom of a lengthy post. The issue with the preview of attachments to posts throwing misleading error messages is now resolved. You can now preview all attachments successfully. We have fixed the issue where some HTML characters in the case related fields in the Case Portal were encoded while sending information to Salesforce. Now, these HTML tags are no longer encoded. We have fixed the issue where the Top Tagged Posts widget displayed archived content. We have fixed the issue where the post count for a particular label on the Labels page did not decrease when posts with this label were archived. With this release, the post count for labels associated with archived posts will decrease as the post is archived. The Forum Topic Pages in Forums v5 with the Inline Editor enabled took more time than expected to load. We have improved the load time with this release, and all the inline reply controls load faster. We have fixed the performance issues with the load time when users with a large number of subscriptions navigate from the Notification Feed page. There was an issue with the notifications feed page, that when members use the notification bell icon to view new messages, the page was empty. The messages are loaded only after a page refresh. With this release, the notification feed page will display the notifications correctly when members access them from the bell icon. Khoros Communities has upgraded to the latest version of the XStream library. We have fixed the issue where users with simple HTML privileges could access and edit unpermitted HTML classes. This issue was specific to communities using a security feature designed to restrict allowed class values. This fix is available to all communities using this feature and are on version 21.5 or later. Note that this will prevent the use of all but a predefined list of values for HTML classes and can be customized on request. Reach out to Support if you have any questions or concerns. Accessibility fixes Earlier, the tooltip popup did not collapse when you clicked the Esc key, thus preventing users from viewing other controls. We have fixed this issue. On pressing the Esc key, the tooltip popup collapses for all tooltips across the community platform. There was an issue where the color contrast between community page elements and the background was insufficient for low-vision users to view the elements clearly. This fix ensures the contrast between foreground and background colors meets the WCAG 2 AA contrast ratio thresholds. We have fixed the issues where the JAWS screen reader did not identify the mandatory fields on the forms. Now, screen reader-dependent members can recognize the required fields, controls, and functionality. We have added titles for iFrame in the HTML code for all the dialog and drop-down menu components with this release. We have fixed the issue where the error message “Please input a complete URL”, while uploading an Image via URL to a given post, was not being read by VoiceOver. We have fixed the issue where while navigating on the search page, the tab focus and element role was not present on the “clear” link on the search form component.2.2KViewsSign in to react to this post18Comments