Best Practices: Community Experience Surveys in Aurora
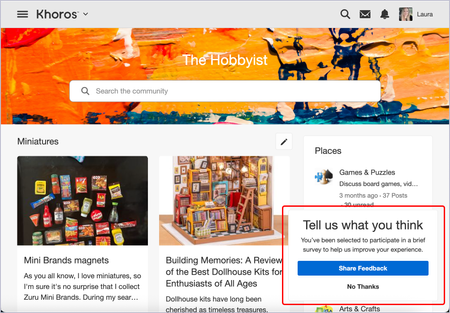
Community Experience Surveys provide community managers with a way to identify issues and optimize the community. Does this replace my existing survey tool? No. The Community Experience Survey complements any existing survey tool you may have. However, the Community Experience Survey provides more granular member details, such as node- and rank-specific data, that other tools can’t provide out of the box. Where should I deploy the survey? Where you deploy the survey depends on what questions you want to answer. For example, if there are certain boards you want to focus on, then deploy the survey there. However, you can also deploy surveys in the entire community first to get a sense of the baseline response and response in each place since you can always filter at the board level in the CSV Export for survey responses. When should the survey fire? We recommend not firing the survey immediately when a visitor lands on the page as it is disruptive to the user experience. (Remember, your visitors are there for a specific reason, and you don’t want to get in the way of that goal.) However, at the same time, you don’t want to wait too long to fire the survey as the browser session may expire. We recommend something in between. One approach is to see what your average Member Time on site is from Community Analytics and reduce that value by 20% to get close to the time when a user is nearly complete with their task/session. How long should I run the survey for? How do I know I’ve collected enough data? We recommend running the survey continuously so that you have a larger set of data to analyze. Visitors will receive the survey once within a 90-day period (by default, but this setting is configurable). However, if you plan to turn the survey off at some point, we recommend keeping the survey running for as long as it takes for the mean/average of the results to stabilize and not change much with additional samples. What’s a good response rate? For web-based surveys, 5-15% is a good response rate. For mobile-based surveys, 10-20% is a good response rate. Since the majority of community traffic is still web based, you should hope to see about a 10% response rate. 349ViewsSign in to react to this post
 0Comments
Aurora: View community experience survey results
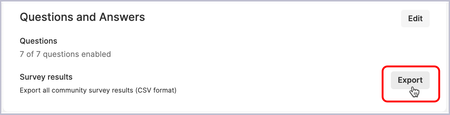
Admins can enable community experience surveys, which prompt members to provide feedback about their experience in the community (see Create community experience surveys). Survey responses and scores can be collected via an export. These results are in CSV format. To export community experience survey results: Open the Account menu. Select Settings. Select Content Features. In the left column, select Community Experience Survey. In the Questions and Answers section, beside Survey results, select Export. The CSV file contains the following information for each visitor who responded to the survey: The date on which the survey was taken The place in the community where the survey was triggered The username of the member who took the survey The member’s rank The member’s role(s) The answers given to each question391ViewsSign in to react to this post0CommentsAurora: Create community experience surveys
Admins can enable community experience surveys surveys, which prompt members to provide feedback about their experience in the community. Survey responses and scores can be collected via an export (see View community experience survey results). Create a survey Creating a survey requires several configuration steps, including designing the branding, designing its behavior, selecting its questions, and finally, turning it on for visitors. To access survey configuration options: Open the Account menu. Select Settings. Select Content Features. In the left column, select Community Experience Survey. Set up your survey: Design survey branding Design survey behaviors Select your questions Turn on the survey for visitors Design survey branding In the Branding area, select Edit. In the window, update the following as needed: Community name: The community name used in survey questions Brand name: The brand name used in survey questions Survey logo: Use a PNG or SVG logo; horizontal preferred. Text color Header background color: Used in the background of the survey header Select Submit. Design survey behaviors In the Survey Behaviors section, select Edit. Select whether you want to Present To: Signed-in members Anonymous users Both members and anonymous users (Optional) Select the role(s) you want to survey. (Optional) Select the role(s) you don’t want to survey. (Optional) Select the place(s) where you want the survey to be triggered. In the Frequency area, enter the number of Maximum responses to collect per month. This field sets the maximum number of surveys to collect for a given calendar month. After collecting this number of responses, no users will be prompted to take the survey until the first day of the following month. Enter a number of visits in the Present survey after this many visits field. This field sets the number of visits (0-500) to wait before prompting a viewer to take the survey. For example, if set to 3, the viewer isn’t prompted to take the survey until their fourth visit. Default = 0, which is the first visit. Enter a number of minutes in the Present the survey after this many minutes field. This field sets the number of minutes (1-60) to wait before prompting a viewer to take the survey after the defined number of visits have occurred. Default = 2. In the Conditions area, enter a number of days in the If declined/abandoned, repeat after this many days field. This field sets the number of days (1-365) to wait before prompting a viewer to take the survey after they’ve declined to take the survey. Default = 30. Enter a number of days in the If completed, repeat after this many days field. This field sets the number of days (1-365) to wait before prompting a viewer to take the survey again after they have already completed it. Default = 90. Select Save. Select your questions In the Questions and Answers section, select Edit. Use the toggles to turn on or off the questions you want to include or exclude on your survey, respectively. Some questions have follow-up questions based on the selected responses. Note: Because this survey is intended to gather important metrics and feedback, including CSAT (Customer Satisfaction Score), updating question titles and the order of questions is not permitted. Use the checkboxes by responses under your selected questions to designate which responses will be available for those taking the survey. Select Save. Turn on the survey for visitors After you have designed your survey the way you want it, you can enable it for your visitors by turning on the Community Experience Survey toggle at the top of the Community Experience Survey section.1.2KViewsSign in to react to this post3CommentsAurora: Configure DKIM for community emails
DKIM (Domain Keys Identified Mail) is an email authorization technique that leverages unique keys to digitally sign mail. This is done by adding an encrypted DKIM signature to the message header. It helps combat certain techniques often used in phishing and email spam, such as emails with forged sender addresses that appear to come from legitimate organizations. Our customers commonly implement DKIM records together with SPF to meet DMARC policies. This can provide better protection for your domain against malicious emails sent on behalf of your domains. Learn more about SPF setup. Note: Khoros cannot support a custom DKIM implementation in conjunction with SendGrid custom relays. Custom DKIM implementations also prevent the use of Communities Email Analytics. To perform this implementation with Khoros: Provide Khoros the mailer address to be used. Refer to Edit the Aurora community email sender name and address for best practices regarding the address choice. Khoros will provide the DKIM selector and key, which your teams will then install on the target mailer subdomain. Validate the DKIM configuration using tools such as mxtoolbox. The domain to check is the part following the @ symbol in your mailer address. For example, if your address is [email protected], then the domain to check is mailer.customer.com. Ensure all checks pass with the domain and selector. Once the DKIM configuration on your DNS entry is validated, Khoros completes the final Community configuration. Best Practices Refer to Edit the Aurora community email sender name and address for best practices regarding the choice of mailer address. You must use DKIM if you have restrictive DMARC records in place, even if you do not want to DKIM sign emails. The strictness is indicated below: Strict - Reject Strict - Quarantine (with a 25%+ apply percentage) policy Relaxed - Quarantine (with a < 25% apply percentage) policy Relaxed - None policy DKIM deliverability is not as high as with SPF only due to the IP addresses of the Khoros DKIM mail relays being newer (~2020) and part of AWS’s IP space. These relay servers may never be considered trusted by some email vendors for this reason, thus being more susceptible to emails being blocked. You must ensure there is no SP (Subdomain Policy) attribute present on the same subdomain. This can result in your top level DMARC policy being applied to your subdomain, and as a result, email not being delivered. To do this: Go to https://mxtoolbox.com/DMARC.aspx. Add your domain in the field (for example, khoros.com or everything after the @). Select DMARC Lookup and see if an SP message is displayed, which should look like this: “Organization Domain of this sub-domain is: example.com Inbox Receivers will apply example.com DMARC record to mail sent from mail.example.com”322ViewsSign in to react to this post0CommentsAurora: Configure SPF records for community emails
Khoros strongly recommends that all customers update their SPF records to include the region-appropriate Khoros domain. This provides a good balance of deliverability of mail from Communities, reduces setup time, increases security, and allows the use of email metrics. Find the region-appropriate line below, replacing “customer.com” with your own subdomain to add to your SPF record on the subdomain used to send emails: For APAC Communities: customer.com 86400 IN TXT "v=spf1 include:ap.khoros-mail.com --all" For NA Communities: customer.com. 86400 IN TXT "v=spf1 include:us.khoros-mail.com -all" For EMEA Communities: customer.com. 86400 IN TXT "v=spf1 include:eu.khoros-mail.com -all" This step enables Communities to securely send emails on your behalf from that subdomain. Verify that the SPF record is publicly accessible and correctly configured. You can use a SPF Check and Lookup tool to accomplish this task. Configure the email address as described in Edit the Aurora community email sender name and address. Validate your configuration by taking any action in your community that will trigger an email. Verify that the emails do not go into your spam/junk folder and have the intended sender address. Note: This process applies only for email configurations involving relaxed or no DMARC policies. If you require a stricter DMARC policy or any alternative configuration, contact Khoros or refer to Community email options for additional details.392ViewsSign in to react to this post0CommentsAurora: Community email options
Khoros Communities offers several email configuration options to ensure the deliverability and security of emails sent from your community. This article goes over the common email configurations that Khoros provides in a standard community launch. Note: Additional email configuration options might be feasible but aren't included in your community launch. Consult with your Khoros representative for more information. Modify sender name and address You can modify the sender name and address of community emails in the admin settings. For example, emails are sent from “Community Mailer” and "[email protected]" by default in US-based communities. You can change this to something better tailored to your brand, such as “Acme Community” and "[email protected]." Refer to Edit the Aurora community email sender name and address for steps. SendGrid SendGrid is Khoros’ current default relay used by most of our customers. SendGrid features higher mail delivery rates and is capable of handling much more traffic. However, due to our infrastructure, SendGrid does not support strict DMARC policies (“none” is supported). SendGrid is required for the Community Analytics (CA) metrics reporting feature. We do not support Community Analytics email reporting for any other relay type. Sender Policy Framework (SPF) Khoros strongly recommends that all customers update their SPF records to include the region-appropriate Khoros domain. This helps provide a good balance of deliverability of mail from Communities, reduce setup time, and increase security. Sender Policy Framework (SPF) records enable domain owners to publish a list of IP addresses or subnets that are authorized to send emails on their behalf. The goal is to reduce the amount of spam and fraud by making it more difficult for malicious senders to disguise their identity. SPF records can be set only on the A DNS record, not a CNAME DNS record such as (community.customer.com). We strongly recommend that the sender address is a subdomain of your primary domain and that the SPF record is set on that subdomain. For example, if your primary domain is [customer.com], we recommend the sender address to be a subdomain such as [[email protected]] and to set the SPF record there. Refer to Configure SPF records for community emails for more information. DKIM (DomainKeys Identified Mail) DKIM (Domain Keys Identified Mail) is an email authorization technique that leverages unique keys to digitally sign mail. This is done by adding an encrypted DKIM signature to the message header. DKIM helps combat certain techniques often used in phishing and email spam, such as emails with forged sender addresses that appear to come from legitimate organizations. This configuration requires coordination with Khoros in order to exchange key information and configure the Khoros mail relay properly. Note: Strict DMARC policies are not supported and require a Custom Relay instead. Refer to Configure DKIM for community emails for more information. Custom Relay In the rare case that none of the above options are acceptable, you can use your own mail servers for delivery. Essentially, all email outbound from Community are sent to your mail server first and then out to complete the delivery. This solution involves additional engagement with the Khoros Professional Services team.654ViewsSign in to react to this post0CommentsPull different Aurora community content into an RSS feed using URLs
You can pull different community content from different levels in the community in an RSS feed using URLs. To pull the most recent RSS results for the entire community, use: https://yourdomain.com/t5/s/[CommunityID]/rss/Community For example, for Atlas, you'd use: https://community.khoros.com/t5/s/lithosphere/rss/Community To pull content over the RSS for a category, use: https://yourdomain.com/t5/s/[CommunityID]/rss/Category?category.id=[CategoryID] For example, if Atlas had a category with the ID of "Social," you'd use: https://community.khoros.com/t5/s/lithosphere/rss/Category?category.id=Social Note: Category IDs are case sensitive. To pull content over the RSS for a KB, use: https://yourdomain.com/t5/s/[CommunityID]/rss/Community?interaction.style=tkb For example, for Atlas you'd use: https://community.khoros.com/t5/s/lithosphere/rss/Community?interaction.style=tkb1.9KViewsSign in to react to this post7CommentsAurora: Update community vanity URL
There are several actions you must take before we can change a vanity name on our end. The change is straightforward if your community is a non-SSO community, but if you use SSO there's a broader range of things to cover. As always, all changes should first be tested on stage if possible, and this is especially true if you're using SSO. Note: We highly recommend contacting our Professional Services team to complete this process, especially when using a custom SSO setup. Preparation Create a CNAME in your DNS. Point the CNAME at your internal community hostname (for example, communityid.community.com). Allow 48 hours to pass after steps 1 and 2 so the DNS can propagate the internet. Update the community URL Check your community settings and change any hard-coded URLs pointing to the old vanity name. A redirect largely covers this, but eliminating any non-needed page requests/redirects is always a recommended best practice. If you're using SSO and this change affects your SSO sign-in/sign-out/registration URLs, be sure to update them in Community Settings > System > Account and Privacy after the change is made on the Khoros side. IMPORTANT: if you're using SSO, make sure this domain change will not affect your authentication process. In most cases, SSO is domain-centric and works only for requests coming from the domain specified in the cookie, so if the domain is not updated in your SSO it could completely break authentication. For example, if your community URL was community.abc.com and your SSO was set for requests only from .abc.com, changing your vanity name to community.def.com would break authentication, since a cookie from one domain cannot be read by another. You need to update your SSO to ensure it's set to work with the new domain. If you're using a Salesforce integration, check with whomever handled that integration to ensure the change won't cause any unwanted problems. In some cases, that person might have to make changes to accommodate the change. Multiple vanity names are not officially supported, but if you plan to use more than one vanity name you MUST contact Khoros Support to have all of your domains added to a vanity domain allowlist. Any domain not in the allowlist redirects back to the active vanity name we have on record. After all of the above have been reviewed, tested, and you're ready to proceed, the remaining is completed by Khoros: Update the vanity name. Add any desired redirects (301) from the old vanity name to the new one so anyone who has bookmarks/favorites is redirected to the same page using the new domain. Add any other optional redirects you'd like in place. Depending on the number and/or type of redirects requested (for instance, more than a dozen), this may require an engagement through our Professional Services group. Restart the community during the next available maintenance window to apply changes. As noted, if you're using SSO we need to coordinate with you so that you can make any required SSO changes on your end at the same time we update the hostname on our end.579ViewsSign in to react to this post0CommentsAurora: Reverse proxy Best Practices
During pre-sales and launch, our customers often ask us about reverse proxy and vanity URLs. The question usually spawns from branding and search engine optimization (SEO) concerns. Some customers have corporate rules around aggregating all traffic for their domain. Branding, SEO, and corporate guidelines are all reasonable business considerations. In a branding-motivated scenario, a customer may want to use a subdirectory of the customer’s website, such as www.customer_name.com/community instead of our standard subdomain structure community.customer_name.com. With regard to SEO, you can find many articles that discuss how subdomains affect search engine optimization. The tricky part is determining whether the SEO benefit of a subdirectory structure is offset by latency potentially introduced with a reverse proxy. Khoros requires that any customer use of a reverse proxy be implemented in accordance with the appropriate implementation process specified by Khoros and set forth in the Statement of Work (SOW) that Khoros provides. The SOW sets out the process and important information that must be provided to support such implementation. Note: If you are using the Khoros Care with your Community, you also need to ensure that Care is able to communicate through the reverse proxy to Community in both stage and production. If you have IP address restrictions or other access restrictions for your reverse proxy, this might prevent integrations between Community and Care from operating correctly. What is a reverse proxy? In a reverse proxy implementation, community members do not access the community by directly connecting to Khoros servers. Instead, community members make requests to the proxy, which then makes requests to the community on the person's behalf. More generally speaking, any configuration that doesn’t include a CNAME to Community is a reverse proxy. What does Khoros recommend? As a general rule, Khoros strongly recommends against customer-controlled reverse proxy setups as these types of configuration introduce an unknown and uncontrolled layer between the end user (your customers) and our application. Occasionally, we have customers that do not discuss the concerns/goals described earlier with Khoros and add a reverse proxy in front of the community, managing the configuration and maintenance on their own. This practice often causes serious issues with community performance and stability that are difficult to debug. If you truly need a reverse proxy, we provide configuration options to create the most stable experience possible for you and your customers, and we have recommendations and best practices that we’ve learned over the years. Thoroughly discuss using a reverse proxy with Khoros, and work with Khoros Support to configure your request/response flow correctly. Using a reverse proxy—even with Khoros guidance and configuration—comes with costs that customers should understand before making the request. You may find that a reverse proxy's cost outweighs the benefits, or that Khoros has alternative solutions to consider about branding, security, and SEO that meet your needs without introducing a reverse proxy’s complexities. Let’s look at the complexities of customer-controlled reverse proxy implementations more closely: It's a black box to us. Customer-maintained proxies, using a technology of your choosing, are extremely difficult to debug and support without access to your infrastructure and specific proxy configurations. Coordinated debugging is required and can be very time-consuming. Working with Khoros to set up a reverse proxy integration properly pays off in the long run. Issues with a reverse proxy can confuse you and your customers. For example, if misconfiguration or performance issues with a reverse proxy arise, it looks like an issue with Khoros's application/infrastructure to end users. Similarly, Khoros has less information distinguishing users because all requests come from the proxy, which may be pooling connections, transforming requests, or otherwise acting differently than users’ browsers. It often takes some time to find the root cause of an issue. We’ve observed upwards of 2 times the response time for some customer-controlled reverse proxy setups, which can negatively impact SEO and dramatically reduce user retention. The reverse proxy flow has more steps than the standard Khoros response/request flow. More steps translates to extra server resources, a larger attackable surface area, extra latency for the user, and a performance bottleneck. A reverse proxy introduces an additional potential point of failure that is outside of Khoros’ control. If the proxy goes down, there's nothing Khoros can do to rectify the situation. It's entirely dependent on customer resources. Due to the lack of transparency, confusing indicators, and other complexities associated with a reverse proxy, the customer is responsible for verifying the source of any performance issues arising in a reverse proxy configuration. Khoros is not responsible for any performance issues related to or caused by a customer’s use of a reverse proxy. Therefore, it is critical that customers work with Khoros to implement a reverse proxy properly in order to minimize adverse effects. Okay, but what can really go wrong? Need some more concrete details? Here are a few issues we’ve encountered with customers who have attempted a reverse proxy implementation without Khoros guidance and proper community configuration: DNS issues: With incorrect DNS setup for the proxy or when pointing the proxy to Khoros servers incorrectly, the proxy can fail to connect. The failure might not happen at setup time but later when DNS records expire or when Khoros makes infrastructure changes. Examples we have seen include getting stuck in an infinite loop of self-requests, pointing at the wrong servers when we change IP addresses, getting turned away as invalid clients, or repeatedly being redirected to their own URL. The proxy fails to pass destination data from the original request: When this happens, we have no way of knowing the host and port that the end user (your customer) requested. We see only the host/port that the proxy requested. This incongruity can generate links and redirects with the wrong destination. In turn, if vanity hostname redirects are enabled, then the end user (your customer) is either kicked off the proxy or cannot access the community due to infinite redirects. Missing or incorrect client IP: If the reverse proxy doesn’t send the client IP, Khoros cannot get the end user IP. This makes all visitors appear to be from the same computer, which affects per-IP rate limiting and flood detection, IP bans, IP-based analytics in Community Analytics, IP-based geolocation, the Administrator IP-locking security feature, and the User IP address shown in reporting mechanisms. Response transformation: Actions such as injecting markup and JavaScript into the response has caused breakage for end users (your customers) that we could not reproduce or fix. What Khoros needs from you Your SOW order outlines the details of a reverse proxy integration. Here are a few things you can expect us to ask for: Emergency contact information: A person/team on call that we can call in the case of any integration issues, performance degradations, or outages SSL: We will use a secret header with a key to establish trust. Distributed proxy integration requires SSL to avoid the secret and key from being sniffed. These details are worked out during implementation. Proxy headers: We need to know which proxy headers you’re going to send. We require all of the following headers (these are the default, but they are customizable): X-Community-Proxy-Key: This passes the security key provided above and ensures the communication is really coming from your RP X-Community-Real-IP: Original user's IP address X-Forwarded-Host: Originally requested domain X-Forwarded-Proto: Originally requested protocol Requirements for a successful integration Make sure your proxy servers are robust, redundant, stable, and well-monitored. Connect from the proxy to the community via HTTPS for all requests. We also expect your proxy to require HTTPS for the end user. Make sure the 2 proxy headers above are populated correctly on every request. Point the proxy at the internal domain name provided by Khoros (for example, <your-company>.community.com). Do not configure using IP addresses. The community IP address may change at any time. It is recommended to preserve the Host header (for example, use "Incoming Host Header" for Forward Host Header in Akamai). It is acceptable not to preserve the Host header from the client. If you choose not to preserve it, you can pass the end-user request host using the X-Forwarded-Host header. The Host header should still reflect the internal domain provided by Khoros. If you decide not to preserve the Host header, let us know so we can configure it accordingly. proxy.allowForwardedHeader.host = true Do not alter the request or response (including all the headers and cookies) — be completely hands off to avoid regressions that are difficult to debug. If you must transform the request, let us know what you will be doing, and obey the W3C Guidelines for Web Content Transformation Proxies. We do NOT support CDN along with Reverse Proxy implementation, so alert us if you plan to use a reverse proxy so that we can take you out of our CDN. Khoros cannot update robots.txt in reverse proxy communities. You must work with your own IT team to update your robots.txt at the root level. Testing/Troubleshooting Both proxy headers, X-Community-Real-IP and X-Community-Proxy-Key, are mandatory to access the community in a reverse proxy setup across all instances. Consequently, any testing that bypasses the reverse proxy and directly targets our server must use a browser plugin (such as ModHeader for Chrome), to include both secret headers in the request. Still have questions? If you have questions about a reverse proxy implementation not answered in this article, or if you have implementation questions specific to your proxy configuration, discuss them with your Khoros Customer Success Manager.452ViewsSign in to react to this post0CommentsAurora: Redirect user to related content
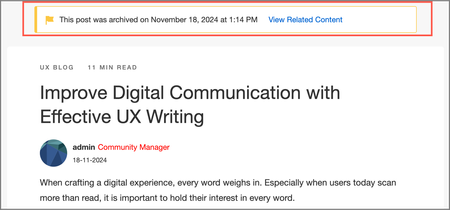
When you archive content, you can provide a permanent redirect link to related content within the community or an external page. Members who attempt to access archived content (via permalink) see a notification indicating that the content has been archived and redirected to relevant information. Though this is optional, it is best practice to provide a related link to relevant content while archiving. For instance, if a Google search result suggests a piece of content that was archived in your community and members select that link, they are automatically redirected to the related content in your community. As the redirection occurs for several members, the Google crawlers understand that the old link is replaced and boost up the new link's ranking instead of the old link. If you didn’t do this when you archived the article, you can opt to add it later from the Archives page. Add a URL to related content Sign in to the community Select Archives on the Manage Content dashboard. Select the Options (...) menu and select Add Link to Related Content. A window to enter the URL opens. Enter a link to the relevant content in your community. Select Add. The entered link is added. After an article is archived: Members who are not admins or moderators are redirected to the page that was added as related content. If no redirect URL is provided, they land on an empty page as shown below. Community admins and moderators land on the original page and see a notification that the page was archived. A link to the related article is provided. Furthermore, you can edit the added link from the archived page by opening the Settings menu and selecting Edit Link to Related Content. Add a URL to an external page You can also redirect members to external pages outside the community. To achieve this, toggle on External URLs under Settings > Features > Moderation > Content Archive.274ViewsSign in to react to this post0Comments