Aurora: View support cases in the community
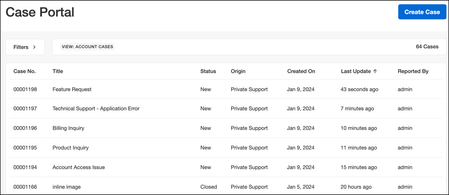
In the community, the Case Portal lists all the cases that are created by members via different channels (phone, email, Facebook, and/or the community). The Case Portal option must be enabled in the Salesforce settings to view the support cases. Members with the Read and reply to own support cases permission can access the Case Portal to view their own support cases: The page lists: Case No.: The unique identification numbers for each case. Title: The titles for each case. Status: The current status of each case. Origin: The source through which the cases were created. Created On: The date on which each case was created. Last Update: The date on which each case was last updated. You can sort the cases based on Last Update. You can further filter cases based on View, Keyword, Status, and Origin: To view support cases in the Case Portal: Open the Account menu and click My Support Cases. Note that you must have the Read and reply to own support cases permission to view this option. The Case Portal page opens. To view the details of a case, click the Title of the case. The case details page opens. From the case details page, you can update or close your case. You can also reply to your own cases: Related topics: Create a support case in the Community Update or close support cases from the Community Set case portal permissions 493ViewsSign in to react to this post
 0Comments
About the Aurora Case Portal
After you set up the Salesforce integration with your community, you can activate the Case Portal within the community. The Case Portal enables members to: Create Support Cases directly from the community. Correspond with Support agents on cases via case comments in the community. Cases can be discussed in public and private areas of the community. Access their open and resolved cases from a private community page regardless of where that case originated. For example, you might have created several support cases via different channels (phone, email, Facebook, and/or the community). The Case Portal enables you to access and respond to all of your cases regardless of how they were originally opened. In the Case Portal, all the interactions between the Support agent and the user are captured in threaded conversations. To enable Case Portal for your instance, open a Support ticket. After the Case Portal is enabled in your community, you can set it up by performing these tasks: Enable and configure the Case Portal in Community Admin Set up Case Portal permissions829ViewsSign in to react to this post0CommentsConfigure Salesforce integration in an Aurora community
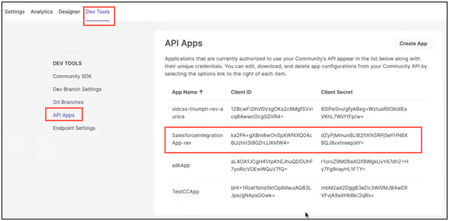
The Khoros Community integration package leverages custom Salesforce settings, which are used by many components and relate to the Khoros Community configuration settings on Salesforce. After you set up your Salesforce environment, you must configure your community environment to complete the integration. From the community Settings area, admins can access and configure Salesforce settings (Settings > Features > Salesforce). To configure the Salesforce integration: Sign in to the community as an Admin. Go to Settings > Features > Salesforce > Settings. From the Settings section, configure the following: In Username for Salesforce, select Edit and configure the following: Username for Salesforce: Enter your full sign-in name (usually an email address) for a user with the System Administrator profile in your Salesforce environment. Password: Enter your password and your “Salesforce.com” security token in this field. For example, if your password is “secret” and your security token is “1234,” you would enter “secret1234” in this field. Read more on how to reset your security token. Salesforce API URL: This is a mandatory field. Enter a URL for the Salesforce SOAP API based on the environment type you’re connecting to: Production: https://login.salesforce.com/services/Soap/u/ Sandbox: https://test.salesforce.com/services/Soap/u/ Authentication endpoint for Salesforce: Enter the authentication endpoint based on the Salesforce environment you’re connecting to: Production: https://login.salesforce.com/services/oauth2/token Sandbox: https://test.salesforce.com/services/oauth2/token Email for Salesforce integration failure notification: Enter the email addresses (separated by commas) of the members to be notified when the Salesforce integration point fails. Changes to the Salesforce Integration API App If you're using connector version 4.4 or higher, make the following changes to the Salesforce Integration API app. These changes are not required for versions earlier than 4.4. Contact support to enable the appropriate configuration for your community for Salesforce connector v4.4. The new setting automatically appears in Aurora Admin as shown below. Open the Options menu for this app (three dots) and select Edit web app. The Edit Web App window opens. In the Authorization redirect URL field, enter the redirect URL (or the callback URL). The redirect URL is the URL of the VisualForce page for Custom Settings in Khoros Salesforce Connector. Select Edit. The entries are saved.1.1KViewsSign in to react to this post0CommentsAurora: Configure custom Salesforce settings
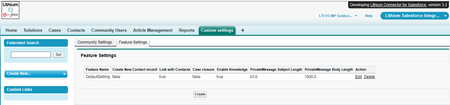
The Khoros Community integration package leverages custom Salesforce settings, which are used by many components and relates to the Khoros Community configuration settings on Salesforce. To apply settings for your Khoros environment: Sign in to your Salesforce.com environment. From the dropdown on the top right of the page, select App as "Khoros Salesforce Integration." Select the Custom Settings tab. Go to the Feature Settings tab. Select Create. Enter the Feature Settings: Feature Setting Name: Default is "DefaultSetting." Do not change this setting, as it is non-editable in newer packages. Create New Contact record: Select this option to enable the creation of a new Contact during user sync if a Contact with the matching email ID is not present. During User Sync, Contact and Community users are linked together. The linkage is necessary for Case Portal functionality. (You must enable the Community User Trigger below for this setting to work.) Link Community User with Contacts: Select this option to allow linking of Community user and Contact during user synchronization, if a contact with same email ID already exists. The linkage is necessary for Case Portal functionality. (You must enable the Community User Trigger below for this setting to work.) Case closure: Select this option to allow automatic case closure when a comment on a post is accepted as solution on community. (You must enable the Case Trigger below for this setting to work.) Max Allowed Private Message Subject Length: Sets the maximum length the Private Message subject (up to 43 characters). Max Allowed Private Message Body Length: Sets the maximum length the Private Message body. No of Federated Search Results from Salesforce: Limits the number of Federated Search results (applies to Salesforce results only). Default value is 100 (Package 4.1 onwards). Enable Community User Trigger: Select this option to enable Community User Trigger. This trigger runs on community user creation/update and links community users with contacts. This linkage is necessary for Case Portal and User Sync functionality. Enable Case Trigger: Turns on or off triggers on cases, which synchronize case status changes with community and also mark a case as closed. Enable Case Comment Emails: Toggle Case Comment email on and off. (Package 3.7 onwards) (Optional) Fallback Community Username: Enter username of the Community user to which postbacks should fall back to when a Community user is not found corresponding to the email address of the user replying. This is also used in case of multiple users with the same email address. Entered Community user should be a valid value. (Package 4.0 onwards) Allow Case Comments for public Community Cases: Select this option to enable the creation of Case Comment on Public Community Cases …1.3KViewsSign in to react to this post0CommentsAurora: Install the Salesforce integration package
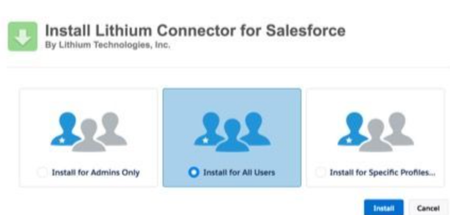
Khoros periodically releases updates to the Connector for Salesforce package to introduce new features and address defects. Note: In addition to deploying the package to your Salesforce server, you need to activate the integration on your Khoros community before you can configure and use the integration. Contact Khoros Support for assistance with activating the integration on your community instance. This article explains the basic process for a new deployment of the Khoros Connector package to your Salesforce org. The process uses the standard Salesforce methodology for deploying managed packages from the AppExchange. To install the integration package for the first time in your target Salesforce org: Download the latest Salesforce Connector package (v4.4): Production Package Sandbox Package Note: If you would like to use Salesforce Connector v4.3 then download the below packages: Production Package Sandbox Package See connector package change logs Select Get it Now. Select Install in production or Install in sandbox and click Confirm and Install. Select Install for All Users and click Install. In the Approve Third-Party Access window, select Yes, grant access to these third-party web sites and then click Continue. When the package is deployed, you can confirm it by going to Setup > Installed Packages: The Khoros Salesforce Integration app in the app navigation menu is located on the top-right corner of the Salesforce window:938ViewsSign in to react to this post0CommentsInstalling and configuring your Aurora/Salesforce integration
The following sections cover the step-by-step instructions for installing and configuring your Aurora/Salesforce integration: Install Salesforce integration package Configure Salesforce integration in Salesforce environment Configure Salesforce integration in community Install Salesforce integration package You must install the integration package in your Salesforce environment. Community Aurora supports v4.4 and v4.3 Salesforce integration connector versions and does not support previous versions (v1/v2/v3/v4). If your community was on Classic Communities and has recently migrated to Aurora Communities, you must migrate from Salesforce integration connector package v1/v2/v3/v4 to v4.3 / v4.4. To initiate the migration process, contact your Khoros account team. If you are a new customer to Aurora Communities and are installing the integration package for the first time in your Salesforce environment, refer to installing the Salesforce integration package. Configure Salesforce integration in your Salesforce environment After installing the Salesforce integration package, follow the steps below to configure various settings in the Salesforce environment: Configure remote site access Configure custom Salesforce settings Create a New Email Service Add a Federated Search component to the Salesforce sidebar Enable postback comment via Salesforce Reply to community members from Salesforce via private messages Modify Contact, Case, Solution, and Account Page Layouts and set up Reporting Dashboards Configure Salesforce integration in your Community Enable SFDC package and configure the Salesforce.com integration in Khoros Community Admin Enable and configure the private support Case Portal (Enhanced SFDC Offering) Set up Salesforce search components for your Community integration Synchronize Community members with Salesforce. After you've deployed your Aurora/Salesforce integration, you can: Allow your agents and your community members to interact through a private support Case Portal View community member details and statistics within Salesforce.com Leverage postback options when working Salesforce cases Reply to community members from Salesforce via private messages1.3KViewsSign in to react to this post0CommentsAurora: User fields synced between Community and Salesforce
This article lists the user fields that are synced between the community and Salesforce. Note: "Data type" defines the type of data a field can hold and its specific constraints. For instance, number(5,0) accepts whole numbers up to five digits, with no decimal places (e.g. 99,999). Data Element Data Type Description Saved in Salesforce? Members’ Basic Details First name Text (50) User's first name Yes Last name Text (50) User's last name Yes Email address Text (50) User's email id Yes Members’ Community Details Khoros User ID Number (7, 0) Khoros' internal user ID Yes isUserDeleted Text (50) Whether the user is deleted or not Yes Rank Text (50) Rank assigned to the user in Khoros Yes Roles Text (50) Roles assigned to the user in Khoros Yes Registration Time Text (50) Time stamp when the user registered on the community Yes Last Visit Time Text (50) Time stamp when the user last visited the community Yes Biography Text (50) User's self composed profile description Yes Administrative Notes Text (50) Additional notes by administrator Yes Location Text (50) Geographic location of the user Yes Khoros SSOID Text (50) (External ID) (Unique Case Insensitive) Khoros community user SSO ID Yes User Profile Avatar URL Text Area (255) The user avatar URL Yes Community User URL URL (255) Community user URL Yes Community ID Text (50) Khoros community ID (member username) Yes User's Community Statistics / Metrics Metric Logins Number (5, 0) Number of times the user has logged in on the Khoros community Yes Metric Minutes Online Number (10, 0) Total duration, in minutes, the user has been online Yes Metric Page Views Number (10, 0) Count of pages the user has viewed on community Yes Metric Posts Number (6, 0) No. of posts the user has authored on the Khoros community Yes Metric Messages Read Number (6, 0) No. of messages user has read the Khoros community Yes Metric Private Messages Sent Number (5, 0) No. of private messages user has sent to other community users Yes Metric Private Messages Received Number (5, 0) No. of private messages user has received from other community Yes Metric Average Message Rating Number (4, 4) Average of the rating (Kudos) given by other users, to the messages posted by the user Yes Kudos Count Number (18, 0) No. of Kudos received by the community user No, fetched from Community No of Accepted Solutions Number (18, 0) …911ViewsSign in to react to this post0CommentsAurora: Configure remote site access for your Salesforce integration
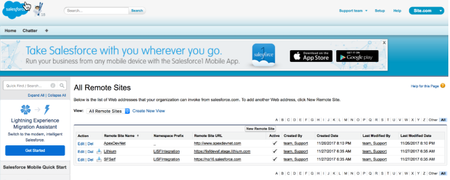
The Aurora/Salesforce integration must be able to access your Khoros community. Part of this integration involves mentioning community APIs in the allowed list so Salesforce doesn't block them. To configure remote site access: In your Salesforce.com environment, go to Setup. Go to Administration Setup > Security Controls > Remote Site Settings. By default, two Remote Site Settings with the NameSpace prefix "LiSFintegration" appear. For the Khoros (Lithium) setting, click Edit. Enter the Base URL value according to your Khoros environment. Note: Be sure to include the https:// and HT credentials. Use the following format: https://<HTUSER>:<HTPASSWORD>@<***Community URL> Example: https://test123:[email protected]/ Khoros Community Stage Base URL Sandbox https:// [community_id].stage.lithium.com Production https:// [community_id].lithium.com Note: Your Khoros Community Success Manager (CSM) can provide you with your Community ID. Note: If you have a more descriptive CNAME/vanity address for your community, use that name when creating the URL (for example, https://community.mycwebaddress.com). (Optional) For debugging purposes, you can turn-off the requirement for HTTP communication. While this is not recommended in any production-like environment due to security risks, it may assist in diagnosing connectivity issues. After your diagnostics are complete, we strongly advise re-enabling HTTPS and maintaining it for security reasons. Click Save. Click Edit for the SFSelf setting and provide the Remote Site URL as your existing signed-in Salesforce URL (for example, https://na16.salesforce.com). Click Save. Repeat steps 3 – 9 for your production community, replacing the name with something descriptive such as “Khoros community – Production” and the URL with the final URL for your production community (for example, https://community.mywebaddress.com). Note: You can also repeat this process to connect multiple Khoros communities to your Salesforce instance. For custom domains (Salesforce 3.9 or later): Click New Remote Site. Enter SFSelfInstance for the Remote Site Name. Enter your Remote Site URL (for example, "yourinstance.salesforce.com"). Enter a Description for this site. Select the Active checkbox. Click Save.820ViewsSign in to react to this post0CommentsAurora: Escalate discussions to Salesforce
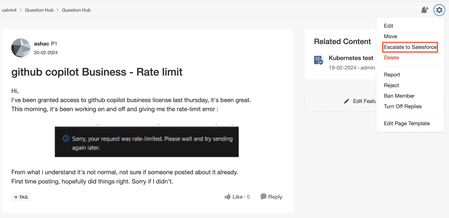
Forum discussions can be escalated either manually or automatically You can also escalate replies to forum discussions. Members with the View escalations permission can see the details about the escalation. Manually escalate forum discussions to Salesforce Members with either the Escalate a discussion to the CRM system and the Escalate one's own discussion to a CRM system permission can escalate discussions to Salesforce. Those with the Manage escalation settings and providers permission can also set the Escalate discussions settings for the forum board. To manually escalate a discussion: Open the Options menu for the discussion. Click Escalate to Salesforce. A window opens where you can enter the details for the escalation. Enter the Reason and Comments for the escalation. Click Escalate. You receive confirmation that the discussion has escalated successfully. On the discussion page, you can see that the discussion was escalated along with details on who escalated it and when. Escalate discussion replies Members with either the Escalate a discussion to the CRM system or the Escalate one's own discussion to a CRM system permission can escalate discussions to Salesforce. Automatically escalate discussions to Salesforce You may want to automatically escalate discussions or replies within your community. This urgency could be due to issues raised by members with elevated roles or the need to promptly address and resolve cases within the community. To address this, you can designate a board specifically for discussions and/or their replies to be escalated automatically. You can also set a waiting period for a response (either a reply or a solution), after which the discussion is escalated automatically. Let’s understand these settings: Scenario 1: If you want to automatically escalate a discussion based on the author’s role, set the Automatic escalation by role settings as shown below. In certain cases, you may not want to regulate escalations from specific members within the community. For instance, admins and moderators might post discussions solely for informational purposes rather than issues or cases requiring escalation. Follow the steps below to implement this control: Click Edit next to the Automatic escalation by role setting. A window where you can set the roles opens. You can do one of the following: Select Exclude escalation of posts from the roles below. In the following example, the roles Administrator and Moderator are selected. This ensures that discussions authored by members with these roles are not automatically escalated. Select Only escalate the posts from the roles below. In the following example, a “CategoryExpert” role is selected. This ensures that only those discussions authored by members with these roles are auto…702ViewsSign in to react to this post0CommentsAbout the Salesforce and Aurora integration
The "Khoros Connector for Salesforce" enables you to create a tight integration between your Khoros Community Aurora content, Salesforce content, and Salesforce cases. For more information on setting up this integration, contact Khoros Services. Note: You must have a full Salesforce license to take advantage of the Khoros/Salesforce integration. The following are the key features of the Aurora and Salesforce integration: Automatically escalate unanswered threads to Salesforce cases Manually escalate threads to Salesforce cases Provide a private support case portal to their community members View community member details and statistics within Salesforce Use enhanced federated search across Aurora and Salesforce content Link Salesforce and Khoros Community Aurora content via postback from Salesforce to the community Before you start Decide on your target Salesforce environment. Khoros strongly recommends that you first enable the integration in a Salesforce developer or sandbox org before deploying the integration to your production environment. Make sure you have your Salesforce integration enabled in the Aurora community environment that will connect to your Salesforce environment. Your Khoros Customer Success Manager can assist with this process. Khoros will enable the integration in your staging environment before enabling it in your production environment. Learn more about Installing and configuring your Khoros/Salesforce.com v3/v4 integration.1.4KViewsSign in to react to this post0Comments