Not receiving user email addresses from search endpoint
I have a script that queries the search endpoint for information about Khoros users. The API call looks roughly like /api/2.0/search?q=SELECT id, email FROM users LIMIT 10 When developing this script against one Khoros installation, I found that the Khoros user associated with the API request needed to have several "User Management" permissions granted to it in order to receive email addresses via this API call. (In particular, granting "View user reports in Admin Metrics", "Manage roles, user bans, and abuse notifications in admin and user profiles", and "Manage roles in user profiles" seemed to be sufficient.) However, when running this script against a second Khoros installation, I am not receiving back any email addresses. Every single user returned has the empty string as their email address, and I've tried querying several hundred (all of whom should have emails). For instance, a response may look similar to the below (redacted) sample: { "status": "success", "message": "", "http_code": 200, "data": { "type": "users", "list_item_type": "user", "size": 10, "items": [ { "type": "user", "id": "1000000", "email": "" }, ...additional users removed for brevity... ], "next_cursor": "AbCdEf" }, "metadata": {} } I have double-checked the roles and permissions for the Khoros user I'm using for this API request. What's the best way to debug? What are some other reasons that I may not be receiving any email addresses? 269ViewsSign in to react to this post
 0Comments
About Content permissions
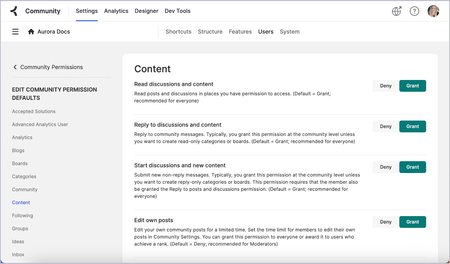
You can adjust permissions related to content at the community, container (category & group), and board level. Some permissions are set to Deny by default while others are set to Grant by default. At the container level and the board level, permission defaults and role permissions are inherited from the parent level. In those cases, the Inherit button is displayed in green to indicate that the permission was set to Grant at the parent level or red to indicate that the permission was set to Deny at the parent level. As an admin, you can manage these permissions. To manage content-related permission defaults at the community level: Note: To manage this permission at a lower level, go to the [Place] Permissions page and edit the permission defaults for that level. To manage this permission for a particular role, go to the [Place] Permissions page at the desired level of the community and edit the permissions of the individual roles. Go to the Roles and Permissions page for the community. Beside Community Permissions Defaults, select Edit. Review permissions in the following areas: Blogs Content Events Ideas Knowledge Bases Select Deny or Grant as required. Unless you have specified different permissions for certain roles or levels below the community level (a category, group, or board), these selections affect all members of the community. Content permissions While Forum permissions are granted by the Content permissions, Blogs, Event Boards, Ideas boards, and Knowledge Bases have distinct permission sections for content type-specific tasks. The Content permissions are provided for general content access and tasks and relate to all content types. Follow the links in the table below to learn more about the tasks granted by these permissions. Permission Default Related permissions in content type sections Read discussions and content Grant Blogs: Read posts and Read comments Ideas: Read ideas and comments Reply to discussions and content Grant Blogs: Comment on posts Events: Comment on events Ideas: Comment on ideas Knowledge Bases: Comment on articles Start discussions and new content Grant Blogs: Start new posts Events: Post new events Ideas: Post new ideas Knowledge Bases: Create, edit, publish, and manage articles Edit own posts Deny Blogs: Edit own published posts Events: Edit own events Ideas: Manage ideas and comments Knowledge Bases: Edit own published articles Edit any post Deny Blogs: Edit any published post Events: Edit all events Ideas: Manage ideas and comments Knowledge Bases: Edit any published article Move content Deny Blogs: Manage any posts and Manage own posts Delete own post Deny Blogs: Manage own posts Events: Delete own events Knowledge Bases: Delete own articles Delete any post Deny Blogs: Manage any posts Events: Delete all events Ideas: Manage ideas and comments Upload file attachments Deny Embed external content Grant Turn on link hyperlinking Grant Use simple HTML in posts Grant Use advanced HTML in posts Deny Use full HTML in posts Deny Make content read only Deny Post read-only content Deny Bypass moderation Deny Blogs: Bypass comment moderation Events: Bypass comment moderation Ideas: Bypass moderation Knowledge Bases: Bypass comment moderation Related topics: About Aurora Community site structure About Aurora Content Types722ViewsSign in to react to this post0CommentsAurora: Look up a member's roles and permissions
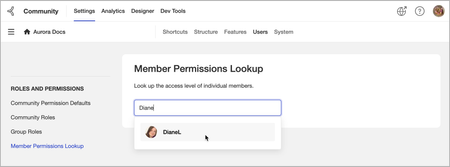
Sometimes you may want to look up the permissions and roles of an individual community member to see what they have access to do. When you look up a member’s current permissions, you may also want to assign them to more roles (or unassign them)—you can perform these actions on the Member Permissions page. Note: You cannot change the individual permissions of a member. Instead, you must add them to roles that have the permissions you want that member to have. If you want a member to have unique permissions, create a role just for that member and adjust the permissions as desired (though this is not recommended). To look up a member’s roles and permissions at the community level: Note: If you want to look up a member’s permissions at a category, board, or group level, you must first select that place in the place picker on the Roles and Permissions page. Go to Settings > Users > Roles and Permissions. In the left column, click Member Permissions Lookup. In the field, enter the username of the member whose permissions you want to view. On the Member Permissions page scoped to the community level, view the following information: Member Information: The member’s rank, username, email address, and how long ago they joined the community. You can also click Profile to go to their member profile for more information about their contributions to the community. (See About the member Profile page.) Community Roles: The roles currently assigned to this member. The Role In column shows at which level the member was assigned that role. For example, if it was assigned at the community level, Community appears; if it was assigned at a lower level, the name of that place appears. Group Roles: The Group roles currently assigned to this member. The Role In column indicates which Group this role applies to. Community Permissions: All the permissions assigned to this member via their roles. To the right of each permission, the Grant or Deny status is displayed along with the level and role where that permission was or was not granted. Hover your cursor over the named role to see its full name and at what level it was assigned to the member. You cannot alter these permissions here, as you cannot assign permissions individually. Permissions are all granted or denied via roles. Note: When you have chosen a lower-level place, instead of Community Roles, you’ll see Category Roles (this section also contains roles for lower-level places within the category), Knowledge Base Roles, Blog Roles, Ideas Roles, or Forum Roles. Also at lower levels, you’ll see Category Permissions, Group Permissions, Knowledge Base Permissions, Blog Permissions, Ideas permissions, or Forum Permissions. At the board level (Knowledge Base, Blog, Ideas, or Forum), the Group Roles section is not available. (Optional) In the Community Roles area, click Assign Community Roles to assign more roles to the member at the community level. On the Assign Community Roles window, enter roles in the Community roles field, and then click Assign Roles. Note: When you have chosen a lower-level place, any roles you assign are applied only at that level. (Optional) If you’re scoped to a Group level, you can also click Assign Group Roles to assign more Group roles to the member. On the Assign Group Roles window, enter roles in the Group roles field, and then click Assign Roles. (Optional) If you want to remove a role in the Community Roles or Group Roles sections, hover your cursor over the role until the Remove button appears, and then click it. Note: If you want to view a different member’s permissions at any time on this page, at the top of the page, Enter a username in the field to switch to that member. Related topics: About roles and permissions Permission descriptions Manage member roles290ViewsSign in to react to this post0CommentsAurora: Manage member roles
The roles that members have determine what they can access and do in the community. These roles are usually a mix of the community default roles and custom roles your community team have created. Sometimes, for a variety of reasons, you may want to remove a role or assign additional roles to members to control their access to various community areas and features. Community managers, moderators, and members with appropriate permissions can manage the roles assigned to individual members from their member profile page. Note: Moderators cannot assign or remove any roles that grant higher permissions than their individual roles. To manage a member’s roles, view the below walkthrough: 10 STEPS 1. Sign in to the community as an Admin or Moderator. 2. To go to a member's profile page, click the member's avatar. 3. Now, you can view the member's profile page with the profile information and their latest activity. 4. Click the Options icon > Manage Roles. 5. Now, you can view the Manage Roles window with the list of existing roles assigned to the member. 6. To remove an existing role, click the Close icon. 7. To assign a new role, click Add role. 8. Search for the roles you want to assign and select them from the list. 9. Click Save. 10. That's it. You're done. Here's an interactive tutorial https://www.iorad.com/player/2173422/Manage-members-roles470ViewsSign in to react to this post2CommentsSelect messages where user *doesn't have* FooBar role?
Objective: Create message list of messages posted by non-employees. SELECT yada, yoda FROM messages WHERE depth = 0 ** AND USER DOESN'T HAVE EMPLOYEE ROLE ** ORDER BY conversation.last_post_time LIMIT 100 From the LiQL reference, I don't see a constraint that will allow this. Is this possible?495ViewsSign in to react to this post2CommentsCan we Bulk Import "Category Expert" Contextual Roles?
I have over a hundred "Category Experts" to add to 26 boards. (different experts per board.) In the documentation, I do not see anything on Bulk Import supporting contexts, so I'm assuming it's not possible. https://community.khoros.com/t5/Roles-and-permissions/Import-user-roles-from-a-CSV-file/tac-p/731416#M194 Does anyone know otherwise?427ViewsSign in to react to this post2Comments
How to create API accessible user account with Community
I am new to Khoros platform and want to crawl data from community. For that I did signup process with one lithium community and got my username and password. I am trying to authenticate myself with via retrieve-the-session-key but api response says curl --location --request \ POST 'https://community.alteryx.com/restapi/vc/authentication/sessions/login' \ --form 'user.login=dshrm' \ --form 'user.password=****' <response status="error"> <error code="302"> <message> User authentication failed. </message> </error> </response> I am trying to get user details via LiQl basic query `select * from users limit 1` What exactly process do I need to follow to authenticate myself ?1.7KViewsSign in to react to this post11CommentsAurora: Assign roles to members in bulk via CSV file import
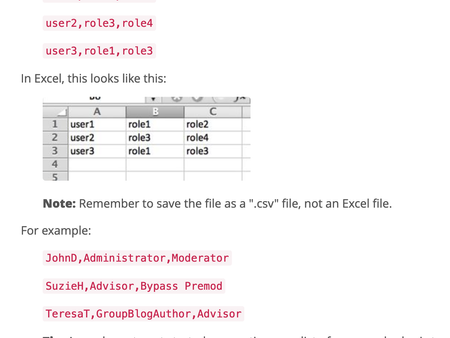
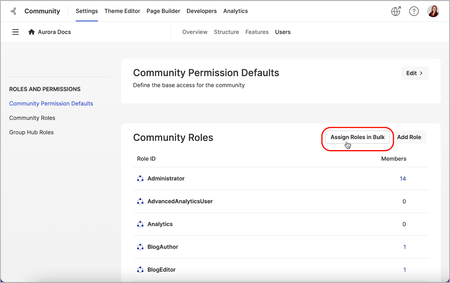
To assign or remove a large number of roles for members at one time, you can use bulk import via a CSV file. Your CSV file needs to include the following for each member: “ADD” or “REMOVE” indicator Username or email address The roles you want added or removed To bulk assign or remove roles: Go to the Settings > Roles and Permissions page. In the Community Roles area, click Assign Roles in Bulk. On the Assign Roles in Bulk window, browse for the CSV file on your local machine. In the Charset drop-down menu, select the character encoding of the CSV file you’re importing. The default for Microsoft Windows operating systems is windows-1252 for most locales saved through Microsoft Excel. Click Start Assignment. Larger sets of member assignments may take longer to be imported. When the import is complete, you receive an email indicating whether it was a success or if there were any errors that need to be corrected. Related topics: Create a role Add members to roles816ViewsSign in to react to this post1CommentAurora out-of-the-box community roles
At launch, new communities normally have several default roles. You can add more roles as needed as your community grows. Members who join the community are automatically given the permissions granted in the Community Permission Defaults (see Permission descriptions); the out-of-the-box roles defined here either grant a member permissions additional to (or different from) the default ones or offer a way to designate that a member belongs to a specific group. Note: Roles are still being researched and developed. These may change in future releases as we add more features. Role Permissions Administrator All permissions in the system as well as the ability to grant permissions to other users. Khoros This role is used to indicate that a member is a Khoros employee but does not give any permissions different from the default set. Moderator Permissions that enable moderators to manage members and posts, including updating, moving, and deleting posts in the community. Analytics Permissions to access the Community Analytics area for Aurora. Blog Author and Blog Moderator Permissions that enable the member to do the following: Update boards Start topics Publish, update, or delete posts Upload file attachments BlogAuthor Permissions that enable the member to do the following: Start new posts Manage comments on own posts Comment on posts KBAuthor Permissions that enable the member to do the following: Create, edit, publish, and manage articles Delete one's own articles Although these roles are intended for new communities, you can continue to use them as your community matures. For well-established and active communities, however, even the most restrictive roles have more access than you might want to give beginners. As a result, one of the most common roles that many communities create is one that limits access for brand new users (newbies). This role is typically assigned using a rank (coming in a later release) that new users automatically receive as soon as they join the community. It’s also a rank that users can grow out of quickly, so the requirements for the next higher rank, where users acquire additional permissions and drop the newbie role, are typically lenient. You can create your own roles with permission sets that fit the needs of your community. Related topics: Create a role Assign roles to members Permission descriptions574ViewsSign in to react to this post0Comments